Business Plus BusinessUser manual
User manual · October 2026

Business Plus Business user manual

Step-by-step help for customers, business owners, sub-owners and delivery people. Every picture is the real app with example data. Choose Computer & tablet or Phone at the top to match the screen you use.

Section 1 · For everyone

1Introduction

Start here to see who this manual is for, how an order moves through the app, and how to find what you need.

  1. 1.1Who this manual is for
  2. 1.2How an order moves through the app
  3. 1.3How to use this manual

1.1Who this manual is for

Business Plus Business connects local businesses with their customers and their delivery people. Everyone uses the same app, and each person sees the pages for their role. You don't need any technical knowledge. A phone, tablet or computer with a web browser is enough.

CustomersOrder from businesses, pay cash or by card, and follow deliveries.Go to section 3 →
Business owners and sub-ownersTake orders, manage products and delivery people, and collect payments.Go to section 4 →
Delivery peopleJoin businesses, confirm jobs, deliver and track earnings.Go to section 5 →

Everyone should read section 2, Getting started first. It shows how to create an account and find your way around.

1.2How an order moves through the app

Every order follows the same path. Knowing who acts at each stage helps you find the right part of this manual.

  1. PlacedThe customer orders from the shop, or the business enters it.Customer · 3.3
  2. ScheduledThe business confirms a day and time and picks a delivery person.Business · 4.7
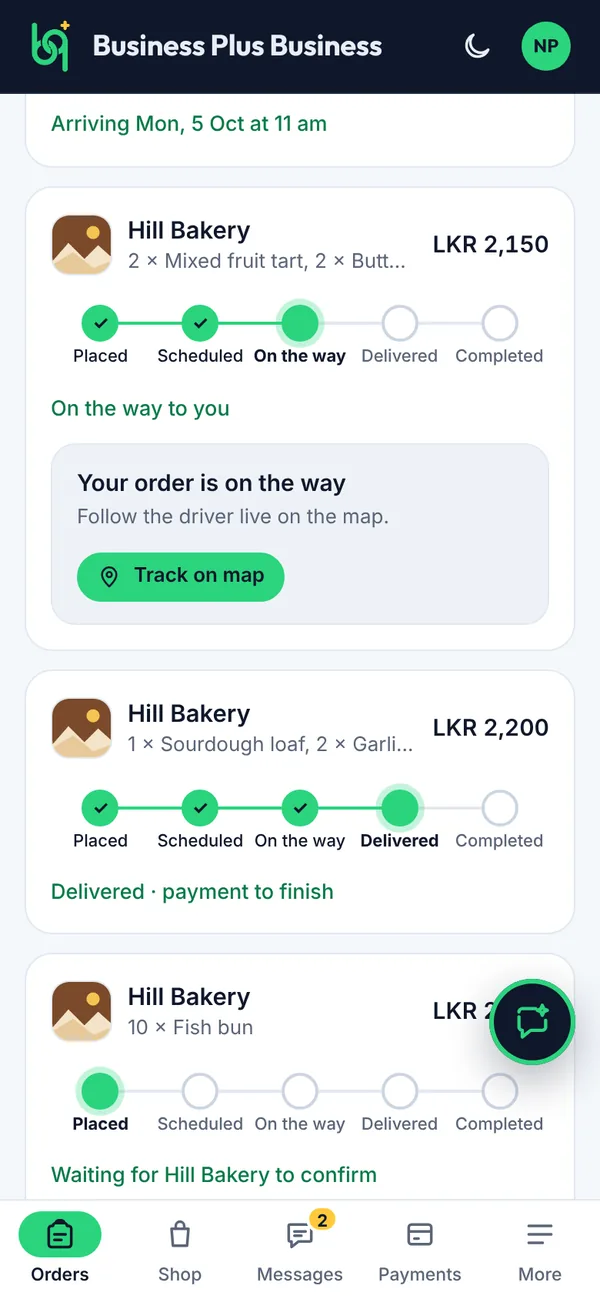
  3. On the wayThe delivery person starts the trip. The customer can track it live.Delivery person · 5.6
  4. DeliveredThe order is handed over. Card payments are charged now.Delivery person · 5.7
  5. CompletedOnce paid, the order closes. The customer can rate it.Business · 4.10

An order can also be New time suggested, Not accepted or Cancelled. Everyone involved gets a message at each step.

1.3How to use this manual

This manual is organised by role, and each article covers one task. You don't need to read it from start to finish.

  • Search. Type in the search box above the contents, for example “refund” or “QR”, to find a topic.
  • Choose your device. Use Computer & tablet or Phone at the top of the page. Every picture changes to match the screen you use.
  • Follow the yellow numbers. Steps with a yellow number match a marker on the picture below them.
  • Figures are numbered by section, for example Figure 3.4, so you can refer to them when you ask for help.
Section 2 · For everyone

2Getting started

Create your account, sign in and learn where things are. This takes about two minutes.

  1. 2.1How to create an account
  2. 2.2How to sign in or reset your password
  3. 2.3How to use the welcome tour
  4. 2.4How to find your way around
  5. 2.5How to change the language

2.1How to create an account

Create one account for your role. The app asks for your country so prices, currency and phone numbers are right for you.

Before you start
  • Open the app and tap Create an account.
  • Have your WhatsApp number and address ready.

Steps

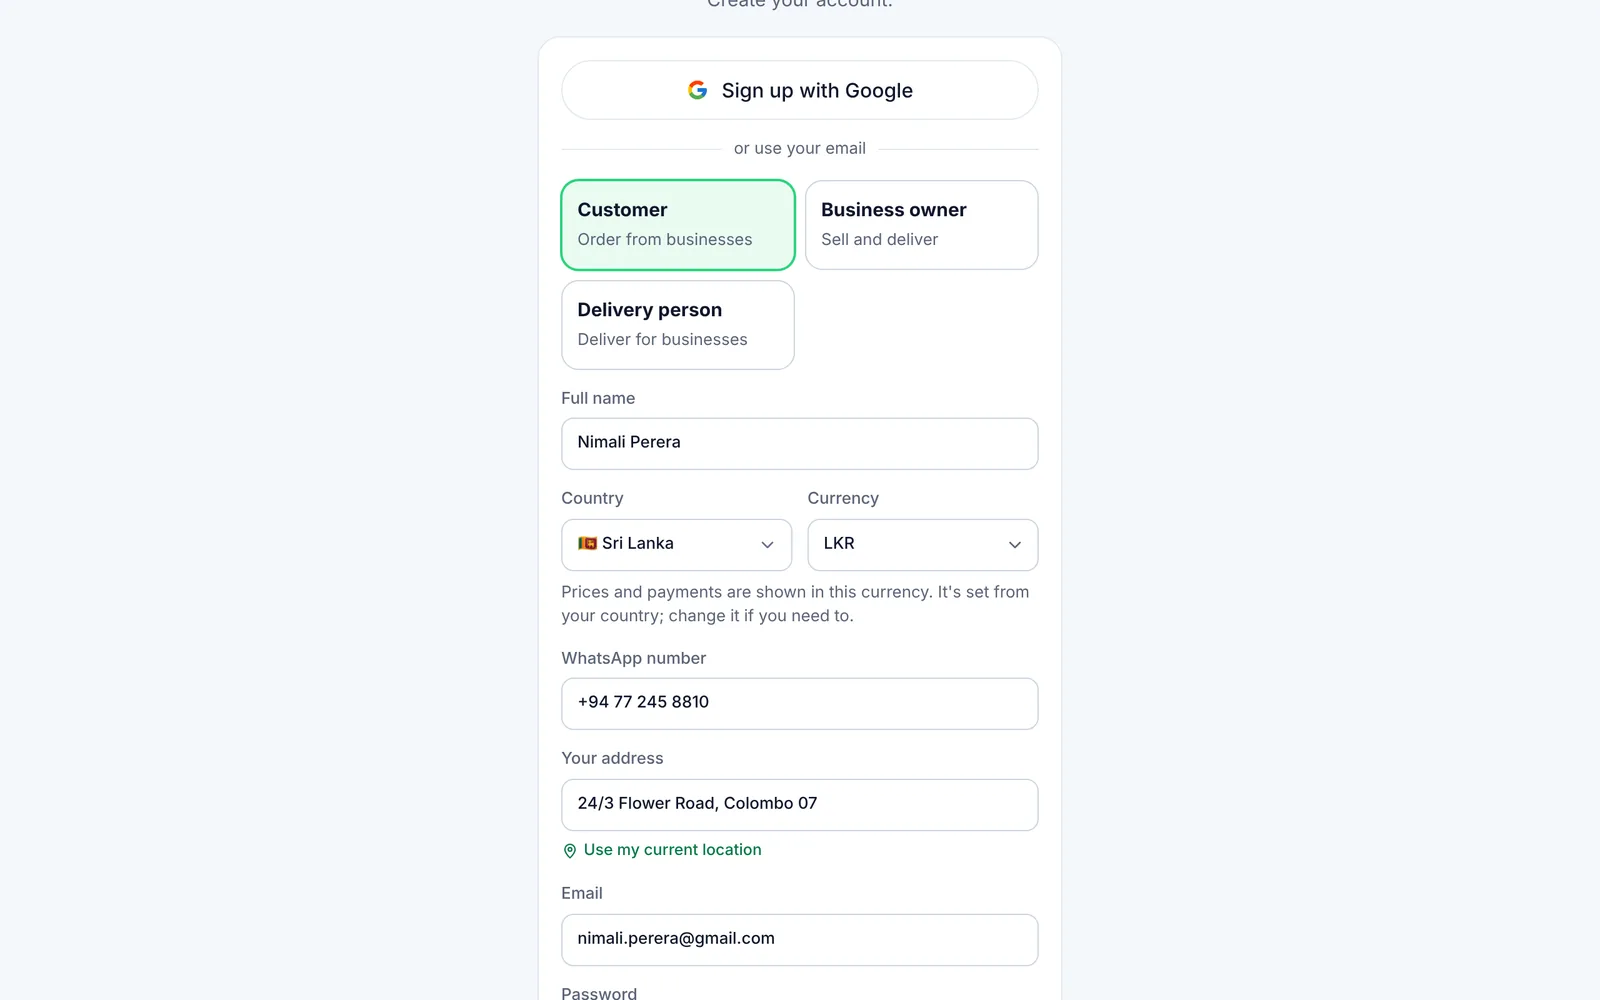
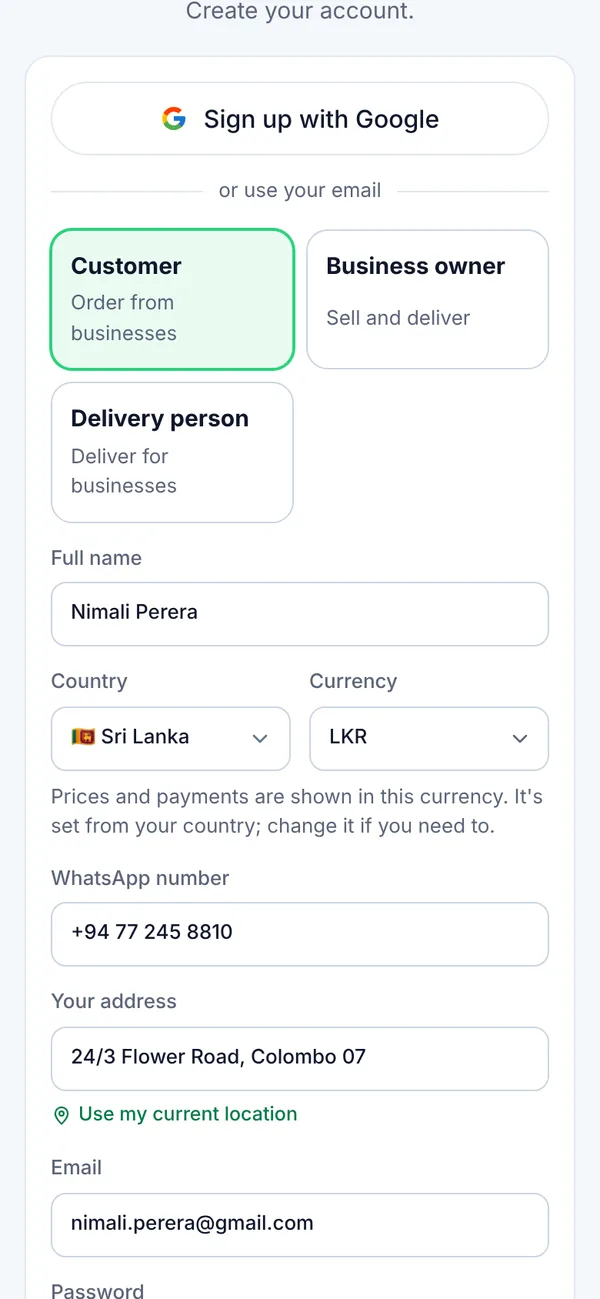
  1. Choose who you are: Customer, Business owner or Delivery person.
  2. Enter your full name. Delivery people also choose their vehicle.
  3. Choose your country. Your currency and phone code fill in by themselves.
  4. Enter your WhatsApp number with the country code.
Create your account: role, name, country and phone on a computer
Create your account: role, name, country and phone on a phone
Figure 2.1Create your account: role, name, country and phone
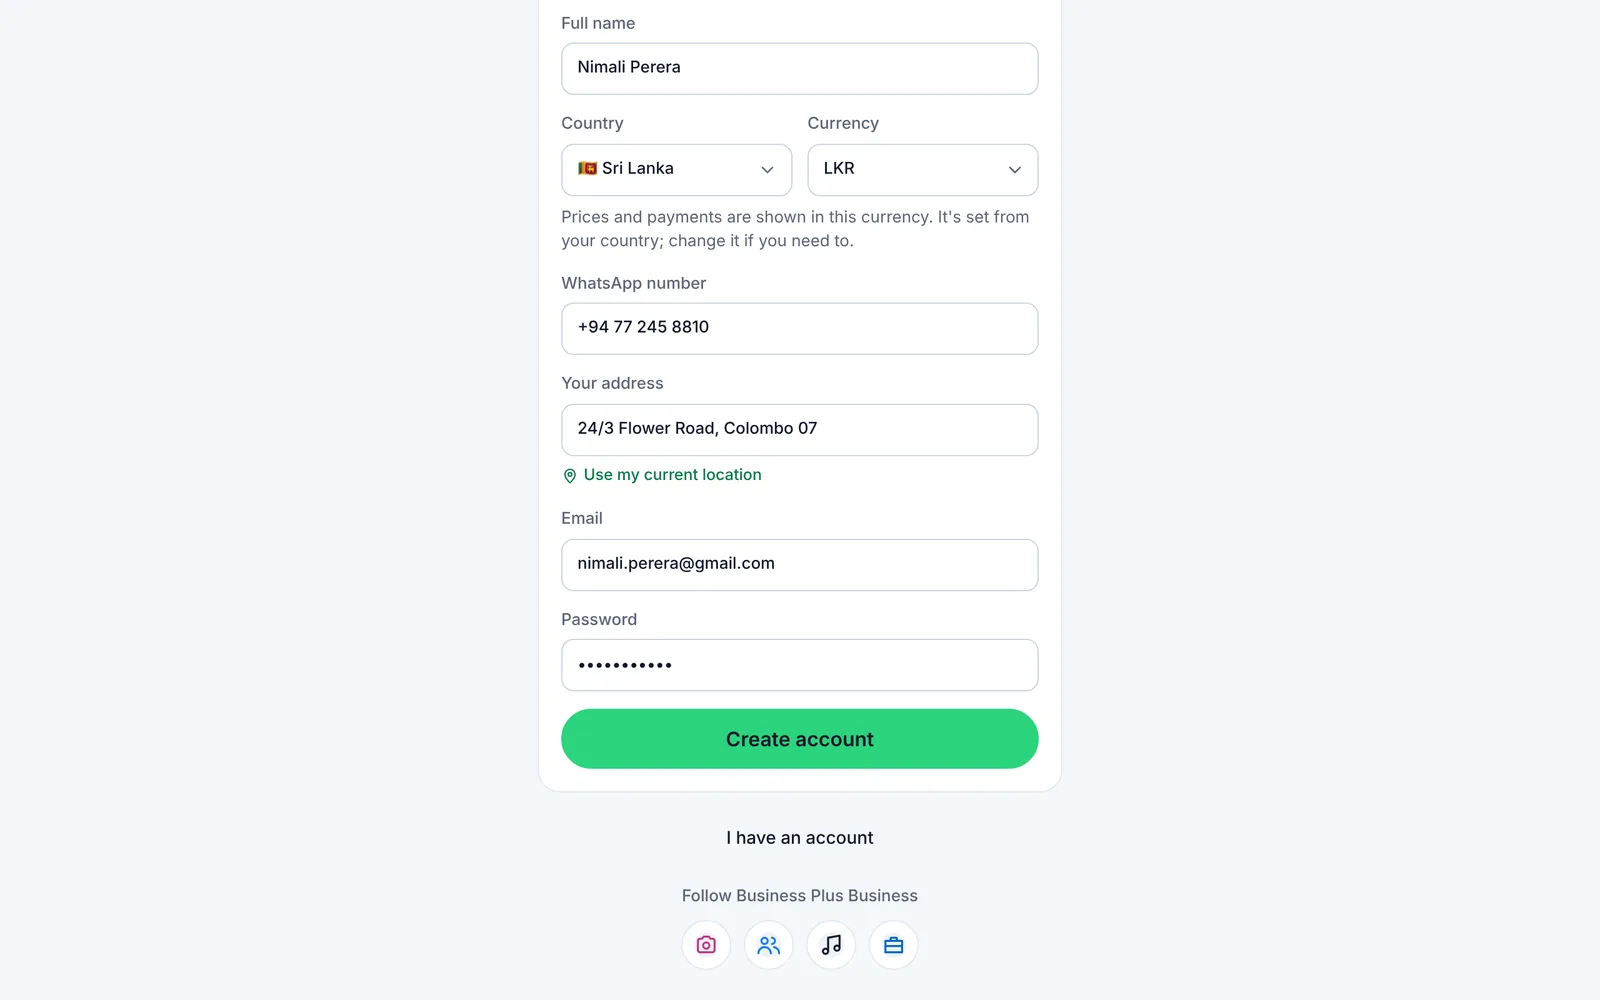
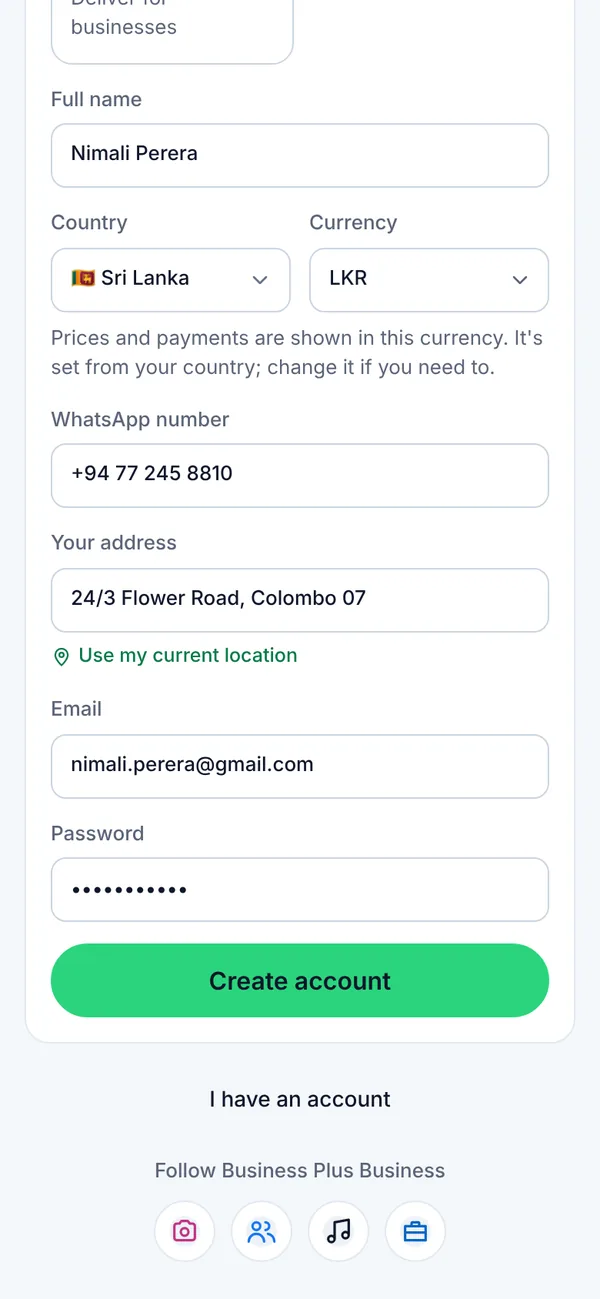
  1. Enter your address, or tap Use my current location.
  2. Enter your email and a password of at least 8 characters.
  3. Tap Create account.
Create your account: address, email and password on a computer
Create your account: address, email and password on a phone
Figure 2.2Create your account: address, email and password
What you’ll see

We email you a confirmation link. Tap it, then sign in. If you used Sign up with Google, the app shows an “Almost done” page with the same questions instead.

2.2How to sign in or reset your password

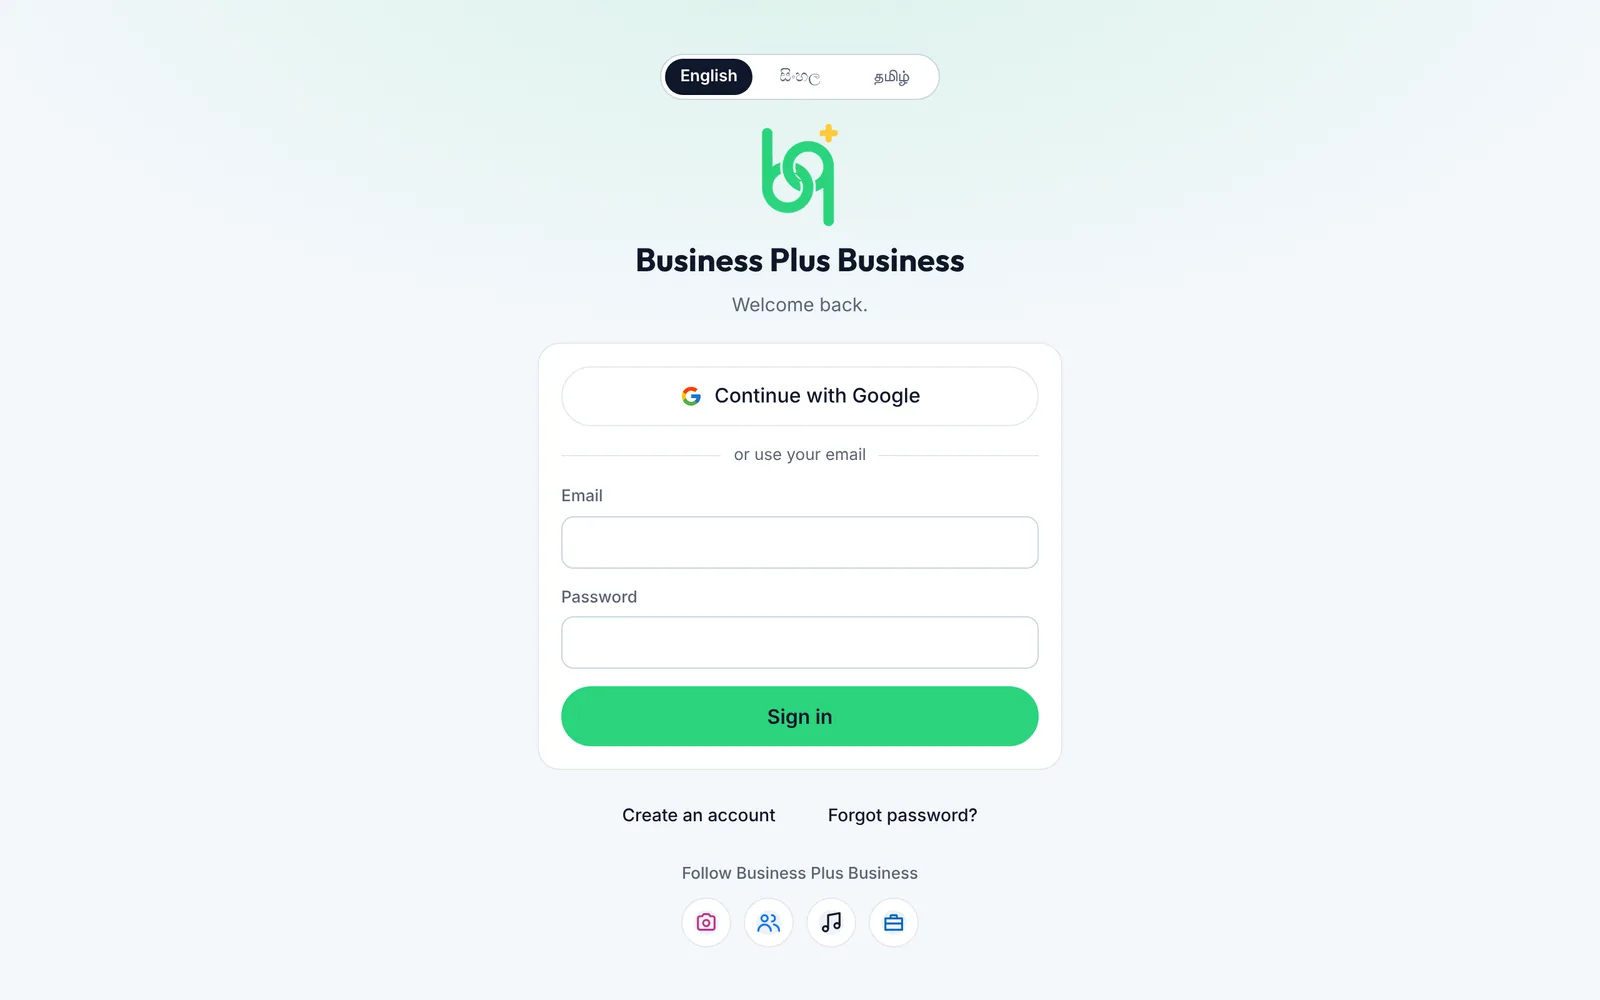
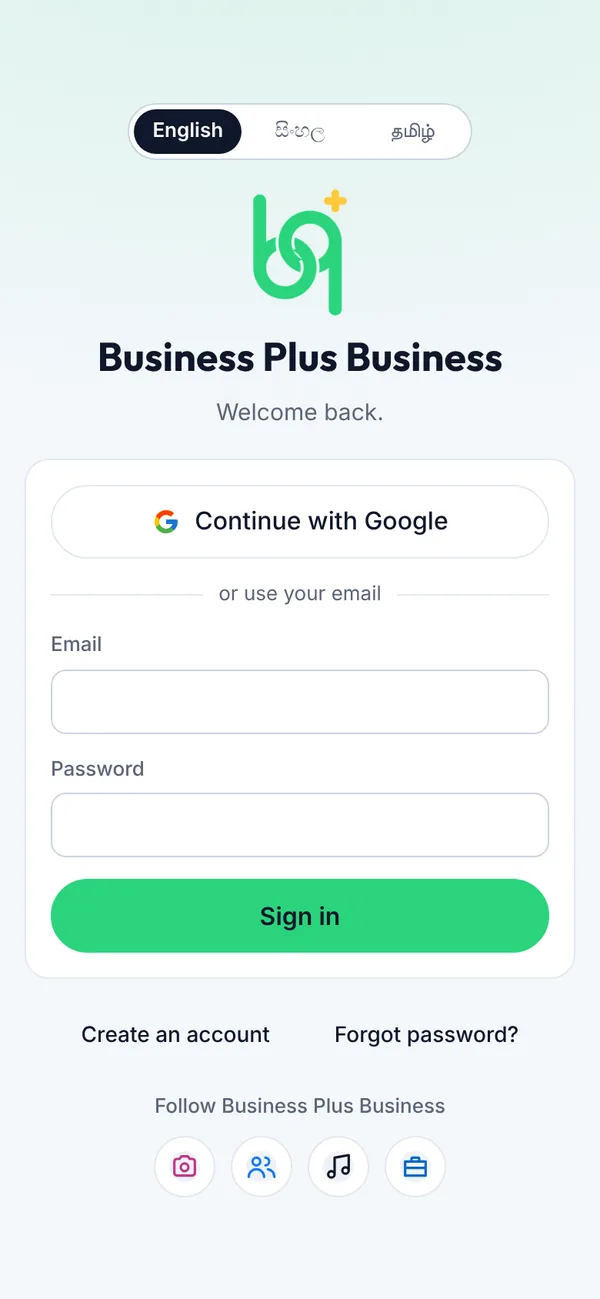
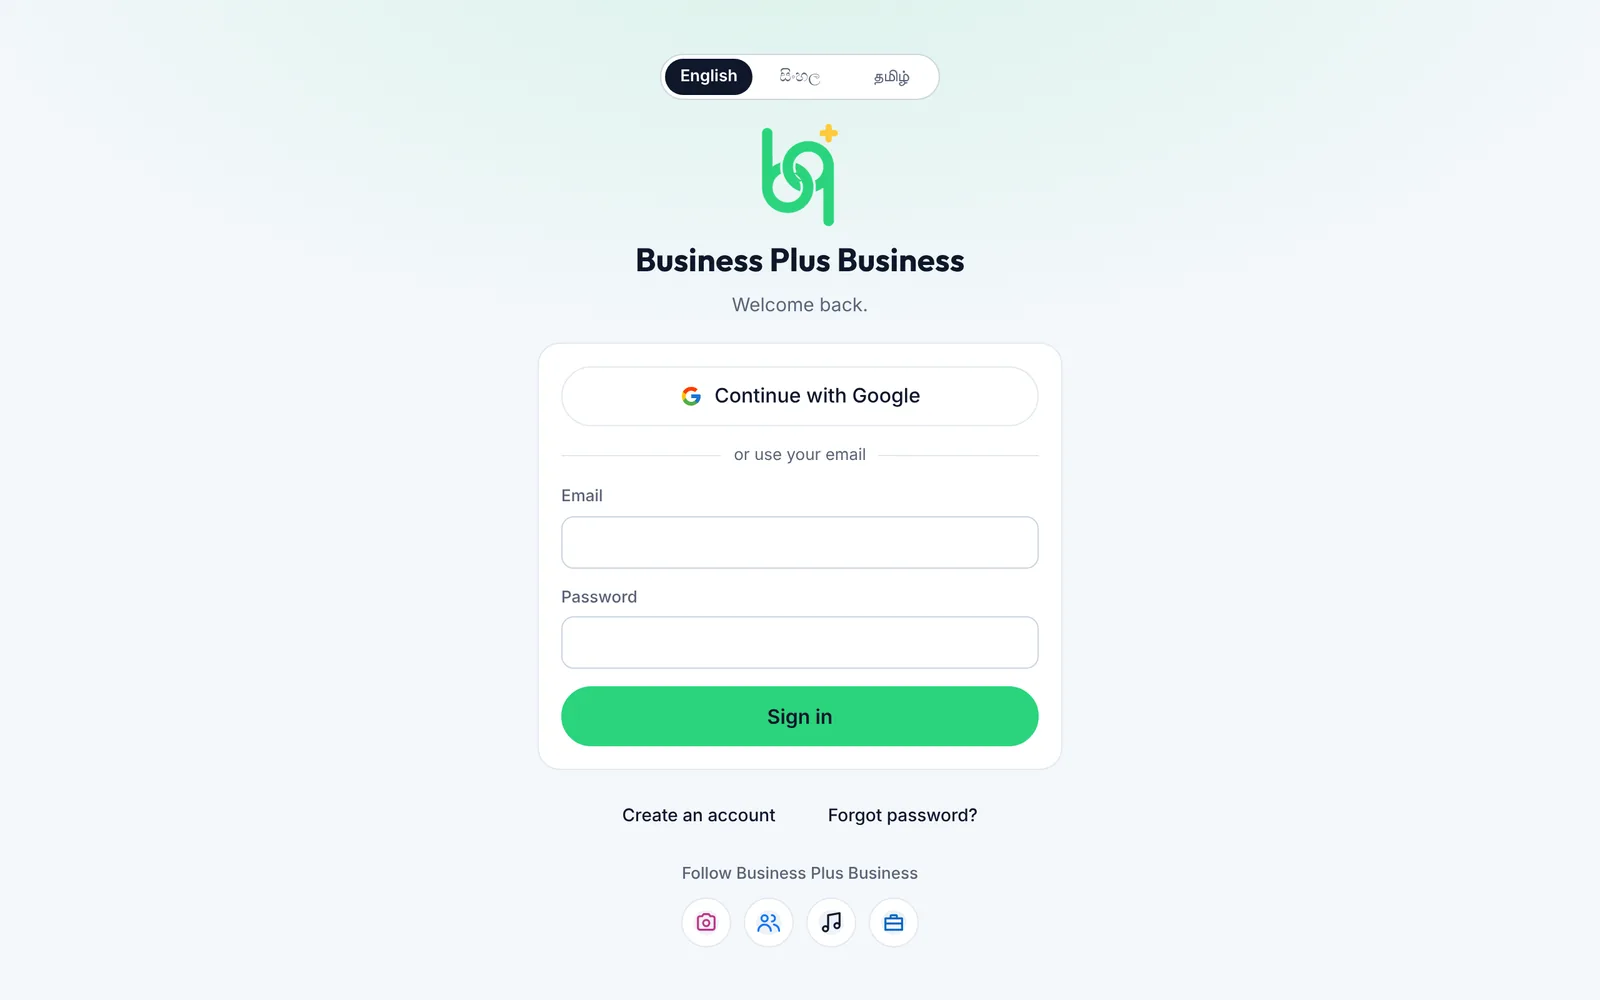
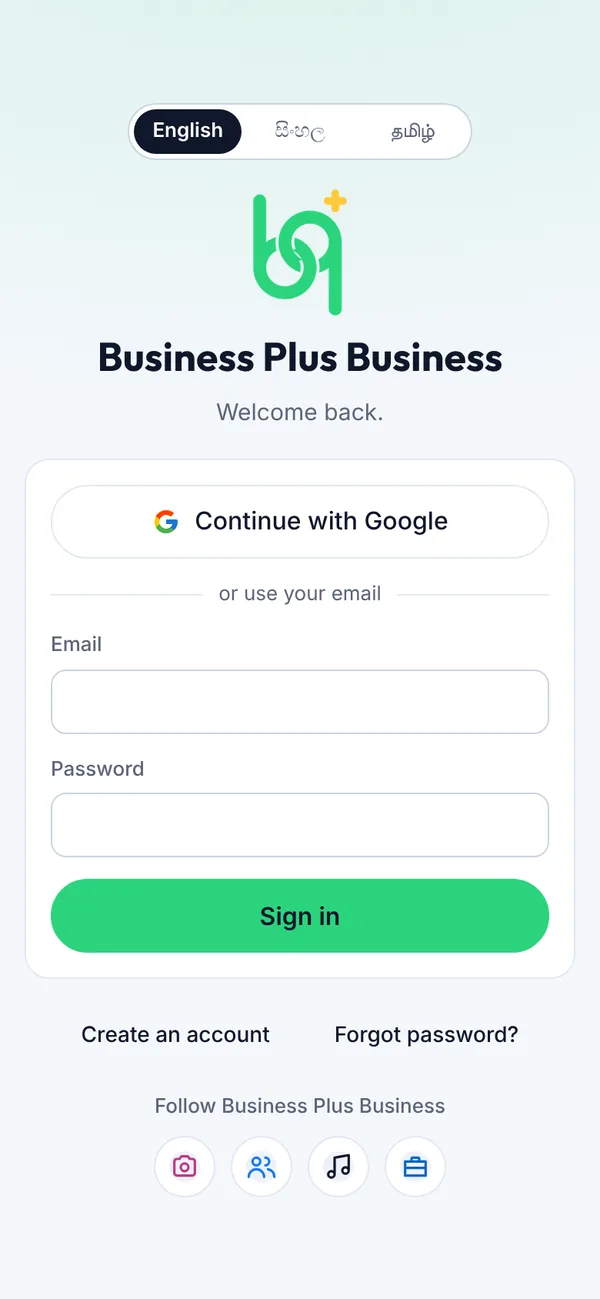
Sign in with the email and password you chose, or with Google.

Steps

  1. Tap Continue with Google to sign in with your Google account, or
  2. enter your email,
  3. enter your password and tap Sign in.
  4. Forgot your password? Tap Forgot password?, enter your email and follow the link we send.
Sign in on a computer
Sign in on a phone
Figure 2.3Sign in
Sub-owners don't sign up. The business owner adds you and sends your sign-in details. The first time you sign in, the app asks you to choose your own password.
What you’ll see

You land on your Home page.

2.3How to use the welcome tour

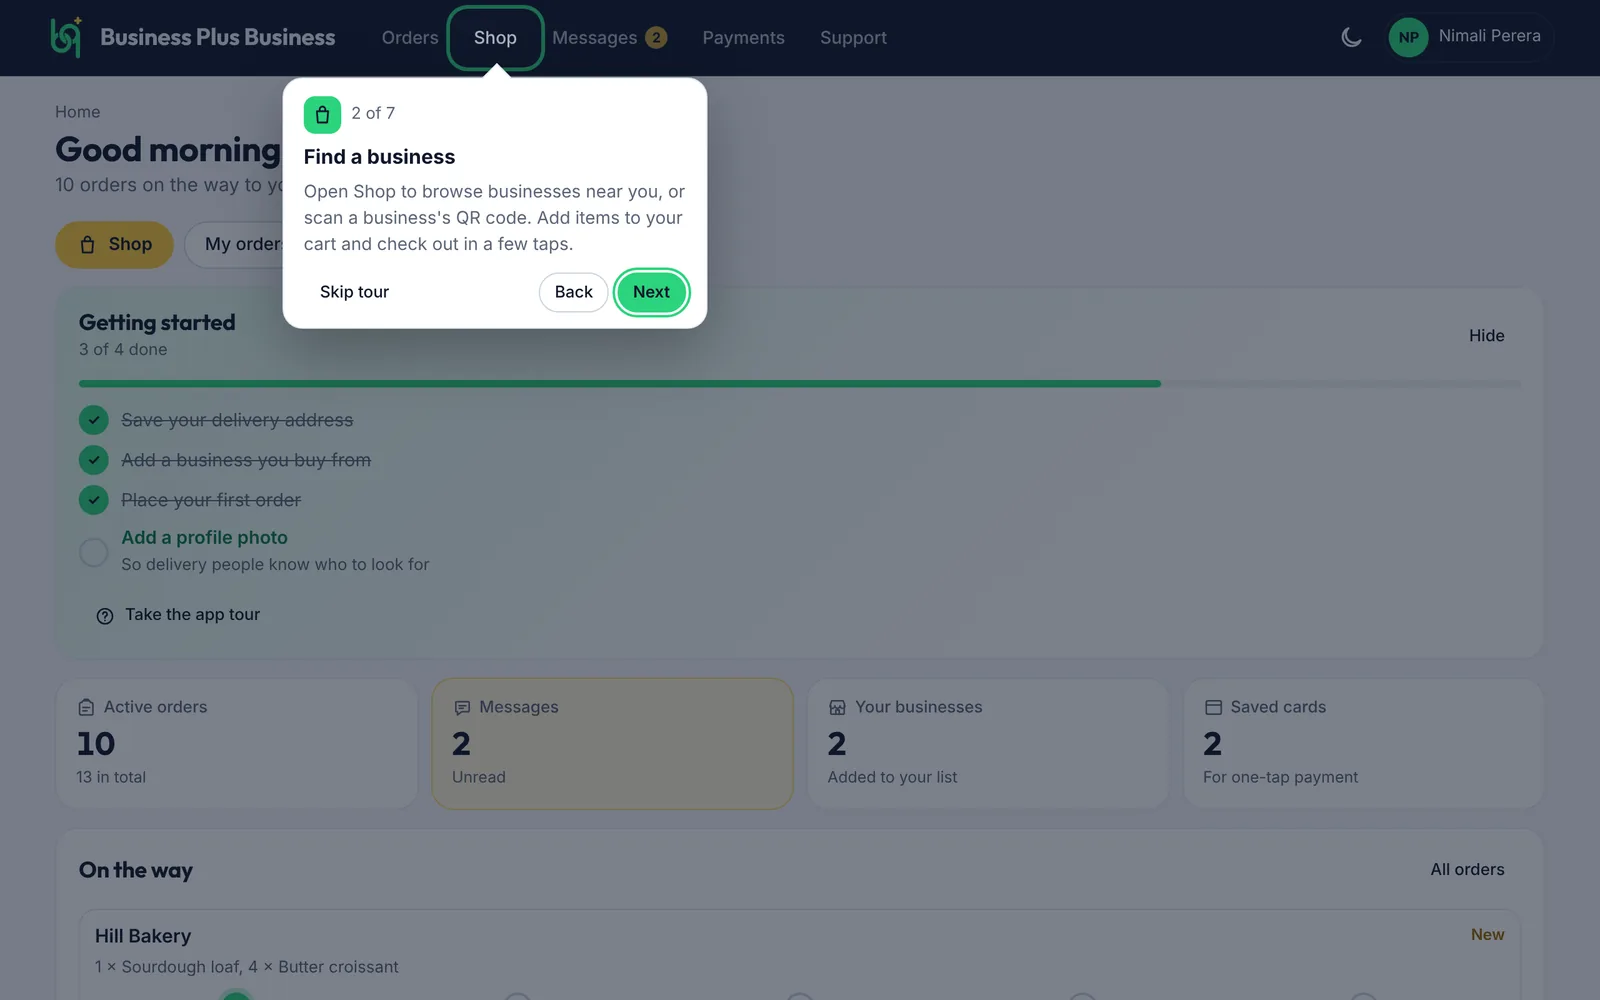
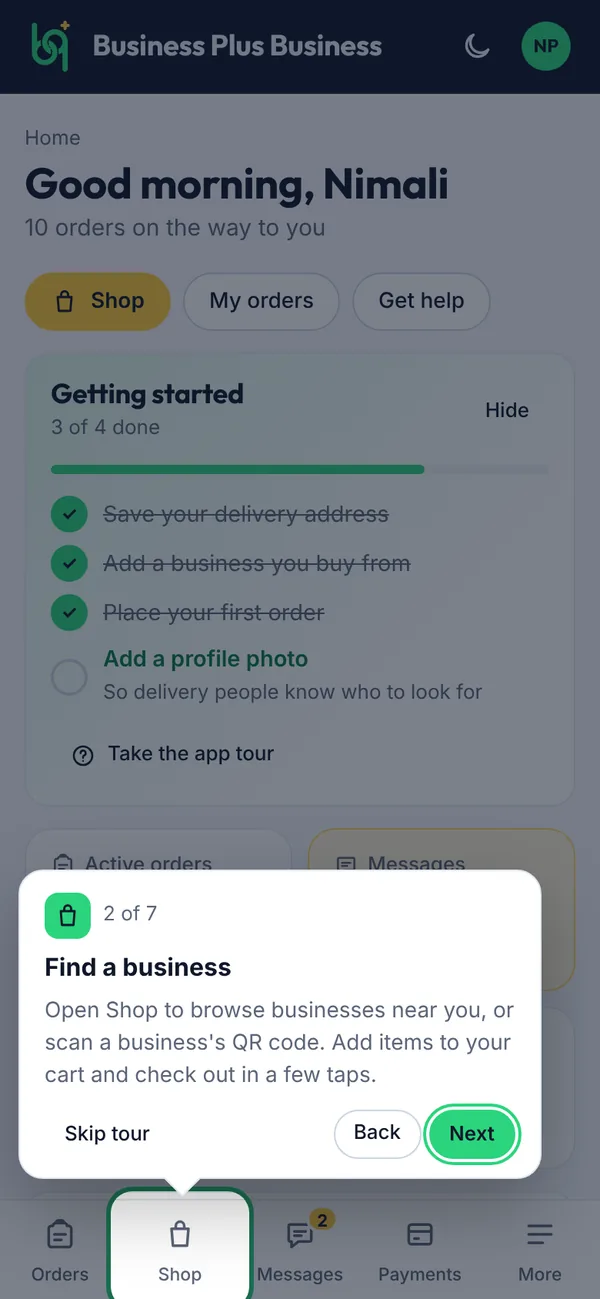
The first time you sign in, a short tour highlights each page in the menu and explains what it's for.

Steps

  1. Read the tip next to the highlighted page and tap Next. Tap Back to see the previous tip.
  2. Tap Skip tour if you'd rather explore on your own.
  3. To see it again later, go to Support → Take the tour or Account → App tour.
The welcome tour pointing at a page in the menu on a computer
The welcome tour pointing at a page in the menu on a phone
Figure 2.4The welcome tour pointing at a page in the menu
What you’ll see

Once you finish or skip the tour, it doesn't appear again.

2.4How to find your way around

Your most-used pages come first in the menu. Account and Support are always last.

Steps

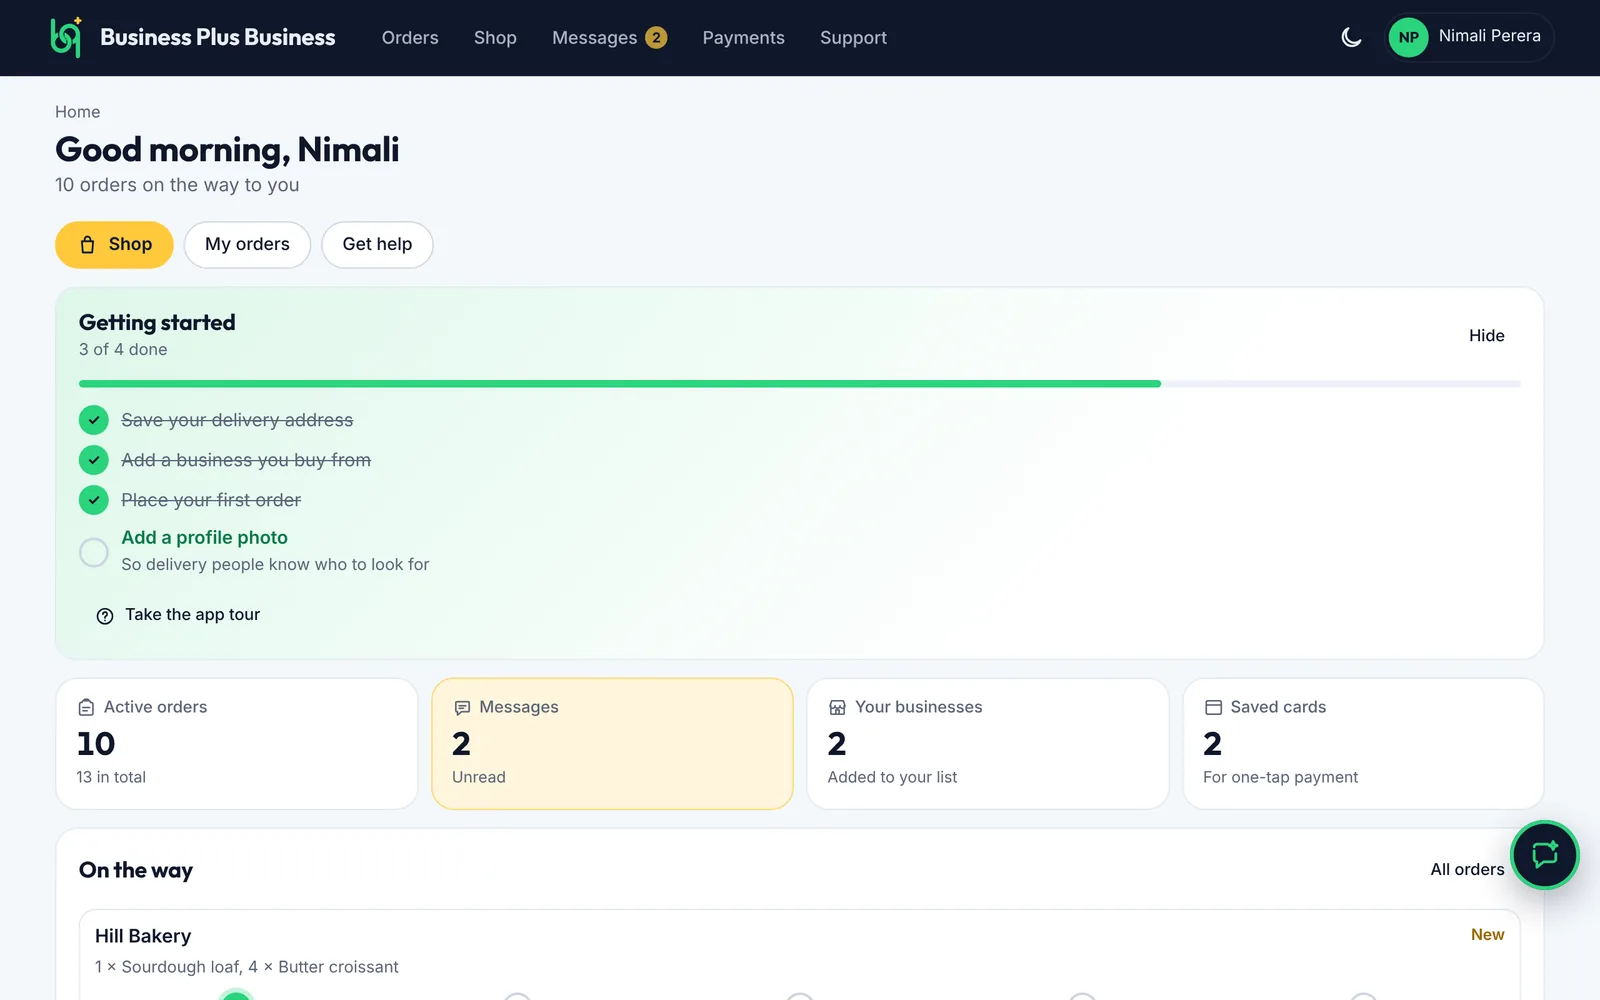
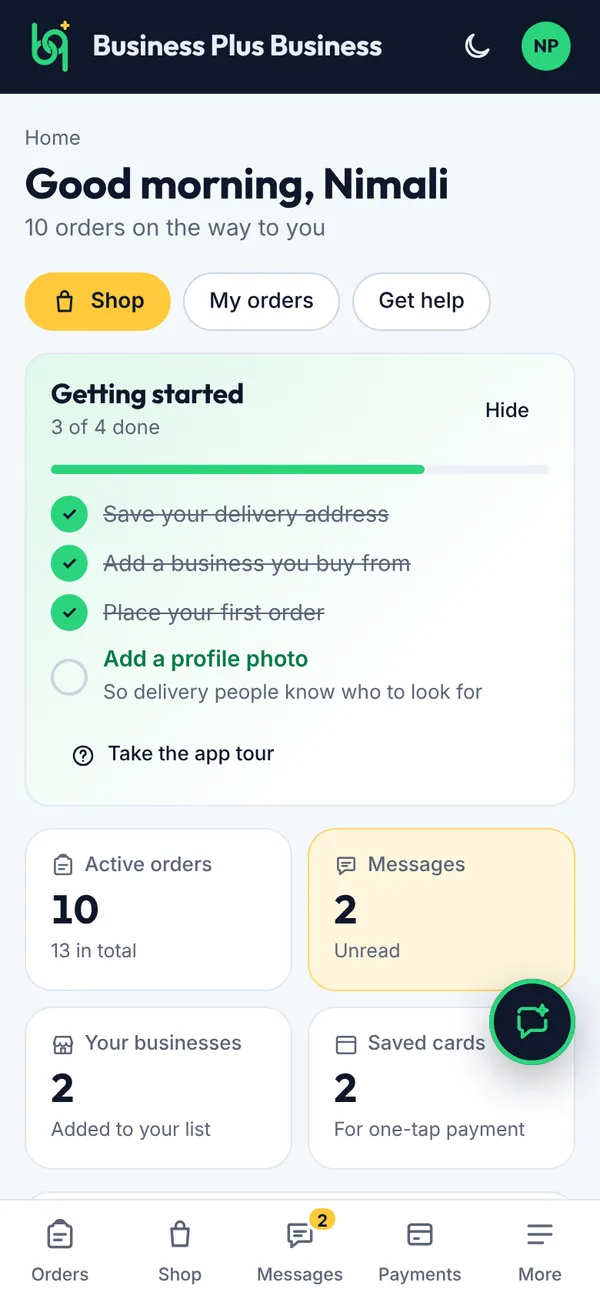
  1. Tap the logo to go back to your Home page from anywhere.
  2. Use the menu to move between pages. On a computer it runs along the top; on a phone it's the bar at the bottom.
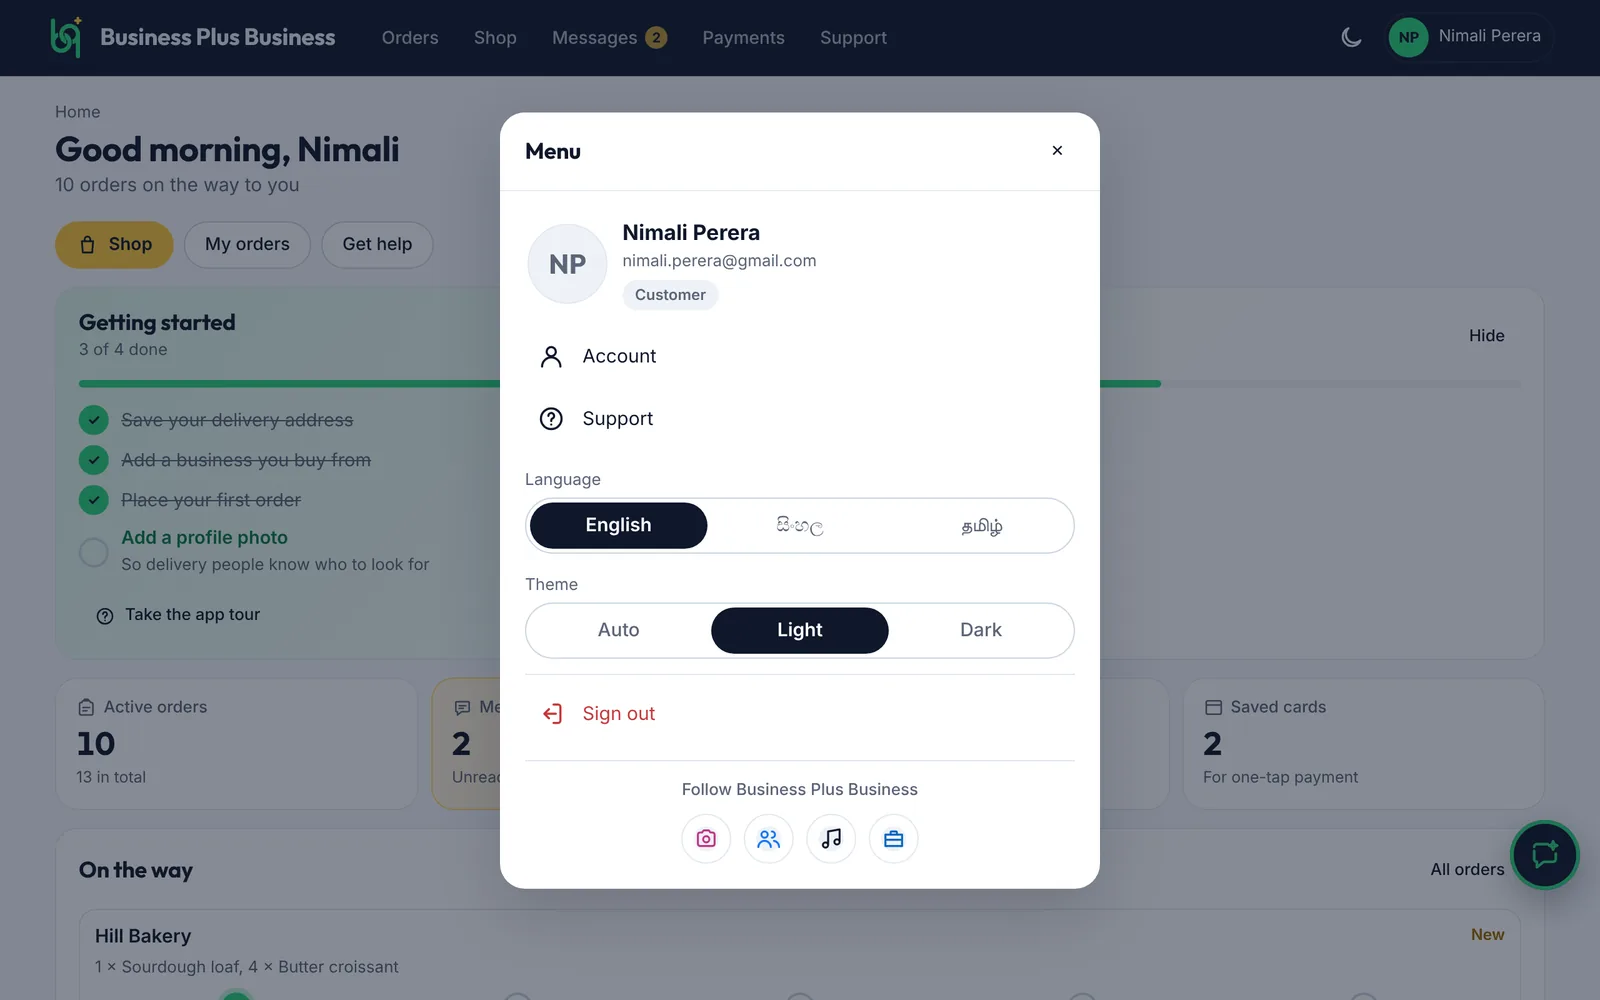
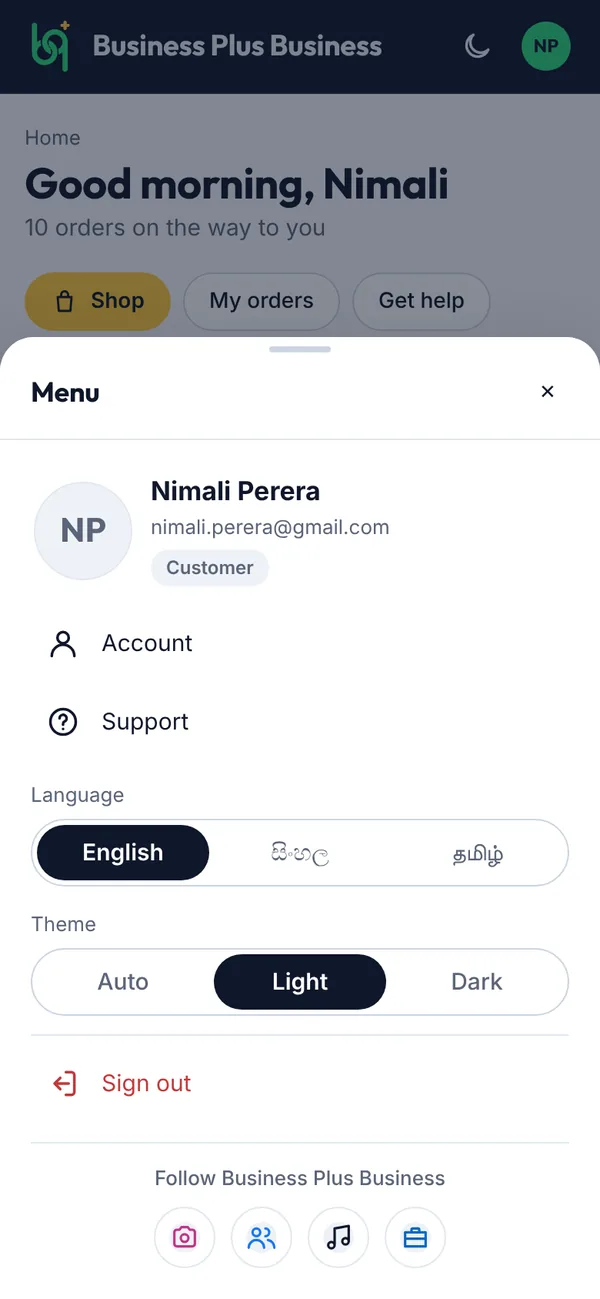
  3. Open your menu: tap your picture on a computer, or More on a phone.
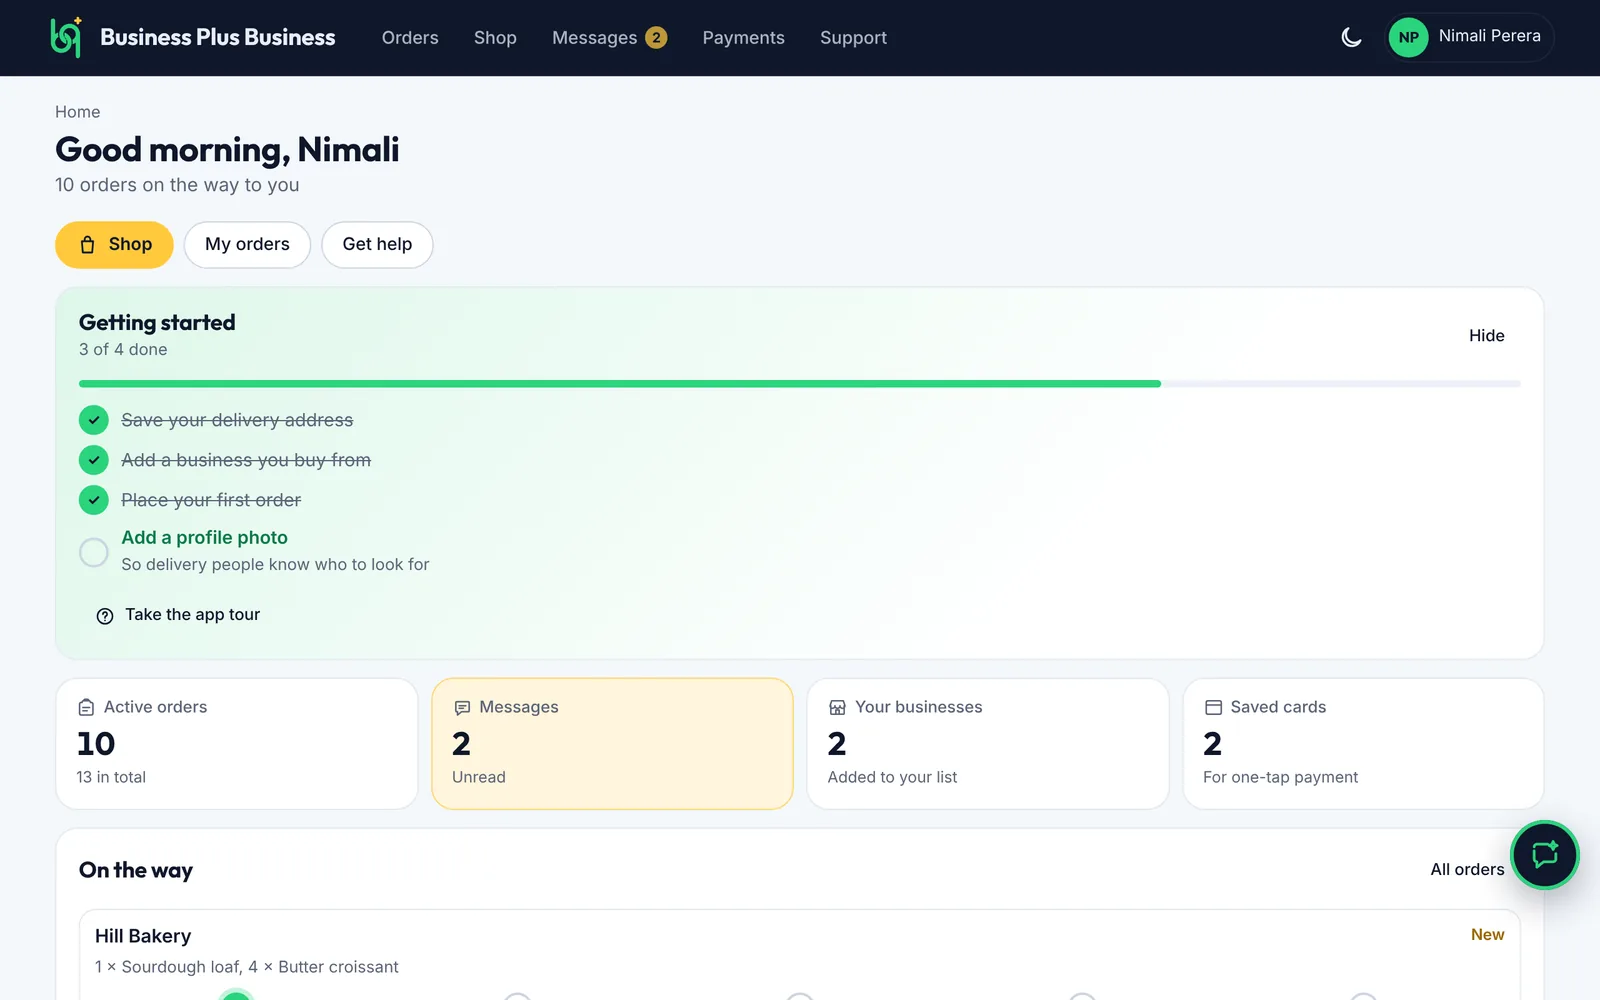
Home page and the main menu on a computer
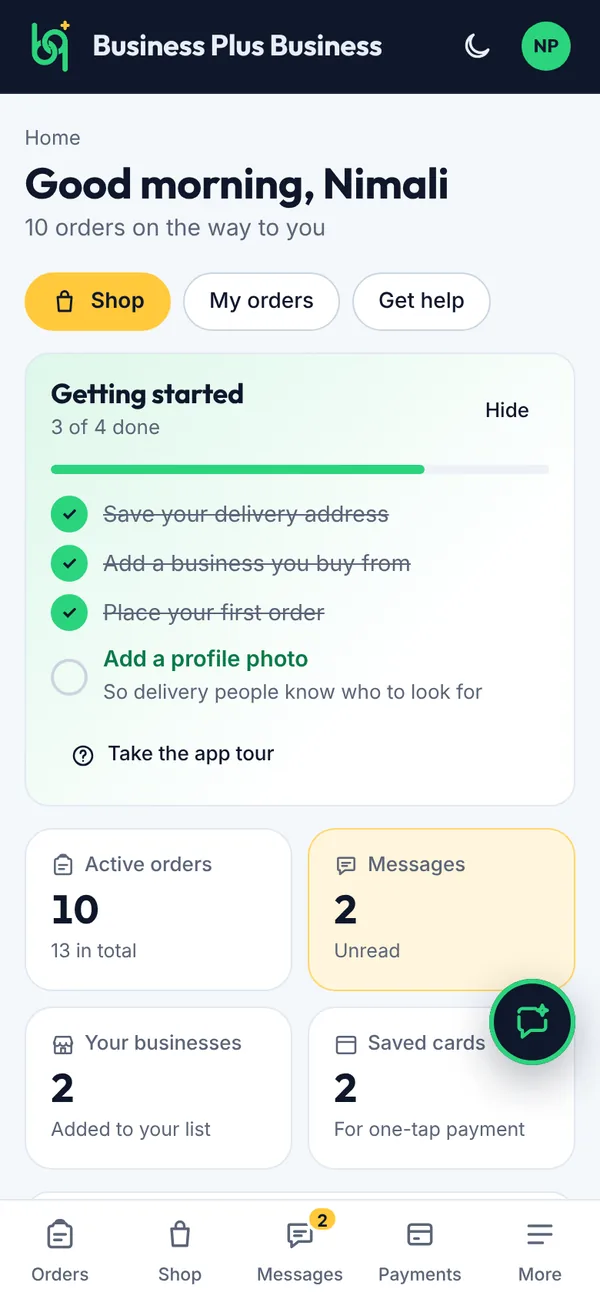
Home page and the main menu on a phone
Figure 2.5Home page and the main menu
Your menu: account, theme and sign out on a computer
Your menu: account, theme and sign out on a phone
Figure 2.6Your menu: account, theme and sign out

In your menu you'll find your pages that don't fit in the main menu, Account, the light or dark Theme, and Sign out. Your Home page also shows a Getting started list that ticks itself off as you go. Tap Hide to put it away.

2.5How to change the language

The app can be shown in English, Sinhala (සිංහල) or Tamil (தமிழ்). Your choice is saved on this device.

Steps

  1. Before you sign in: tap English, සිංහල or தமிழ் at the top of the sign-in screen.
Choosing a language before you sign in on a computer
Choosing a language before you sign in on a phone
Figure 2.7Choosing a language before you sign in
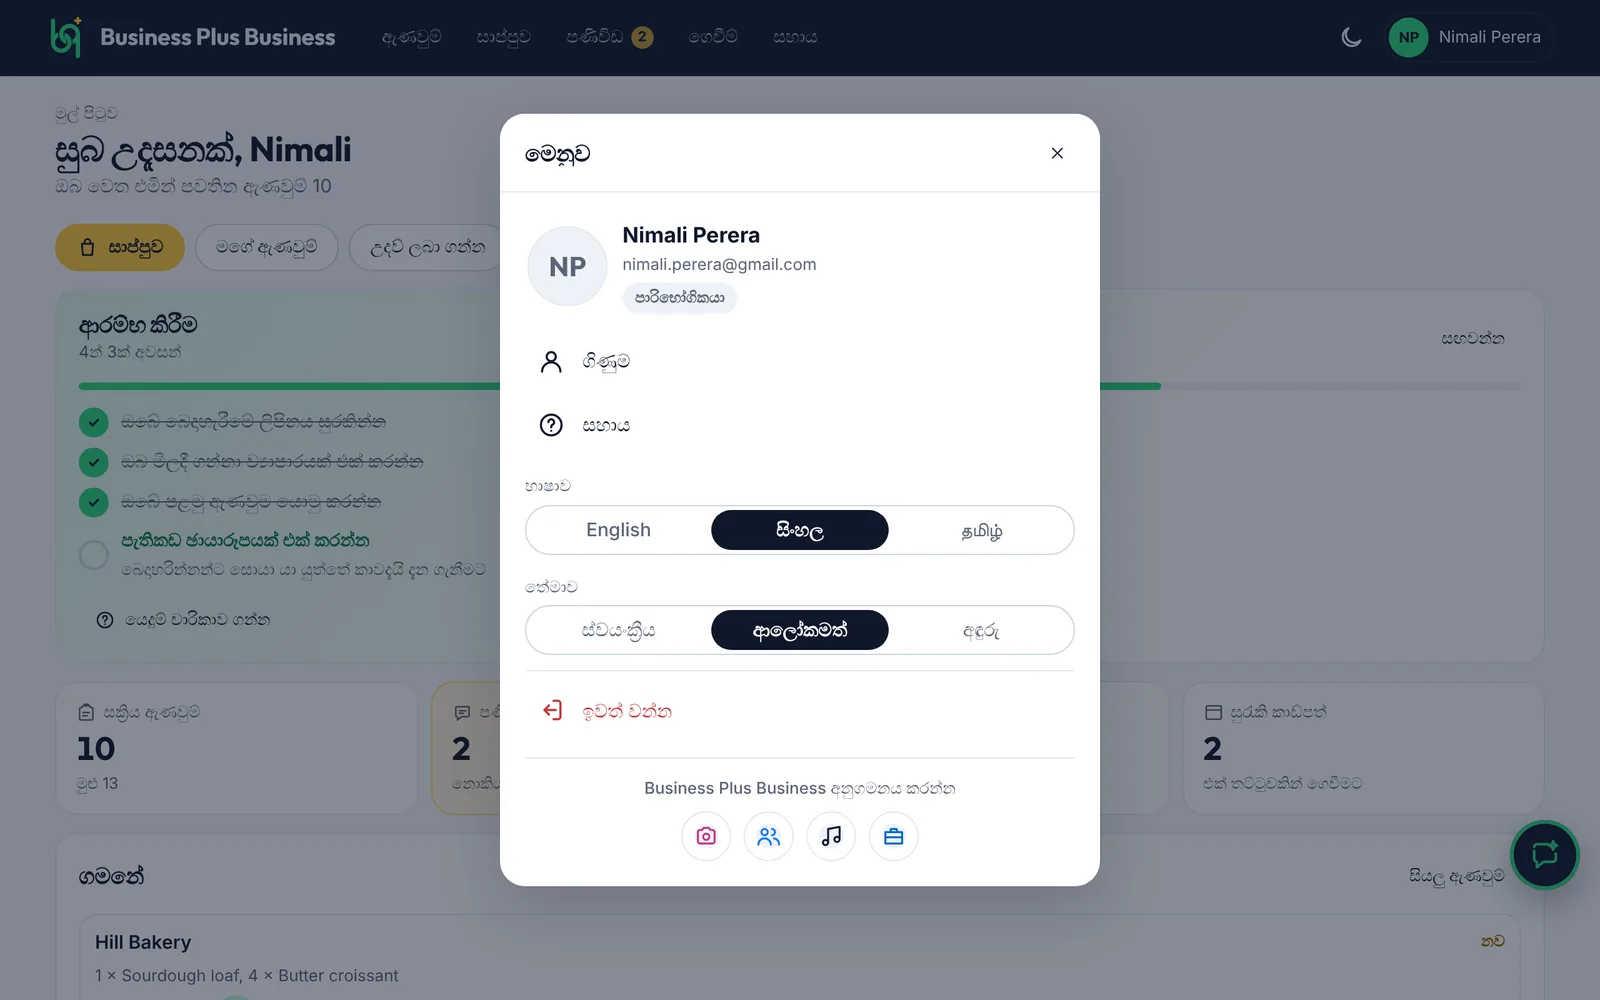
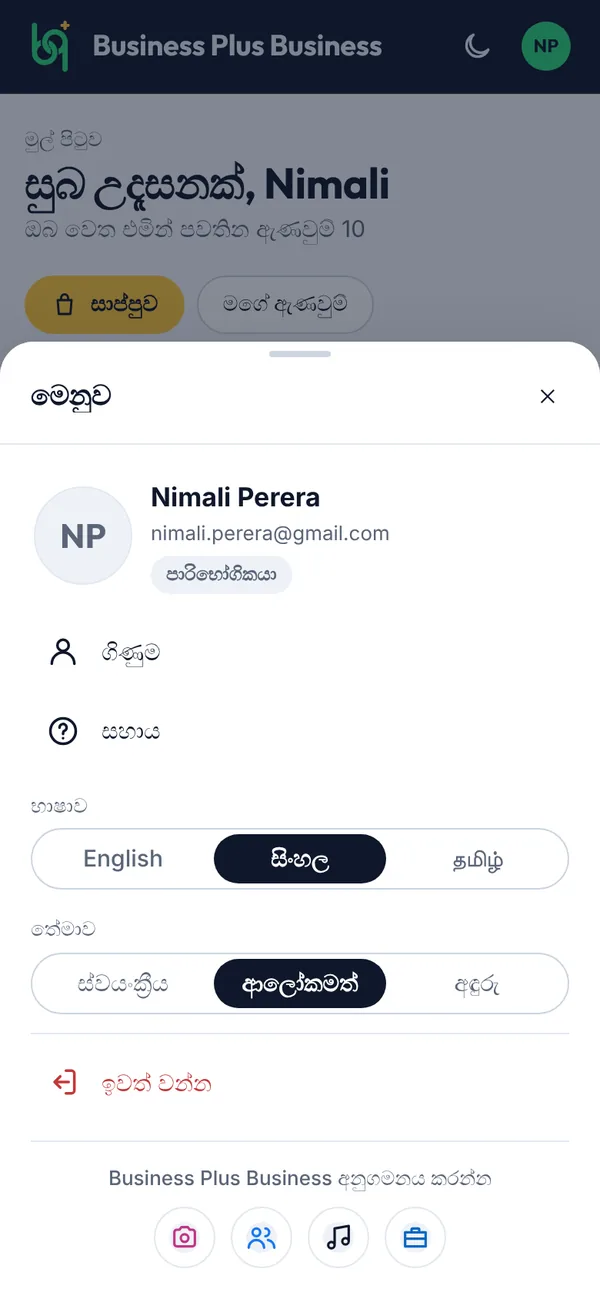
  1. After you sign in: open your menu (tap your picture on a computer, or More on a phone) and pick a language under Language.
The app in Sinhala, with the language choice in your menu on a computer
The app in Sinhala, with the language choice in your menu on a phone
Figure 2.8The app in Sinhala, with the language choice in your menu
Good to know

This user manual is in English. If a word in the app looks wrong in Sinhala or Tamil, tell us from Support so we can fix it.

What you’ll see

The page reloads in the language you picked. Dates and times follow it too. Names, addresses and messages people type stay as they were written. The Ask B+B assistant answers in your language.

Section 3 · For customers

3Customers

Find businesses, place orders, pay the way you like and follow every delivery.

  1. 3.1How to find a business
  2. 3.2How to add items to your cart
  3. 3.3How to place an order
  4. 3.4How to pay by cash or card
  5. 3.5How to follow your order
  6. 3.6How to respond when a new time is suggested
  7. 3.7How to track your delivery live
  8. 3.8How to rate an order
  9. 3.9How to add and manage your cards
  10. 3.10How to message a business or delivery person
  11. 3.11How to update your account and addresses

3.1How to find a business

Open Shop to see every business in the app. Add the ones you like so they're one tap away next time.

Steps

Customer Home page on a computer
Customer Home page on a phone
Figure 3.1Customer Home page
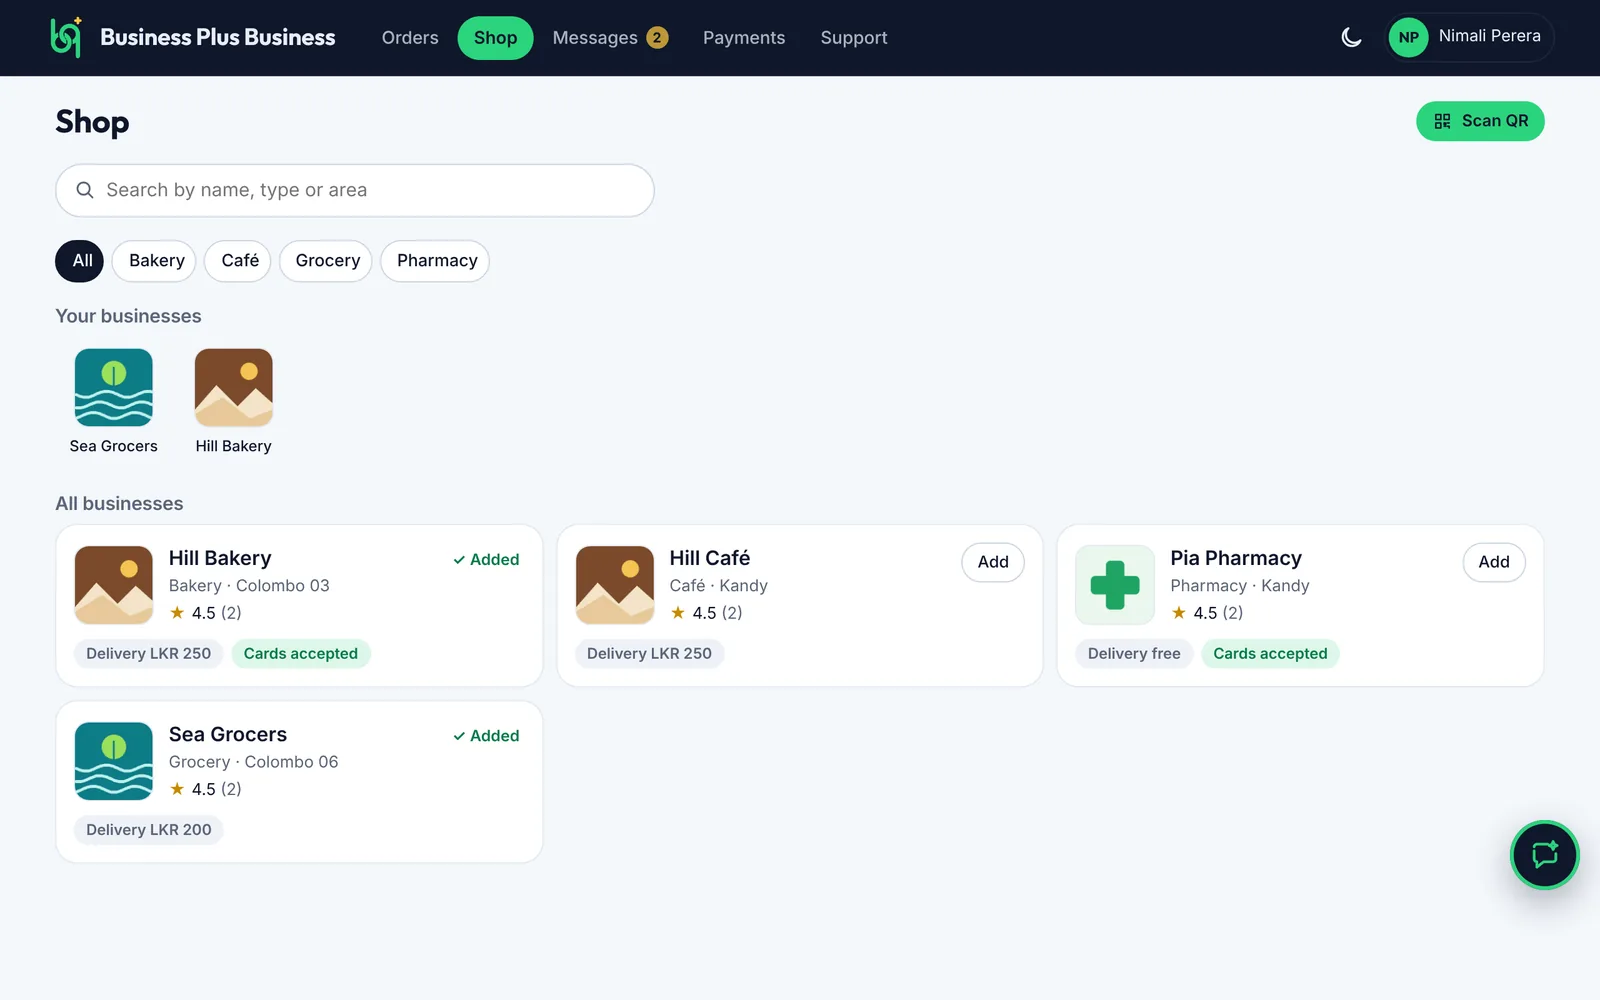
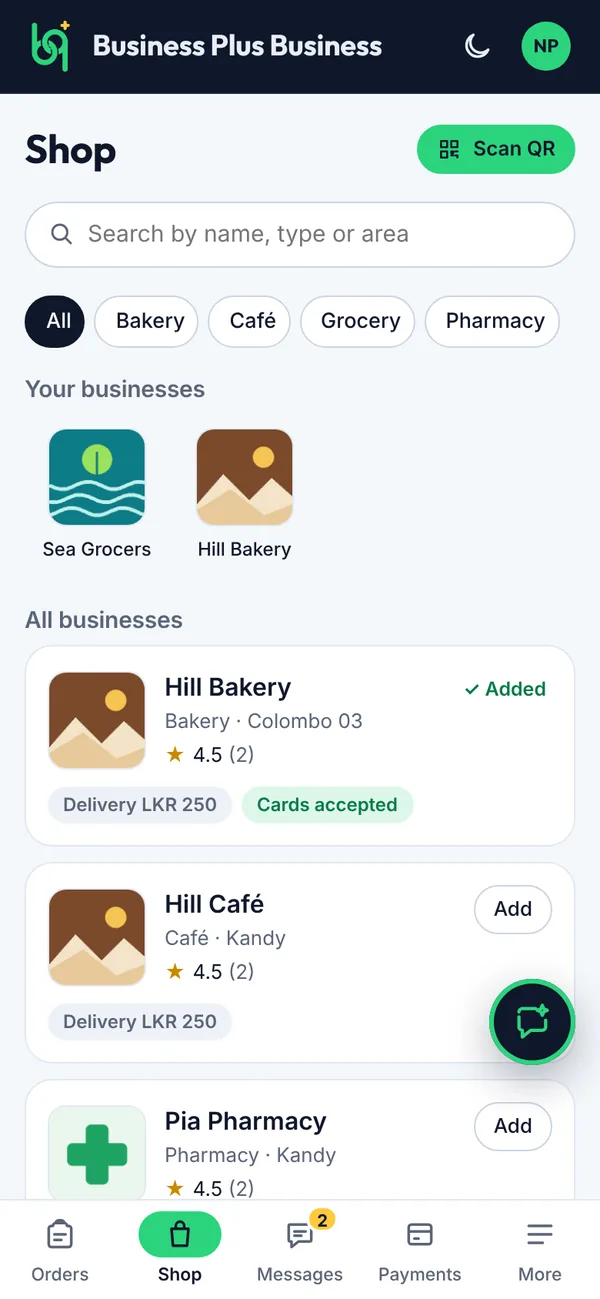
  1. Search by name, type or area. You can also tap a type, such as Bakery, to narrow the list.
  2. Have a business's QR code? Tap Scan QR and point your camera at it.
  3. Tap Add to keep a business in Your businesses.
  4. Tap a business to see what it sells.
Shop: find and add businesses on a computer
Shop: find and add businesses on a phone
Figure 3.2Shop: find and add businesses
What you’ll see

The business opens with its products, delivery fee and contact buttons. Cards accepted means you can pay that business by card.

3.2How to add items to your cart

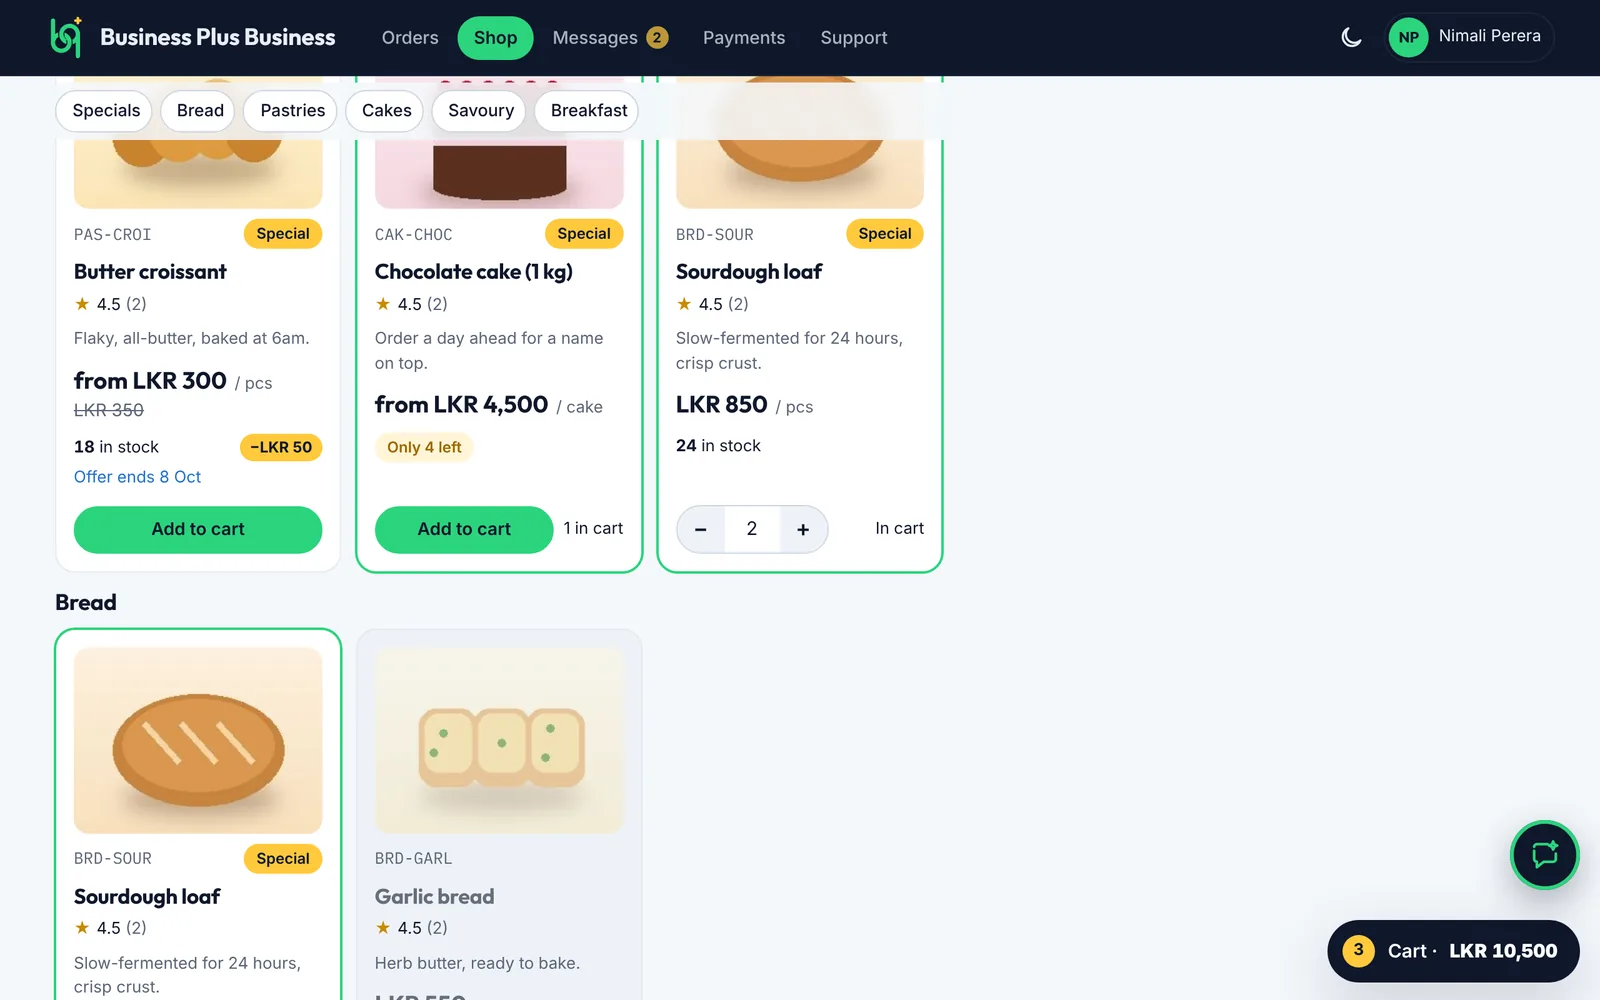
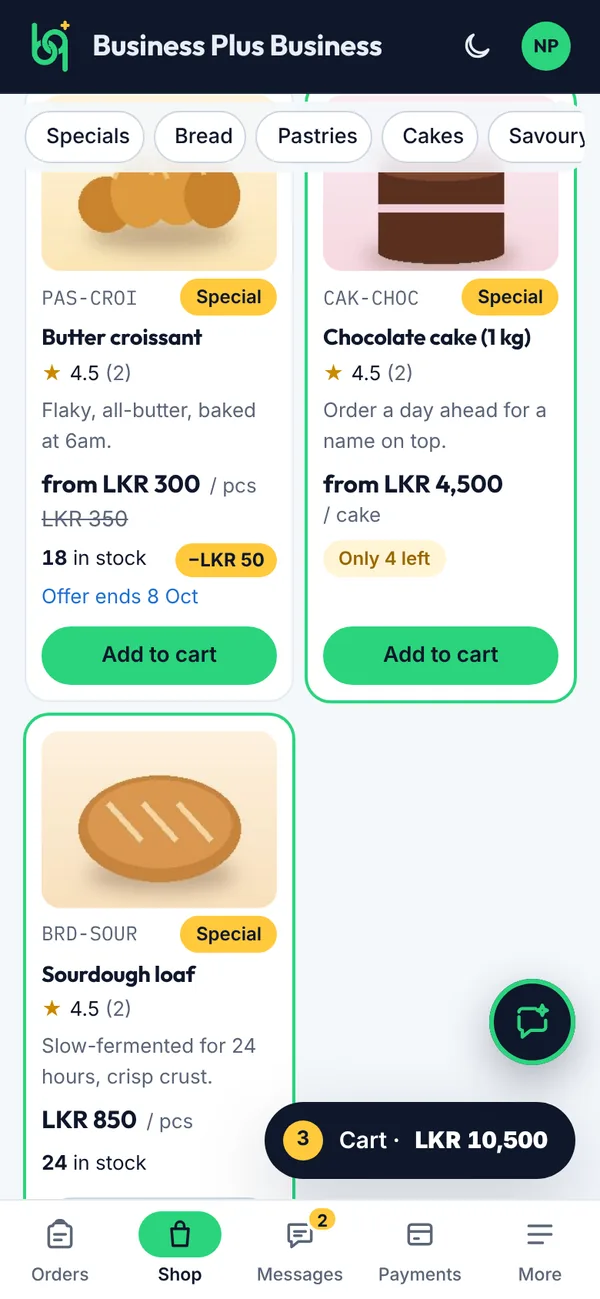
Choose products from one business at a time. Products are grouped into categories, with the business's specials first. Offers show the new price next to the old one.

Before you start
  • Open a business from Shop (see 3.1).

Steps

  1. Tap a category, such as Specials or Cakes, to jump to it.
  2. Tap Add to cart on each product you want.
  3. Use − and + to change how many you want.
A business's products, grouped by category on a computer
A business's products, grouped by category on a phone
Figure 3.3A business's products, grouped by category
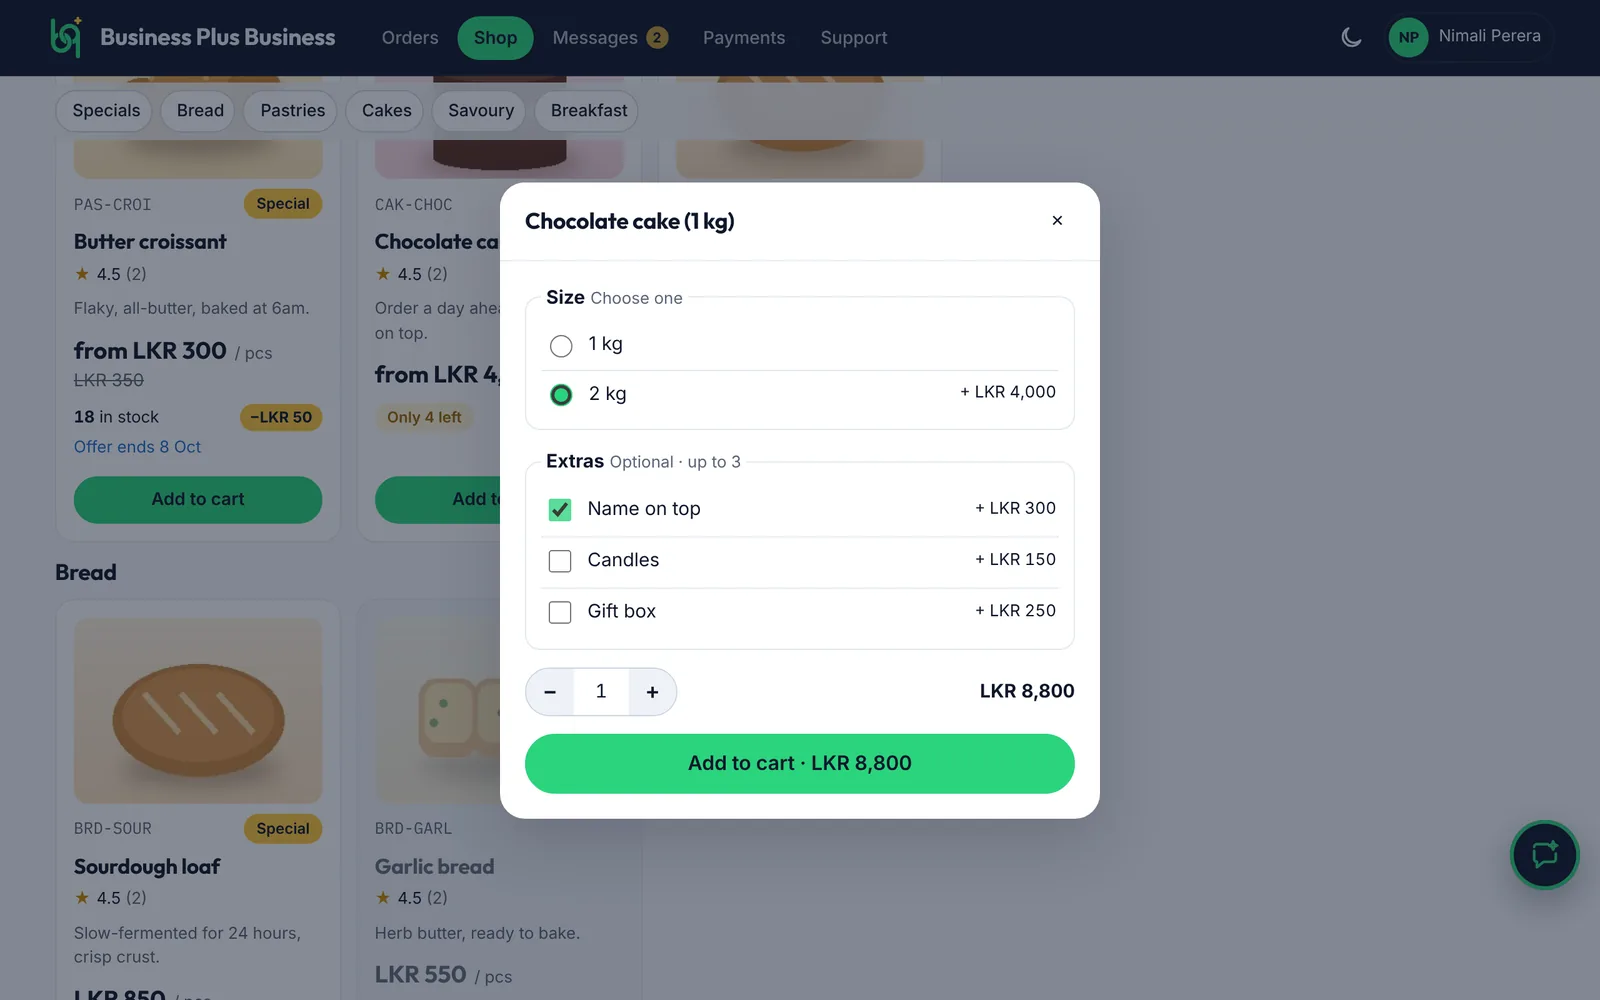
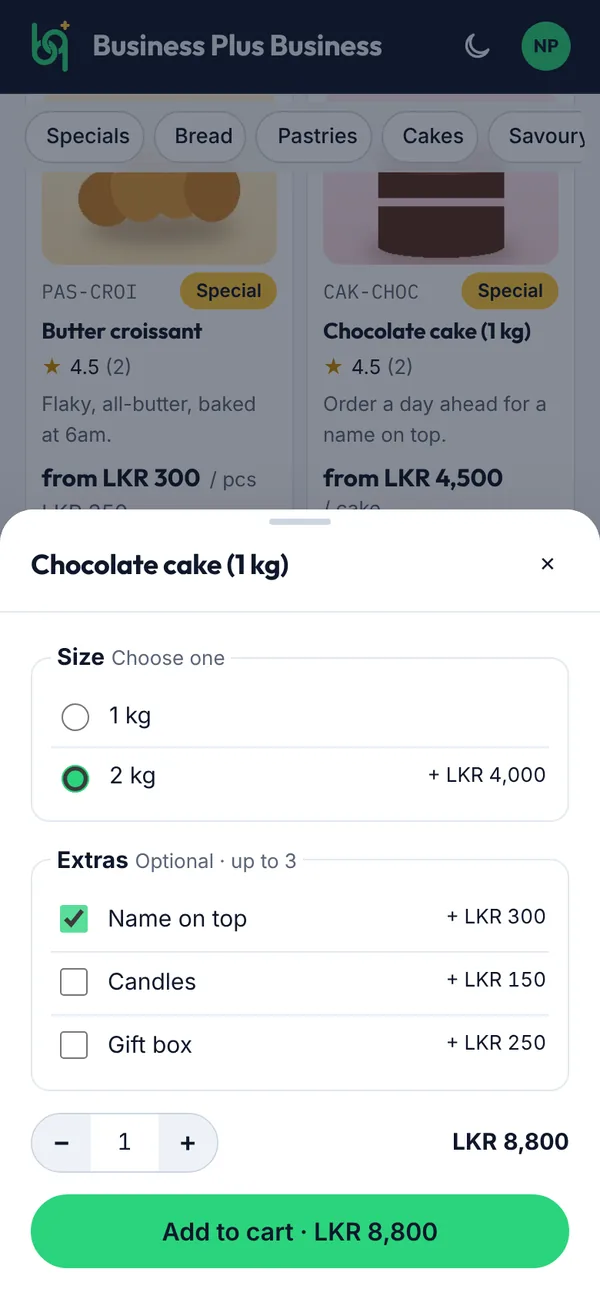
  1. Some products have sizes or extras. Pick the ones you want; the price updates as you choose.
  2. Tap Add to cart at the bottom of the window.
Choosing a size and extras on a computer
Choosing a size and extras on a phone
Figure 3.4Choosing a size and extras
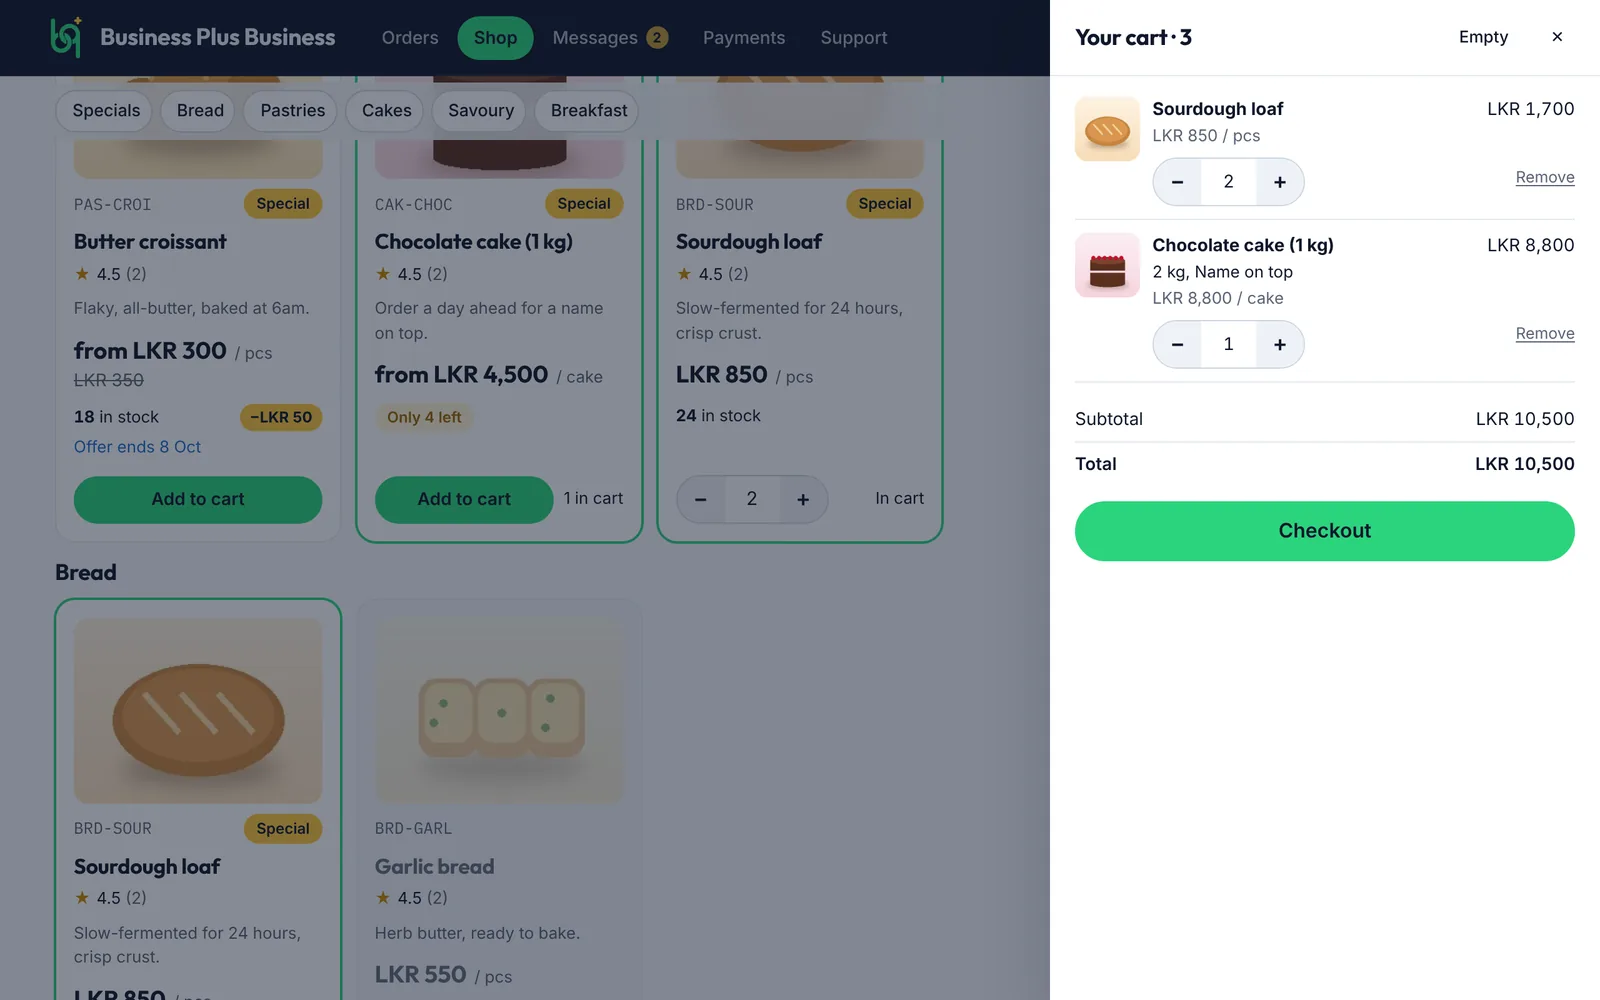
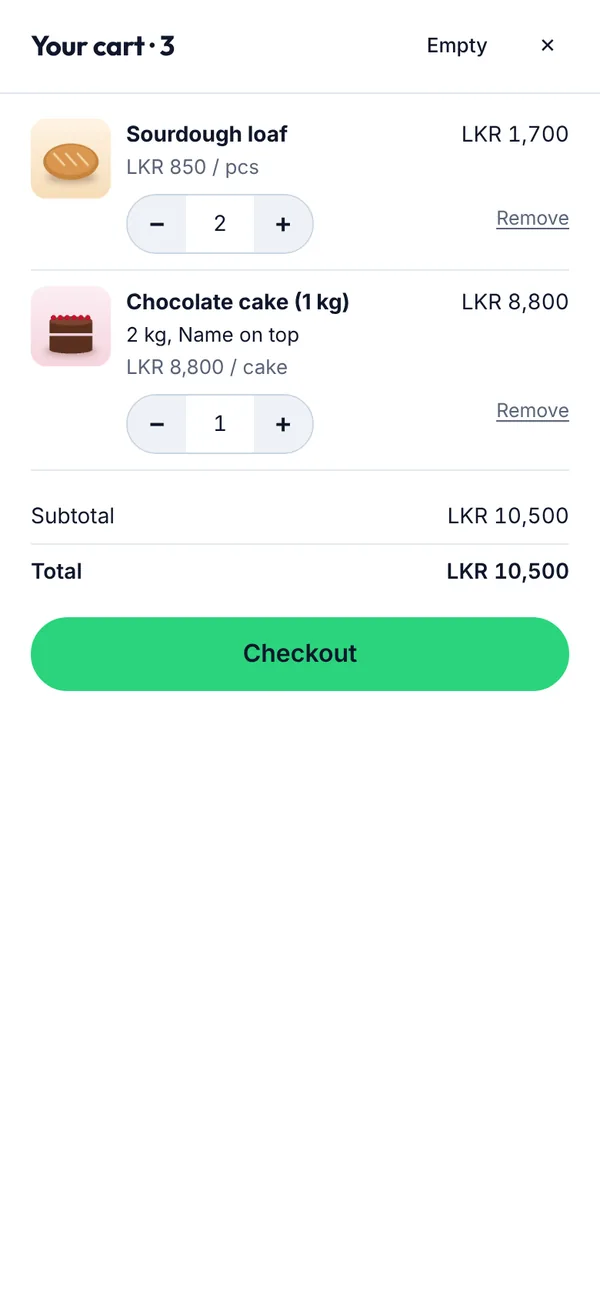
  1. Tap the cart button to review your order, then tap Checkout.
Your cart on a computer
Your cart on a phone
Figure 3.5Your cart
Labels on products

Only 3 left means stock is running low. Not available and Not available today mean you can't add it right now; check back later. If something sells out while it's in your cart, it's marked and left out of your order.

What you’ll see

Your cart shows each item with your choices, what you save and the total. Change amounts or tap Remove, then tap Checkout.

3.3How to place an order

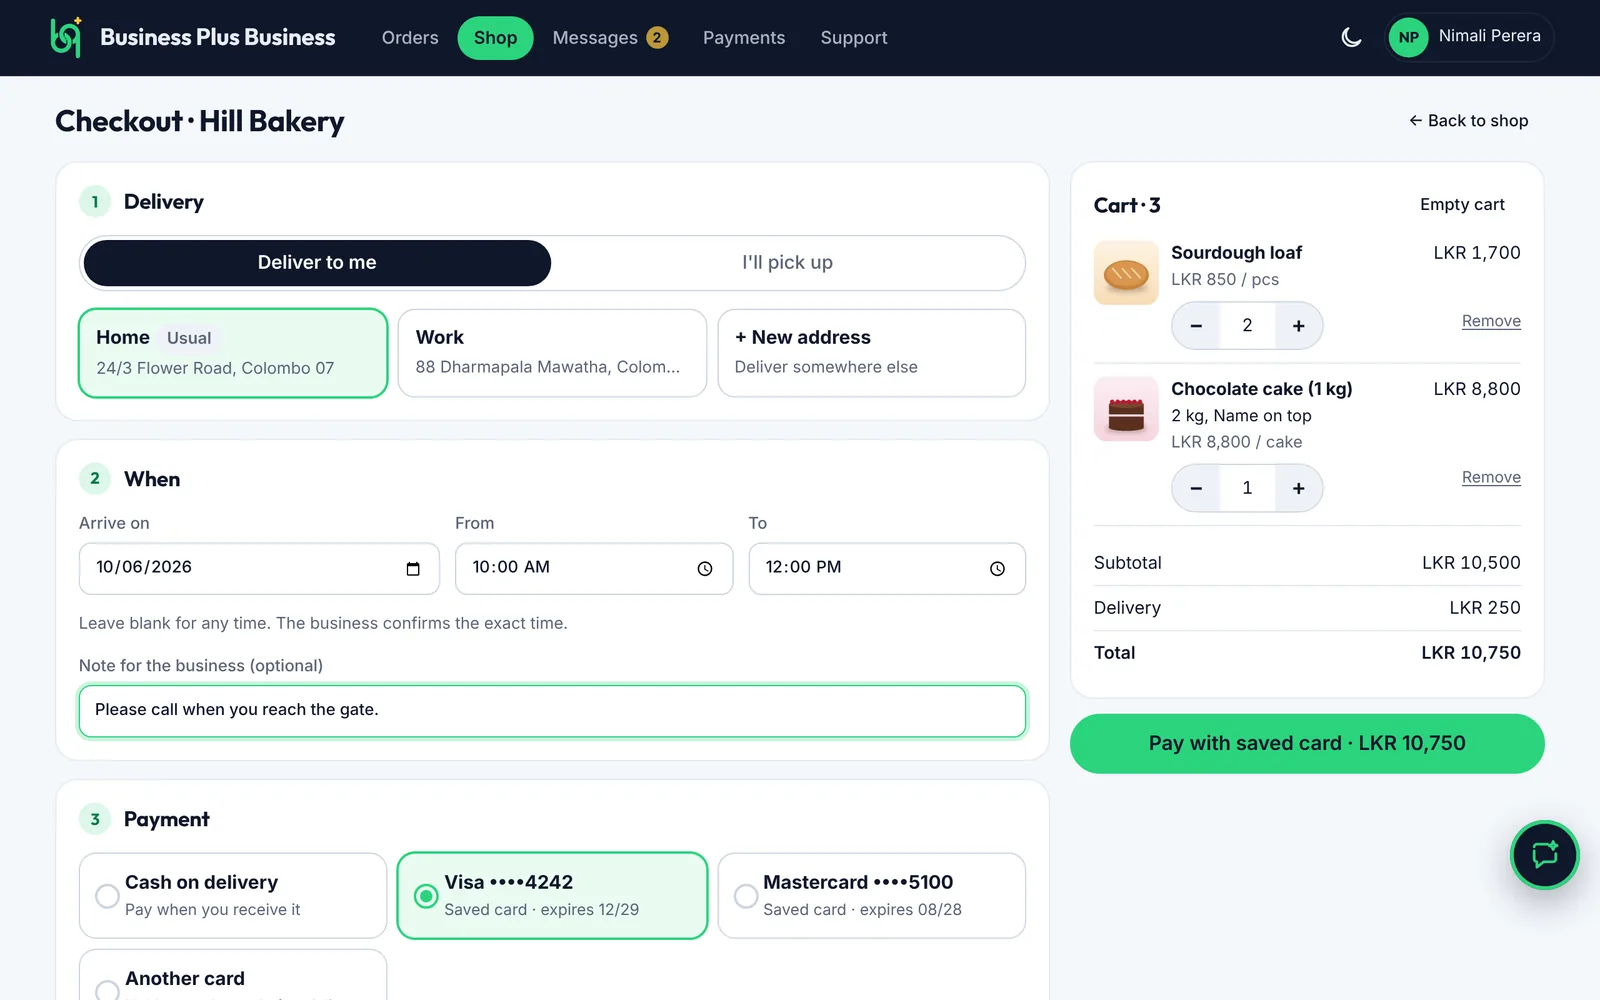
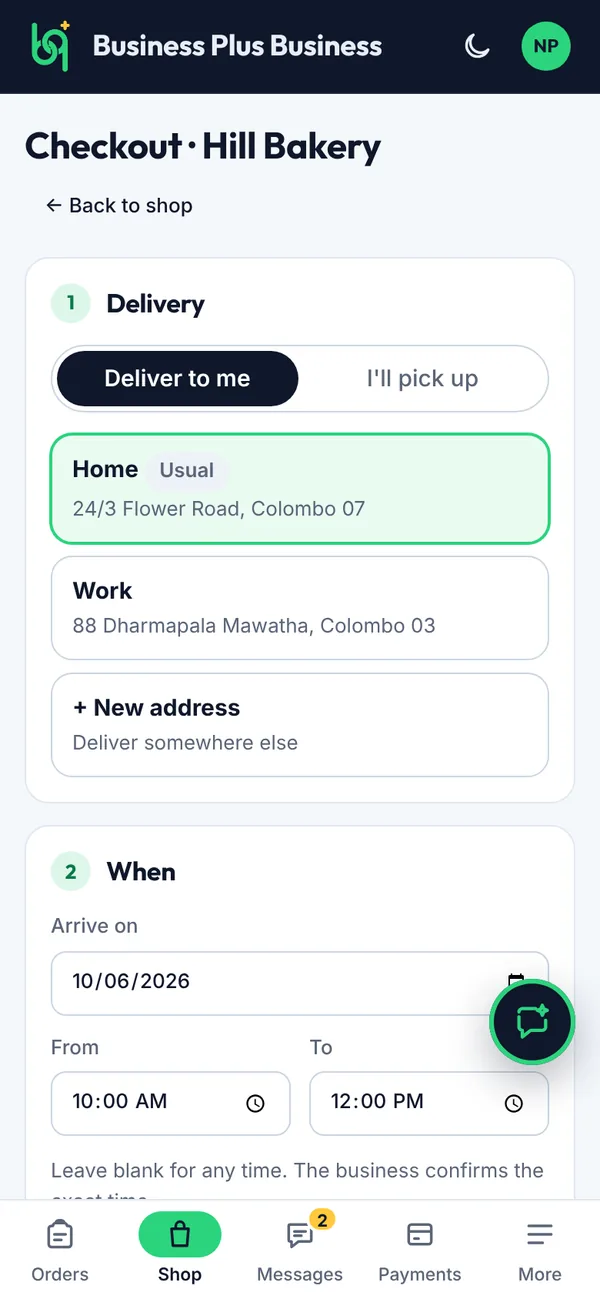
Checkout has three parts: where, when and how you pay.

Before you start
  • Have at least one item in your cart (see 3.2).

Steps

  1. Choose Deliver to me or I'll pick up.
  2. Tap a saved address, or + New address to deliver somewhere else.
  3. Pick a day and a time window. Leave them blank if any time suits you.
  4. Add a note for the business if you need to.
  5. Choose how to pay (see 3.4), then tap the green button to place your order.
Checkout: delivery, time and note on a computer
Checkout: delivery, time and note on a phone
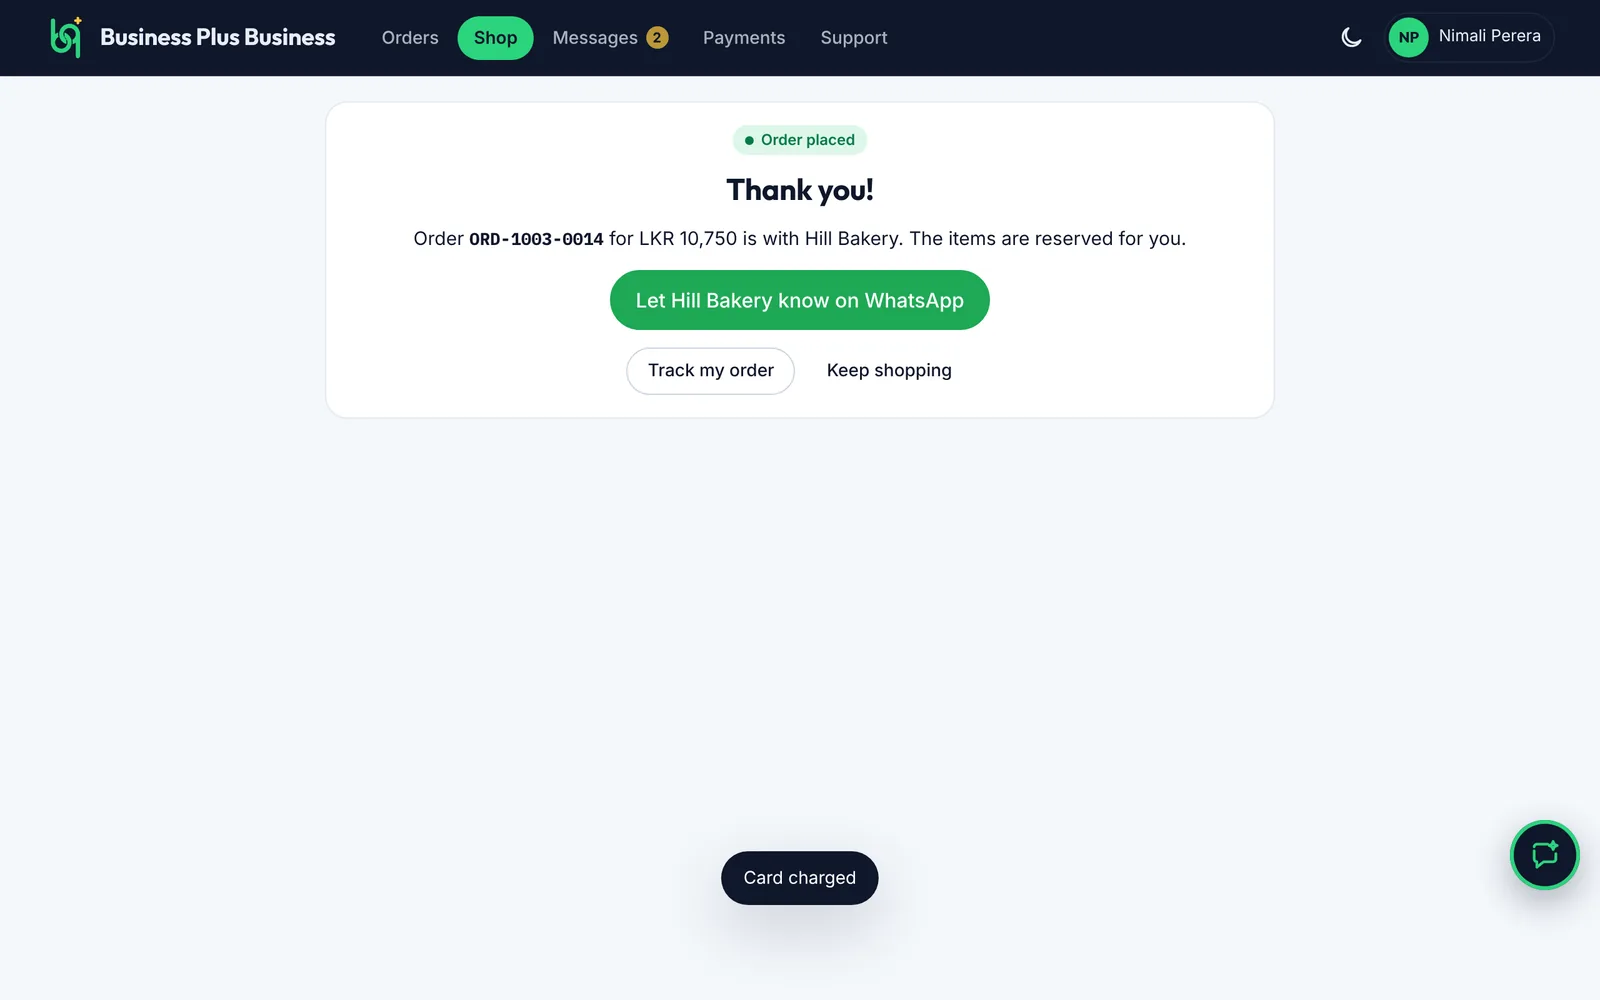
Figure 3.6Checkout: delivery, time and note
Your order is placed on a computer
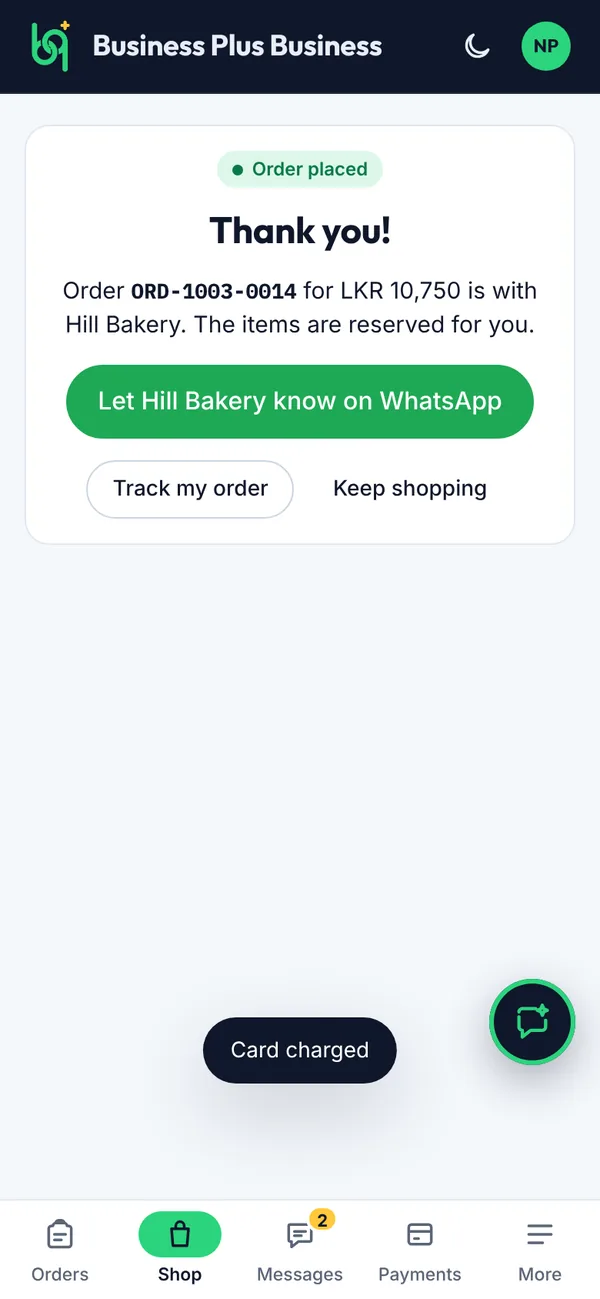
Your order is placed on a phone
Figure 3.7Your order is placed
What you’ll see

You see Thank you! with your order number. Your items are reserved. Tap Let the business know on WhatsApp if you'd like to, or Track my order.

3.4How to pay by cash or card

You can pay cash when you receive your order, or by card. Card payments are held when you order and only charged once your order is delivered.

Before you start
  • The business must show Cards accepted to pay by card.

Steps

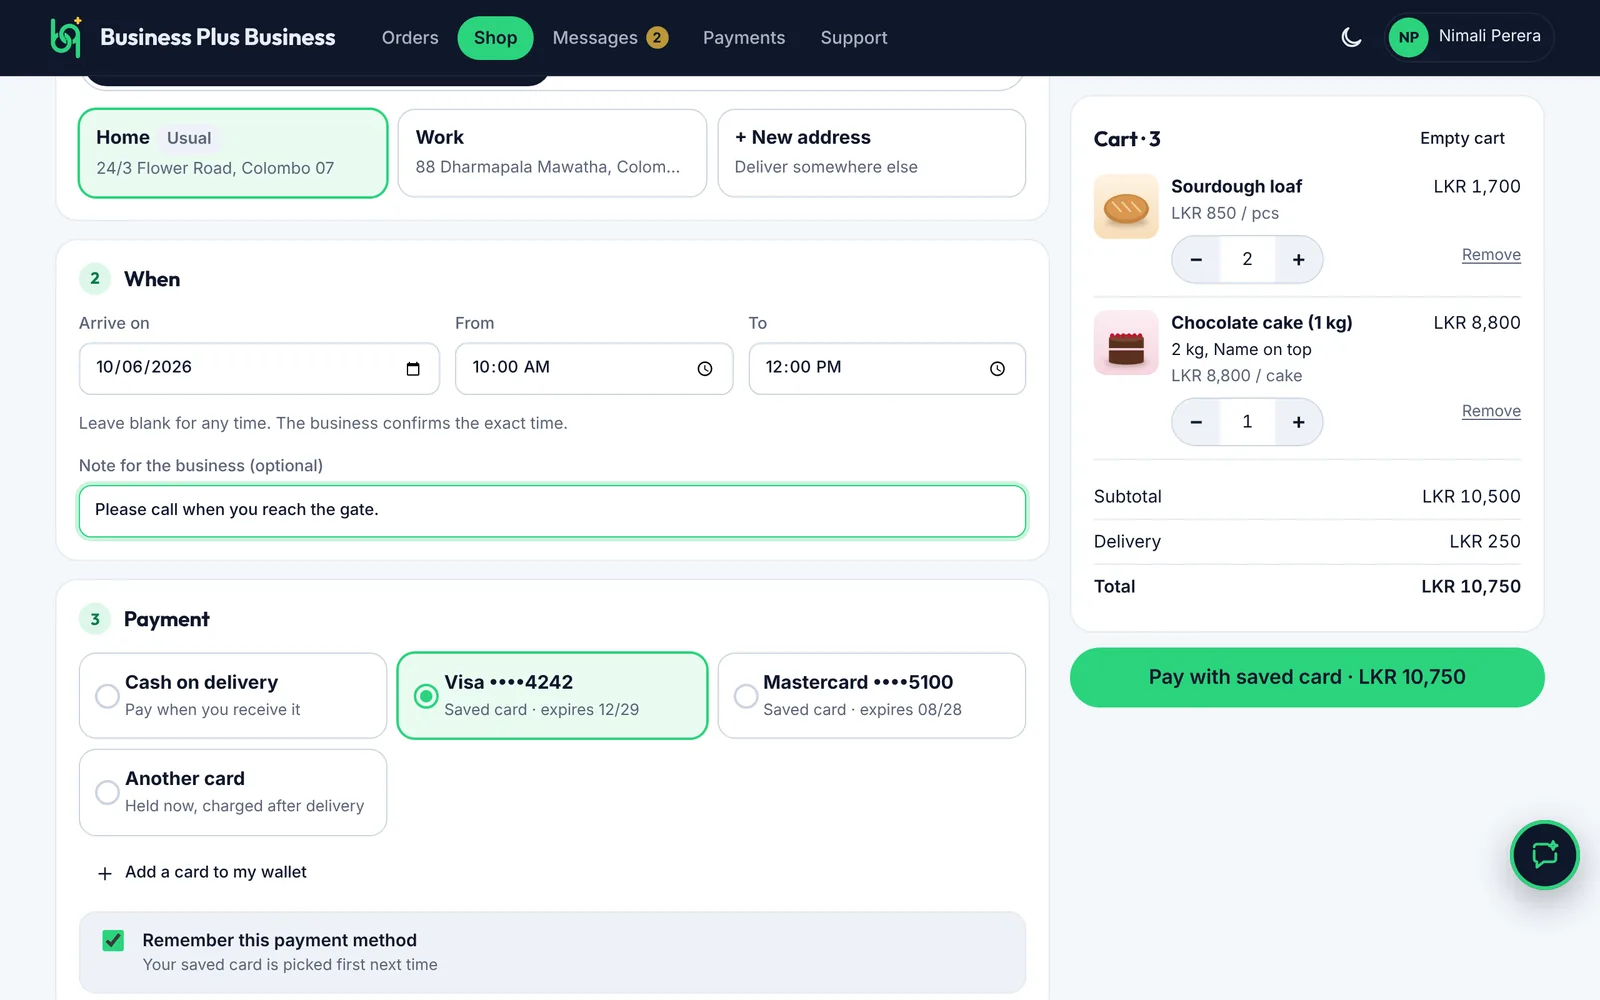
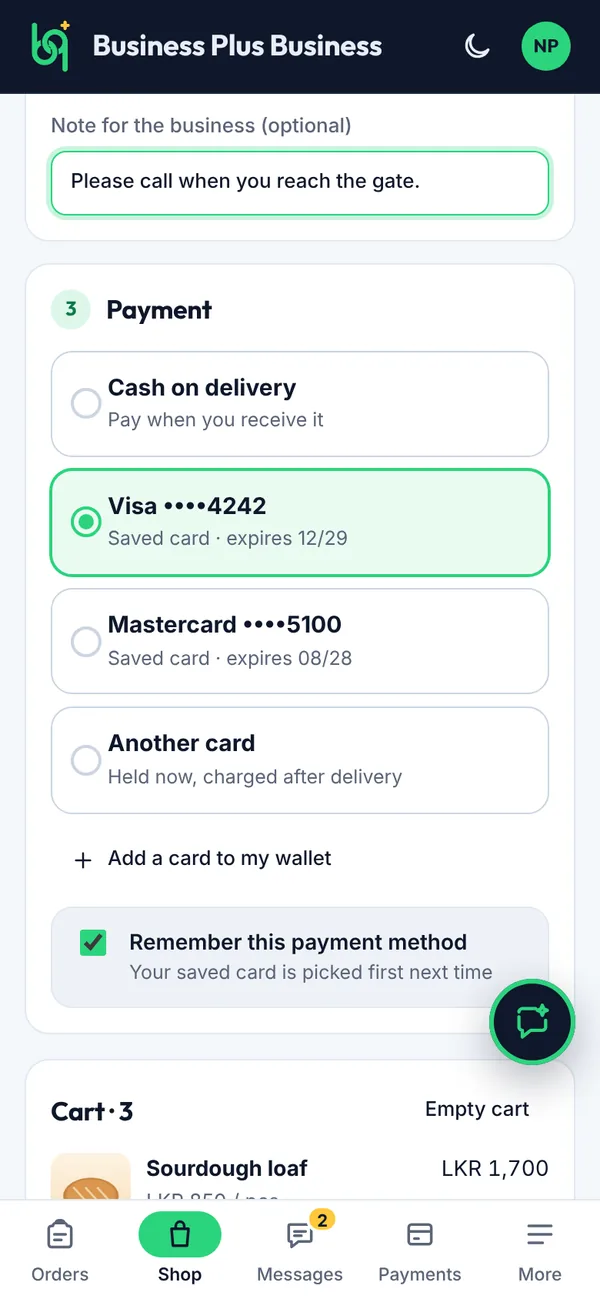
  1. Cash on delivery (or at pickup): pay when you receive it.
  2. A saved card: pay in one tap.
  3. Another card: PayHere's secure window opens for you to enter a card.
  4. Tap Add a card to my wallet to save a card for next time.
  5. Keep Remember this payment method ticked so it's picked first next time.
Payment choices at checkout on a computer
Payment choices at checkout on a phone
Figure 3.8Payment choices at checkout
What you’ll see

If the business declines the order or you cancel it, the hold on your card is released. Card numbers stay with PayHere; the app only sees the last four digits.

3.5How to follow your order

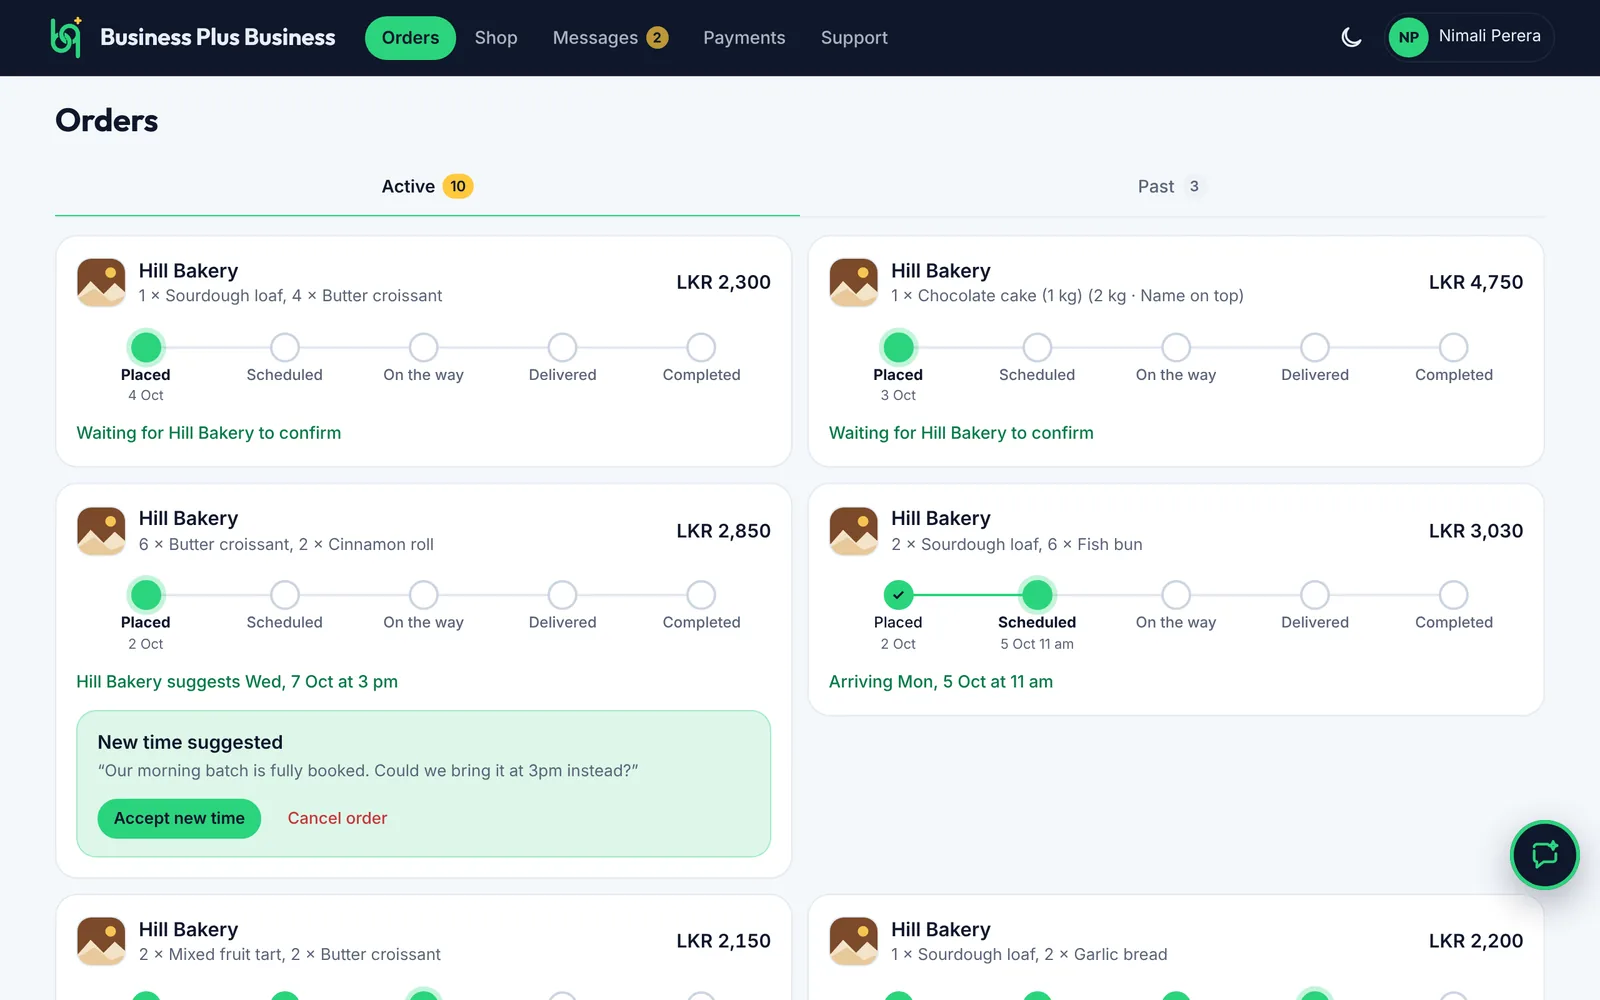
Orders shows every order you've placed and how far each one has come.

Steps

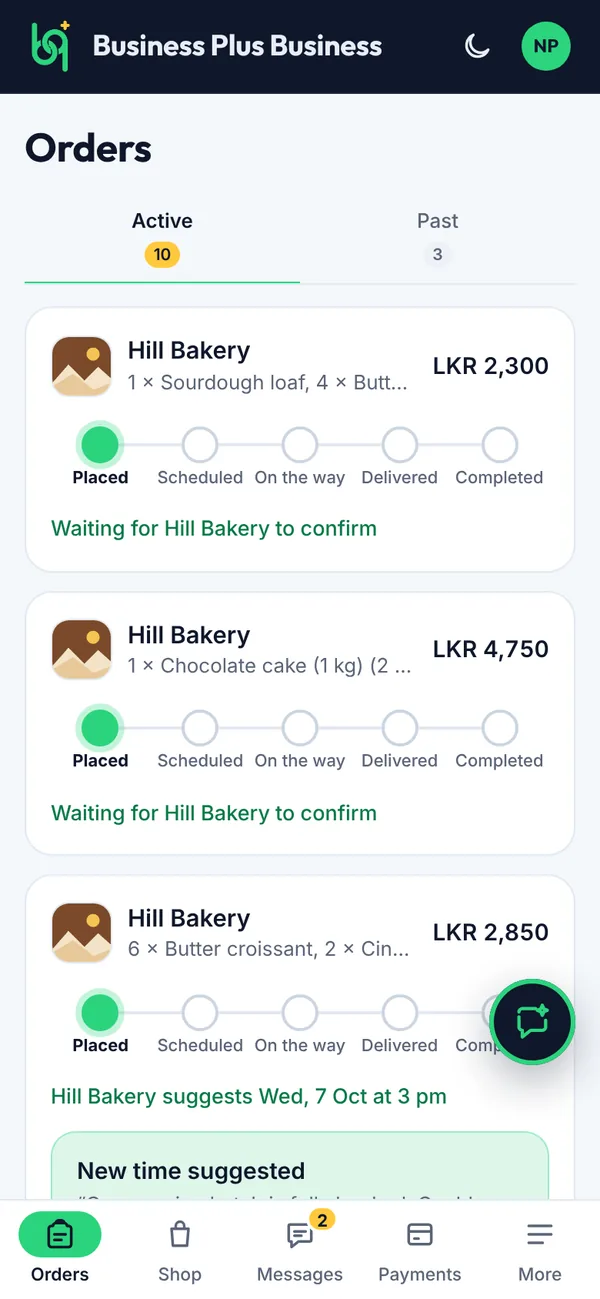
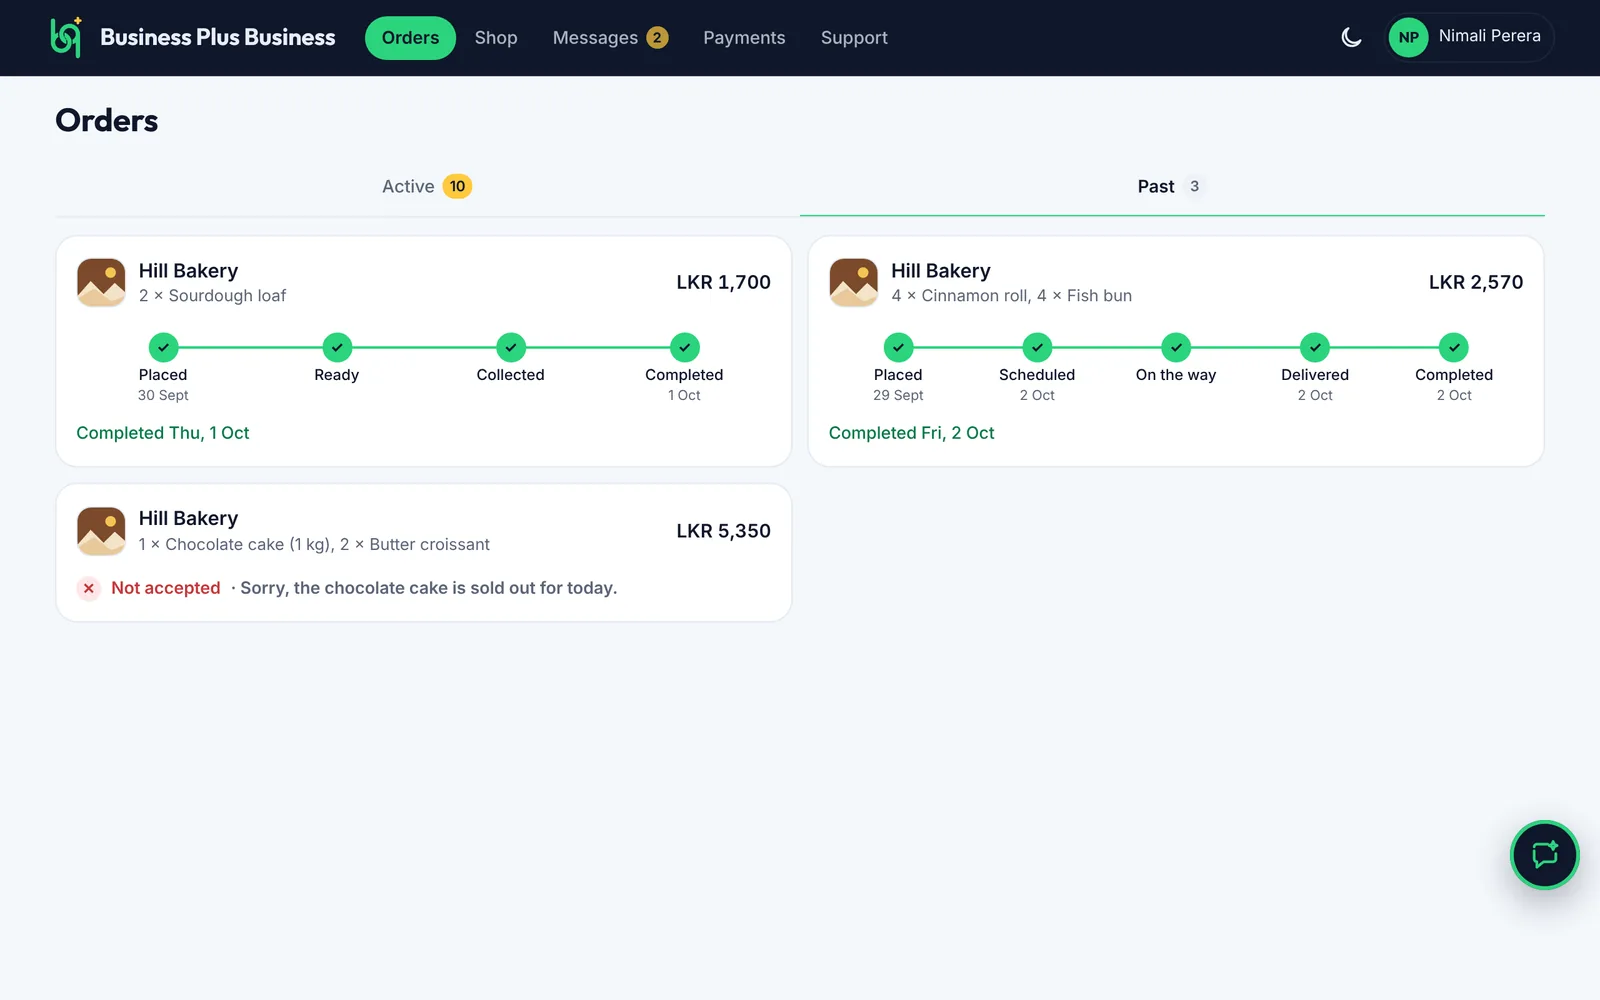
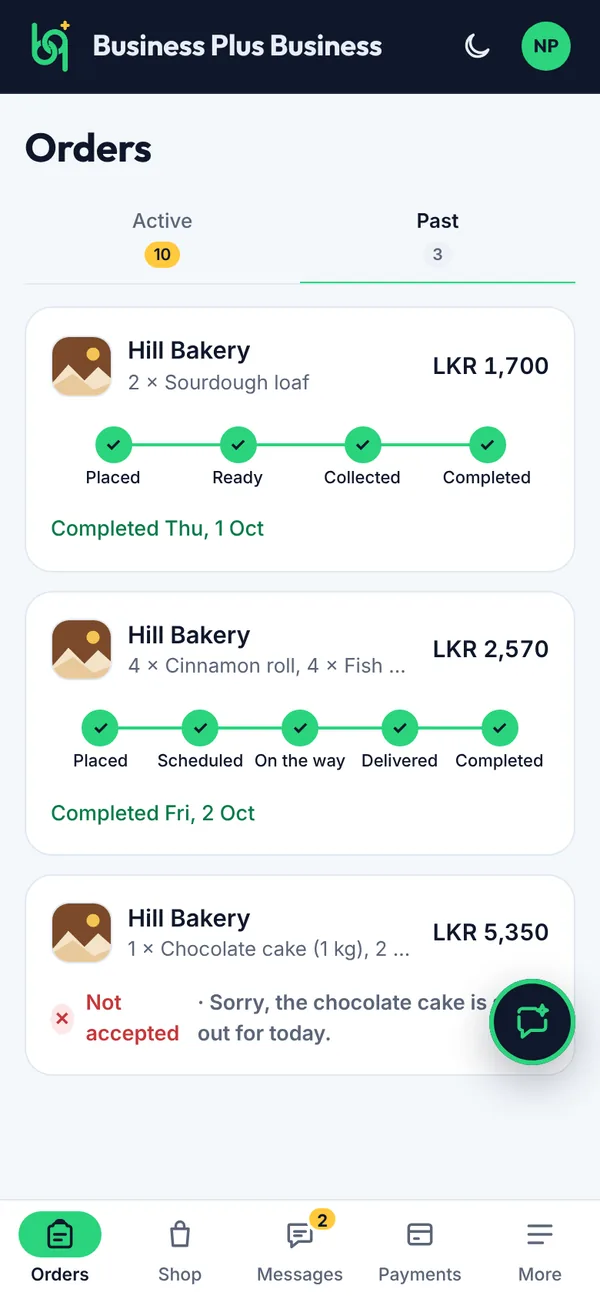
  1. Active lists orders still in progress. Past keeps completed and cancelled ones.
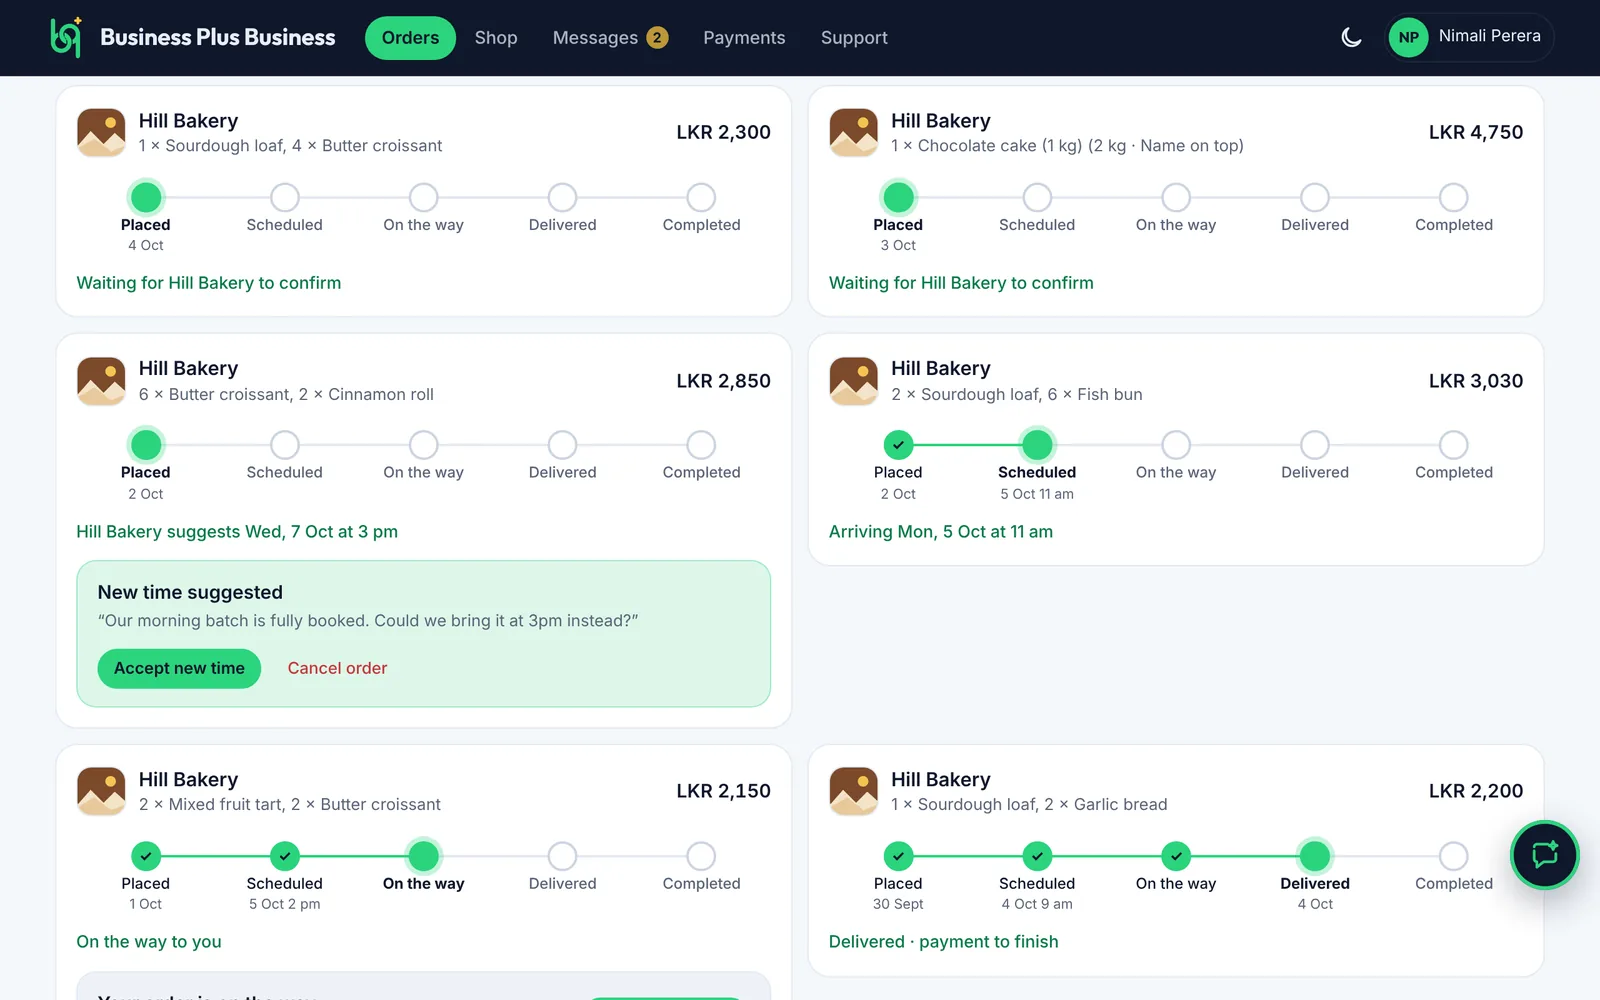
  2. Each card shows the order's progress: Placed, Scheduled, On the way, Delivered, Completed. Tap a card for full details.
Your orders on a computer
Your orders on a phone
Figure 3.9Your orders
Past orders on a computer
Past orders on a phone
Figure 3.10Past orders
What you’ll see

When something needs you, such as a new time, the card shows a button for it. You also get a message at each step.

3.6How to respond when a new time is suggested

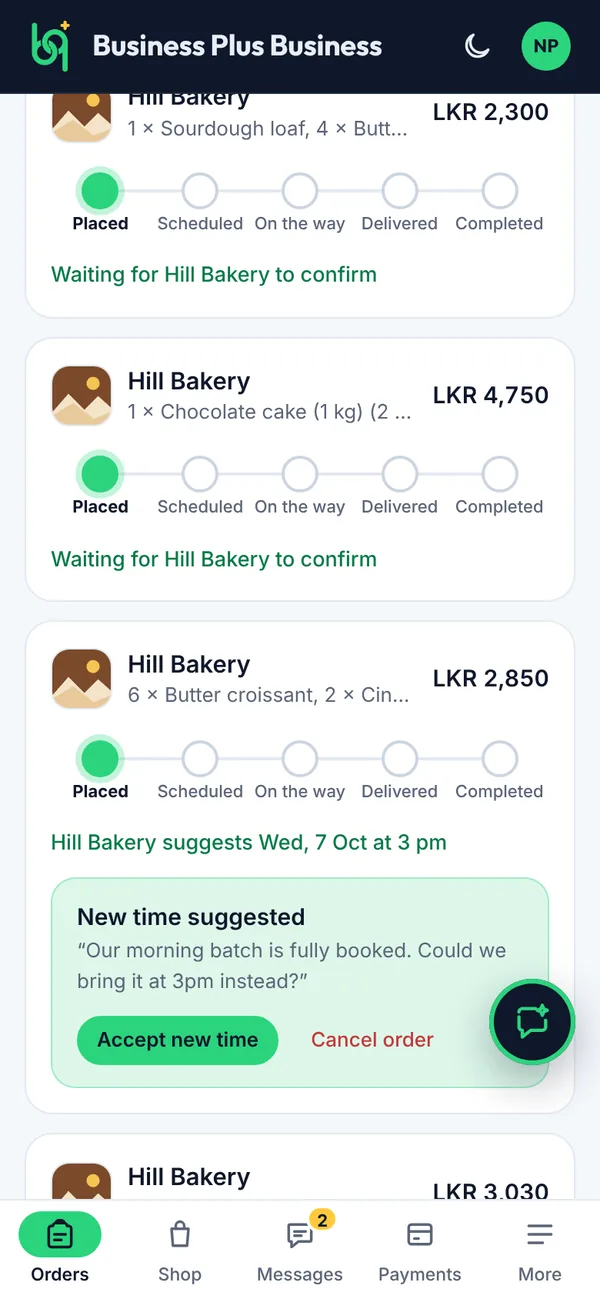
If the business can't deliver at your time, it suggests another. Your order waits until you answer.

Steps

  1. Tap Accept new time to go ahead, or
  2. tap Cancel order if it doesn't suit you. The app asks you to confirm first.
A new time suggested by the business on a computer
A new time suggested by the business on a phone
Figure 3.11A new time suggested by the business
What you’ll see

If you accept, the order is scheduled for the new time. If you cancel, the business is told and any card hold is released.

3.7How to track your delivery live

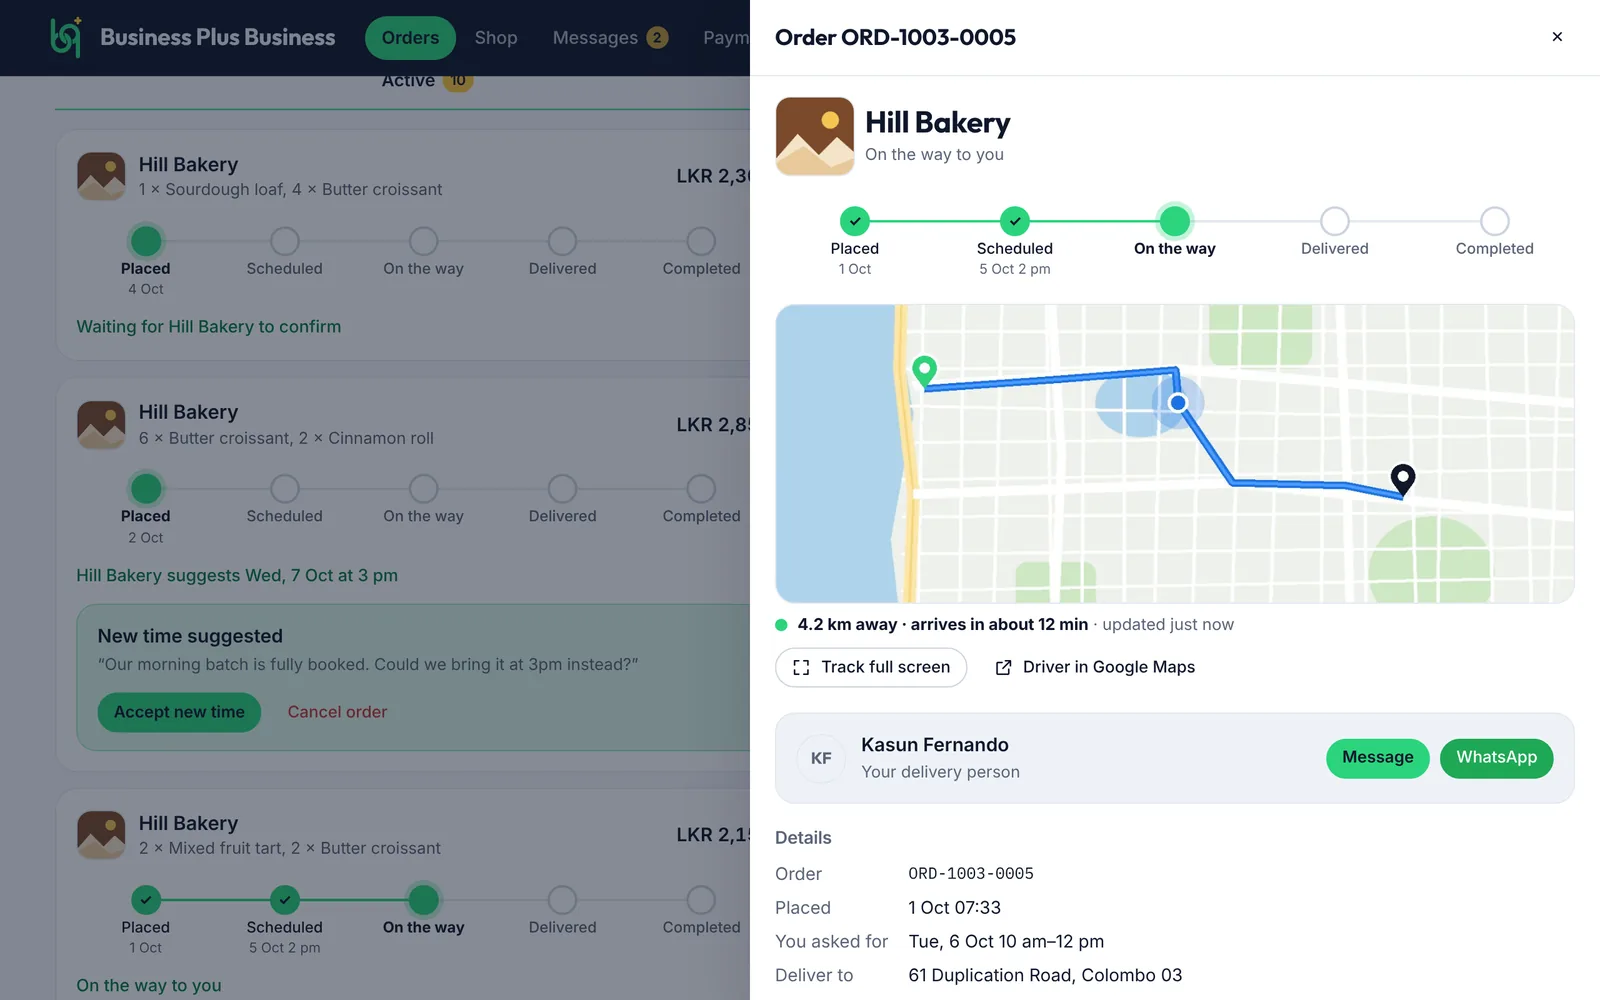
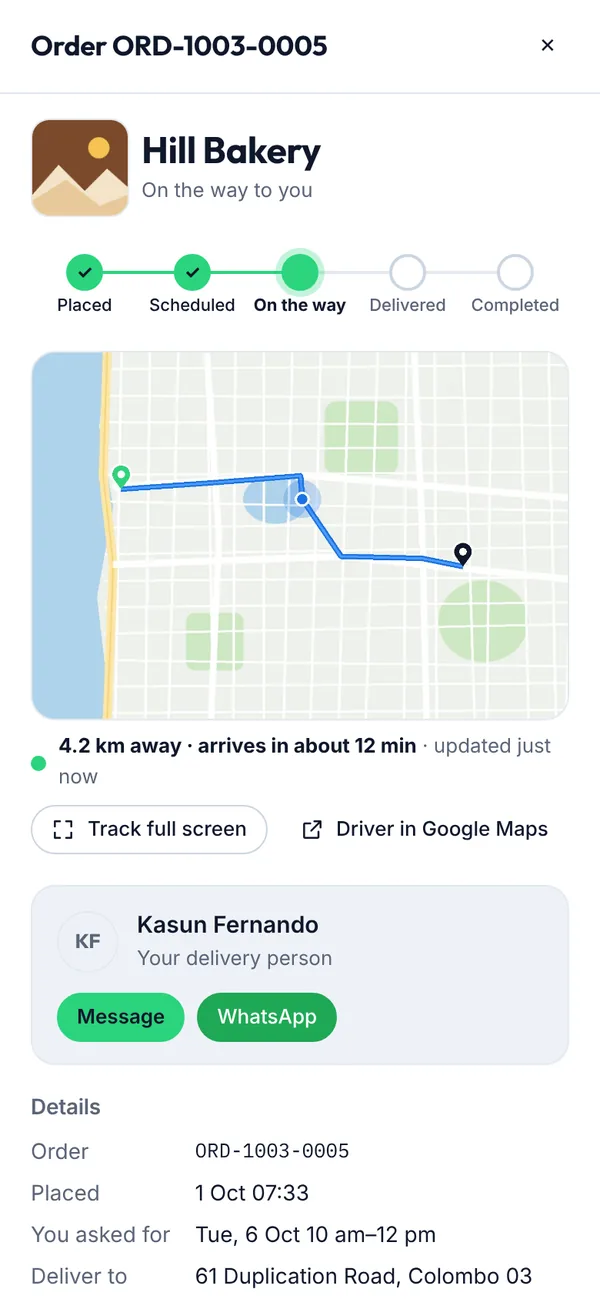
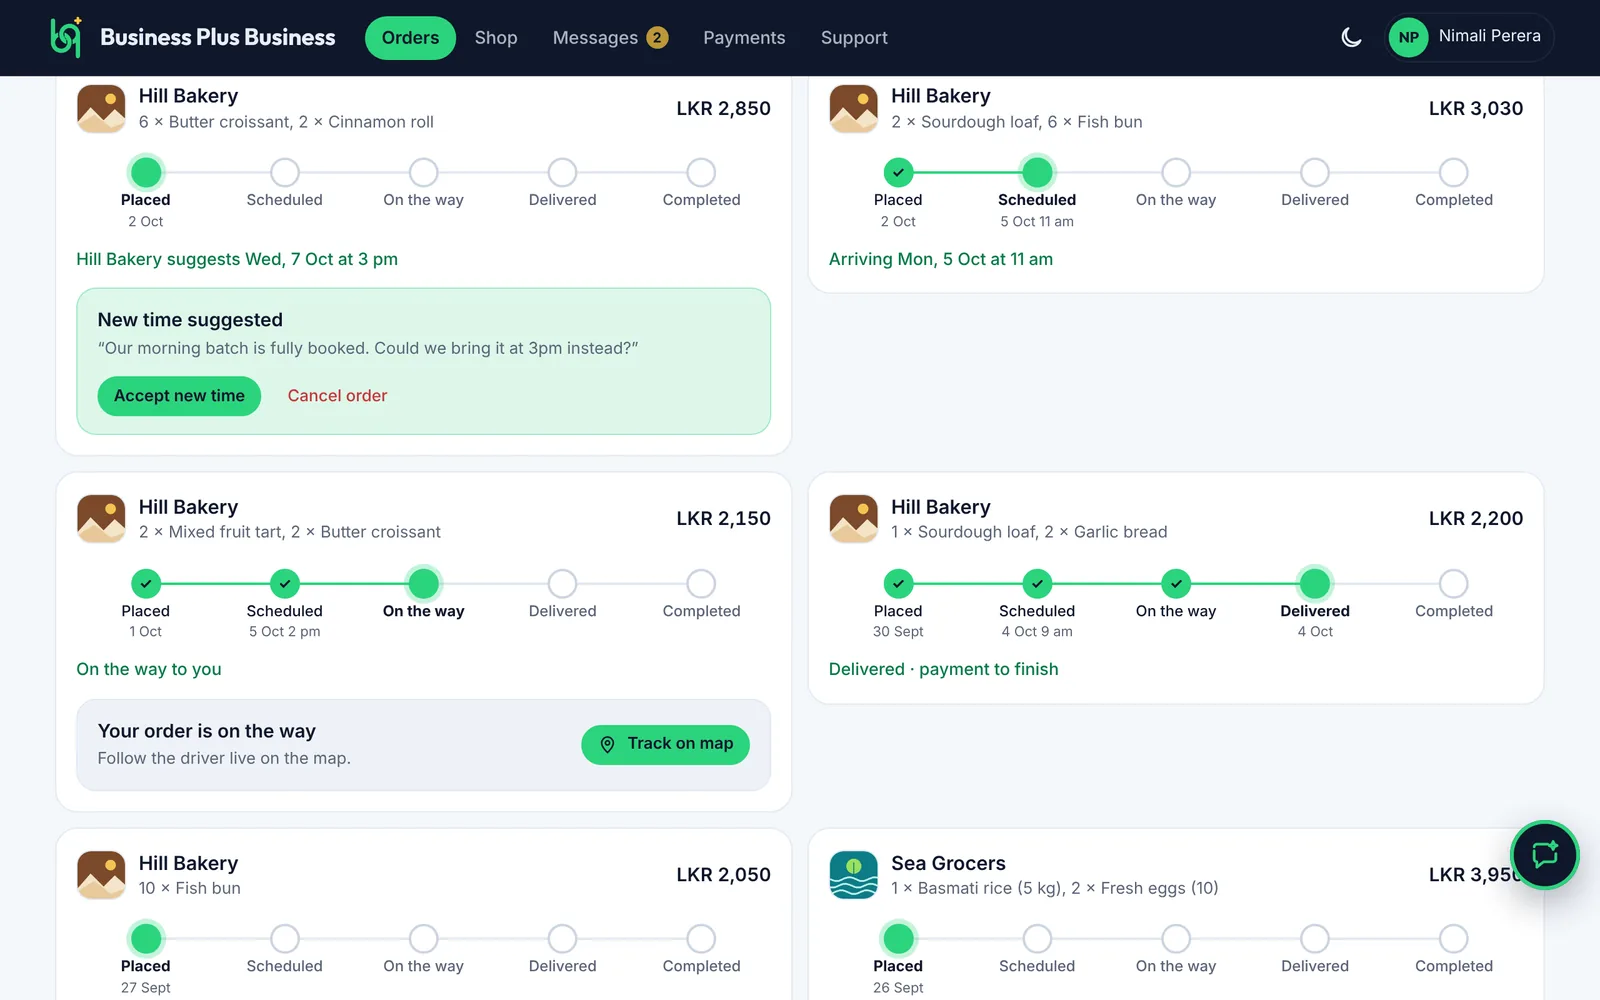
Once your order is on the way, you can see your delivery person on a map, with the route and how long until it arrives.

Steps

  1. On the order card, tap Track on map.
Your order is on the way on a computer
Your order is on the way on a phone
Figure 3.12Your order is on the way
  1. The map shows where your delivery person is now and the route to you.
  2. Tap Track full screen for a bigger map.
  3. Tap Message or WhatsApp to contact your delivery person.
Live tracking and order details on a computer
Live tracking and order details on a phone
Figure 3.13Live tracking and order details
What you’ll see

The map updates while the delivery person has the app open. If it says it's waiting for their location, give it a moment.

3.8How to rate an order

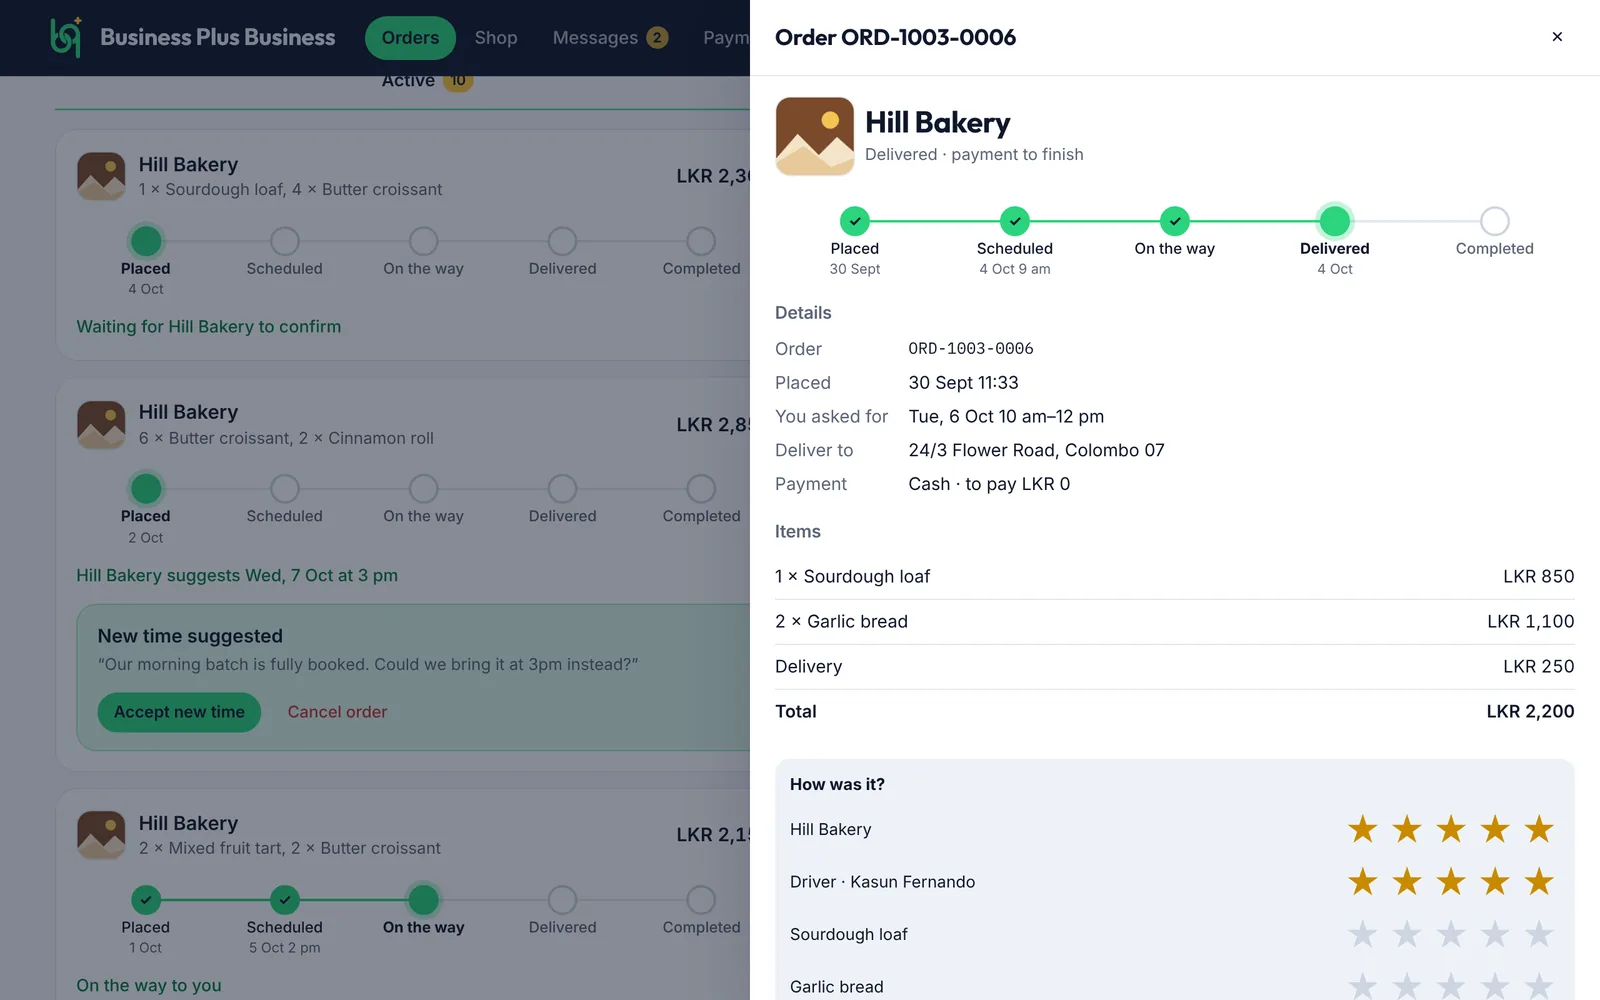
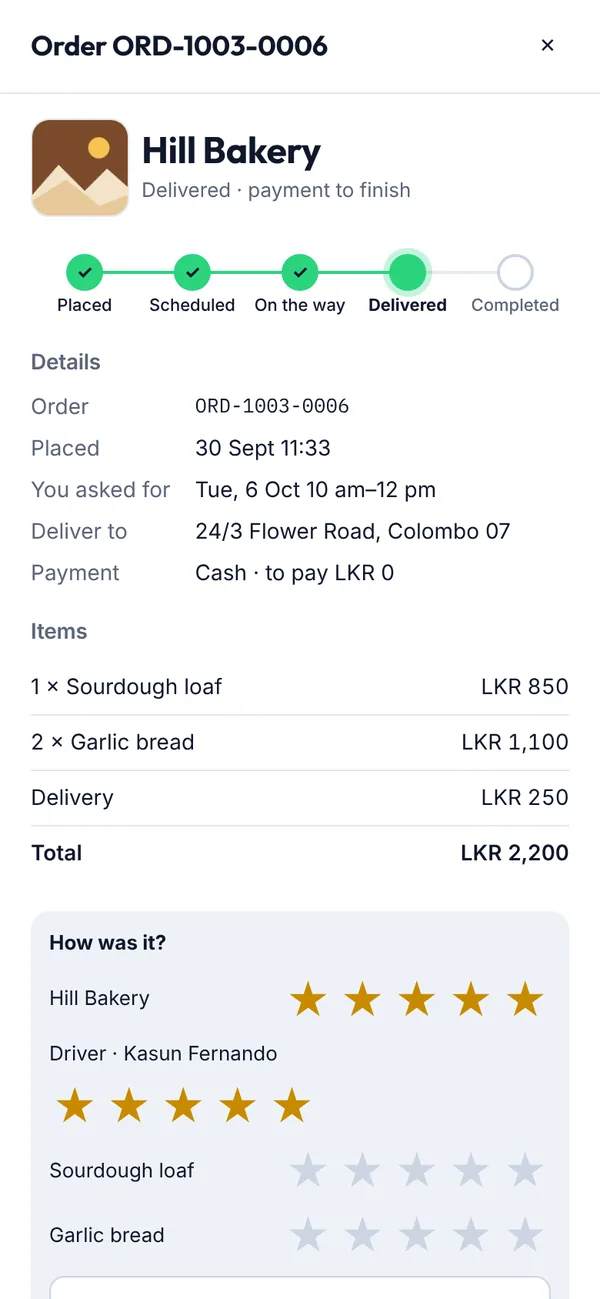
After delivery, rate the business, your delivery person and each product. Ratings help other customers choose.

Before you start
  • The order must be delivered.

Steps

  1. Open the order from Orders and scroll to How was it?. Tap the stars for the business.
  2. Tap the stars for your delivery person and each product.
Rating an order on a computer
Rating an order on a phone
Figure 3.14Rating an order
What you’ll see

Your stars are saved straight away.

3.9How to add and manage your cards

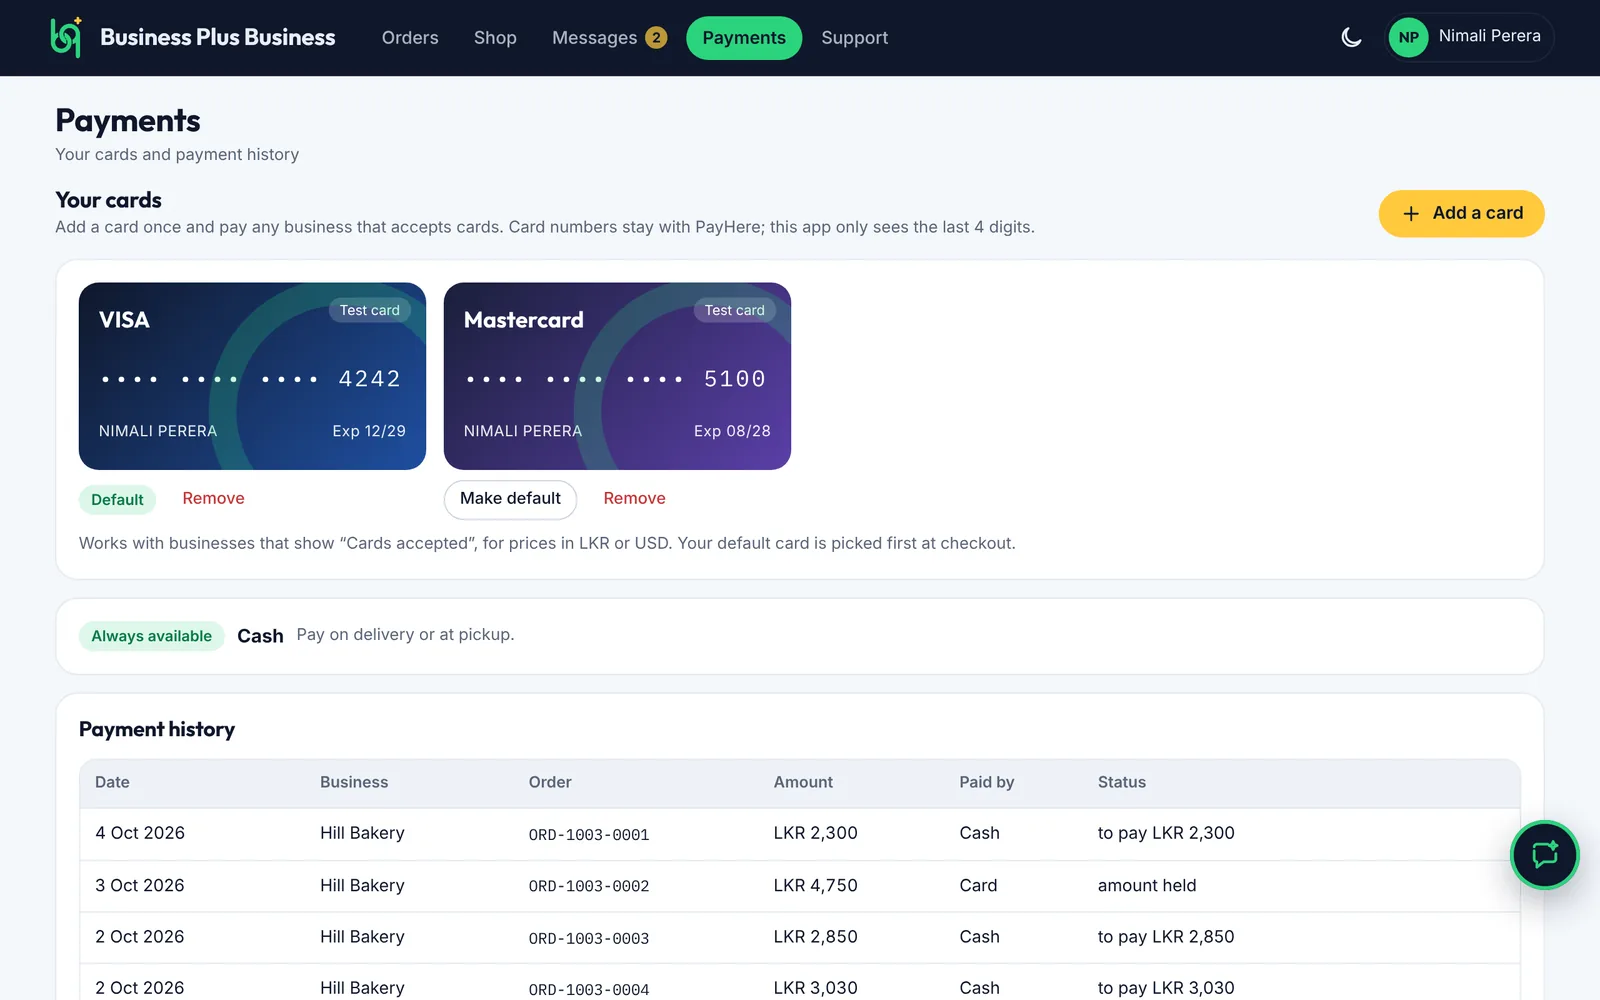
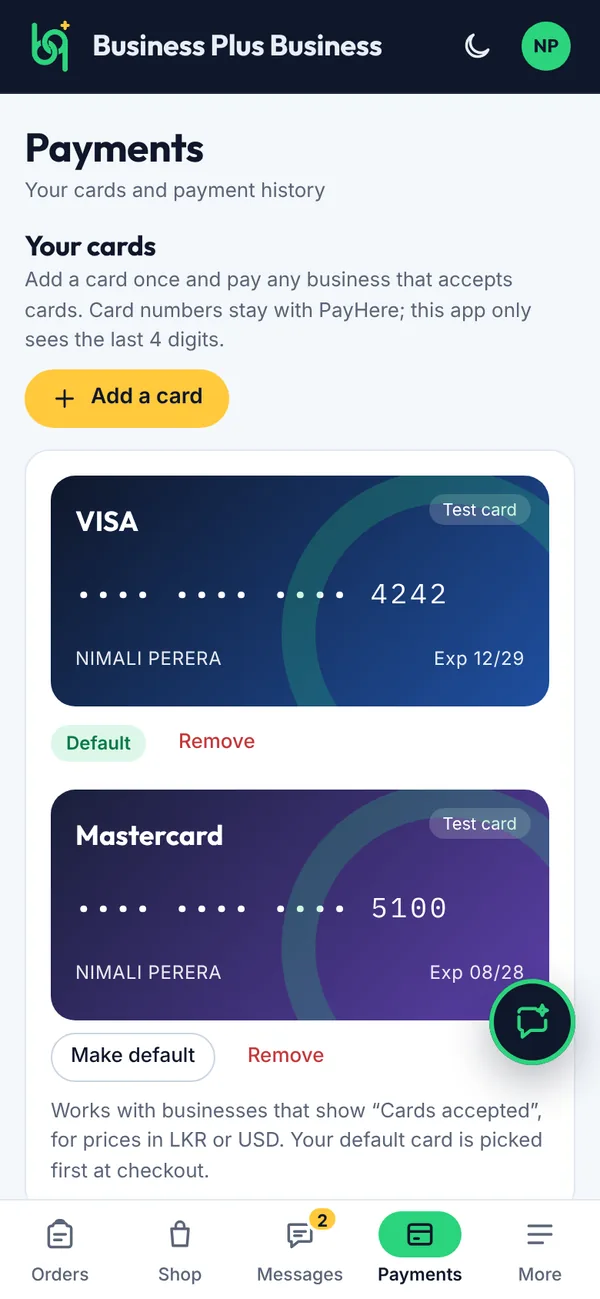
Save a card once and use it with every business that accepts cards, for prices in LKR or USD.

Steps

  1. Open Payments and tap Add a card. Enter your card in PayHere's secure window.
  2. Tap Make default to choose the card picked first at checkout, or Remove to delete one.
  3. Scroll to Payment history to see every order and how you paid.
Your cards and payment history on a computer
Your cards and payment history on a phone
Figure 3.15Your cards and payment history
What you’ll see

New cards appear in your wallet and at checkout. Cash is always available.

3.10How to message a business or delivery person

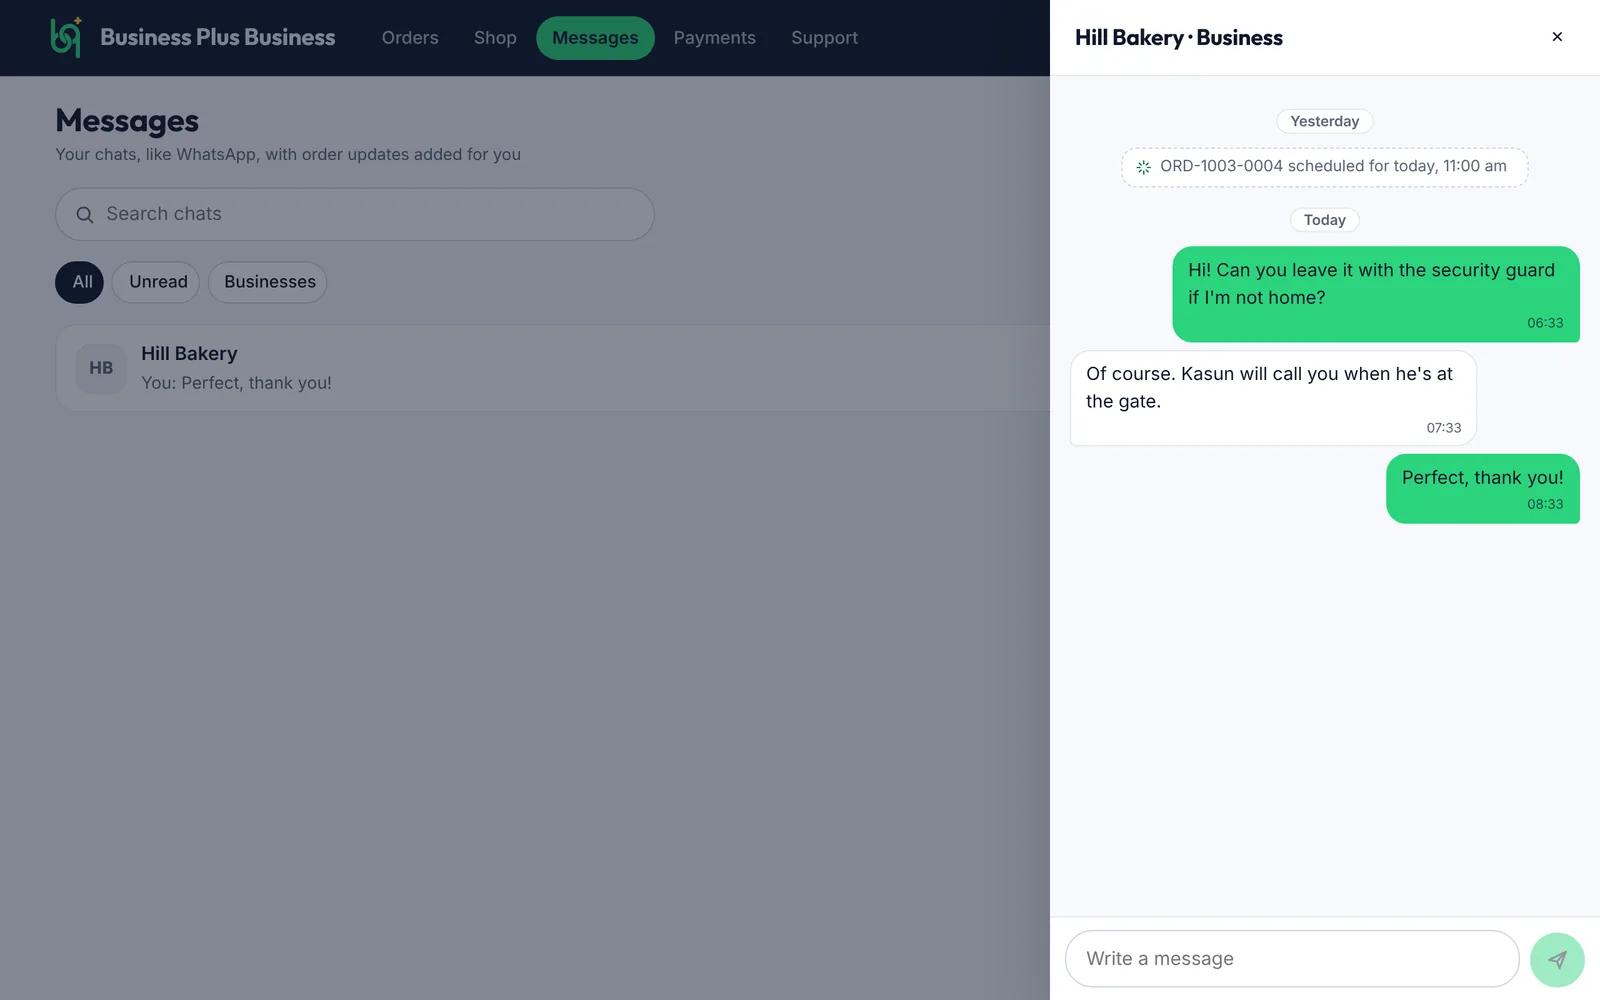
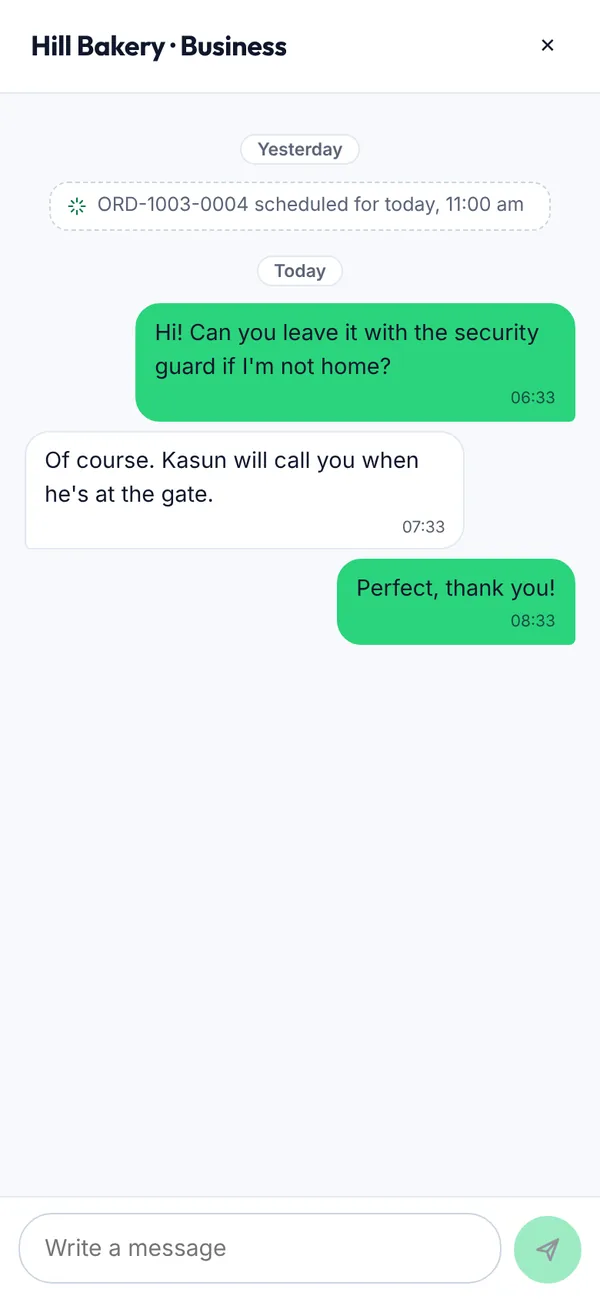
Messages keeps your chats in one place, along with automatic updates about your orders.

Steps

  1. Open Messages and tap a chat.
  2. Type in the box at the bottom and send.
A chat with a business on a computer
A chat with a business on a phone
Figure 3.16A chat with a business
What you’ll see

Your message appears in the chat. Use Unread and Businesses to filter your chats.

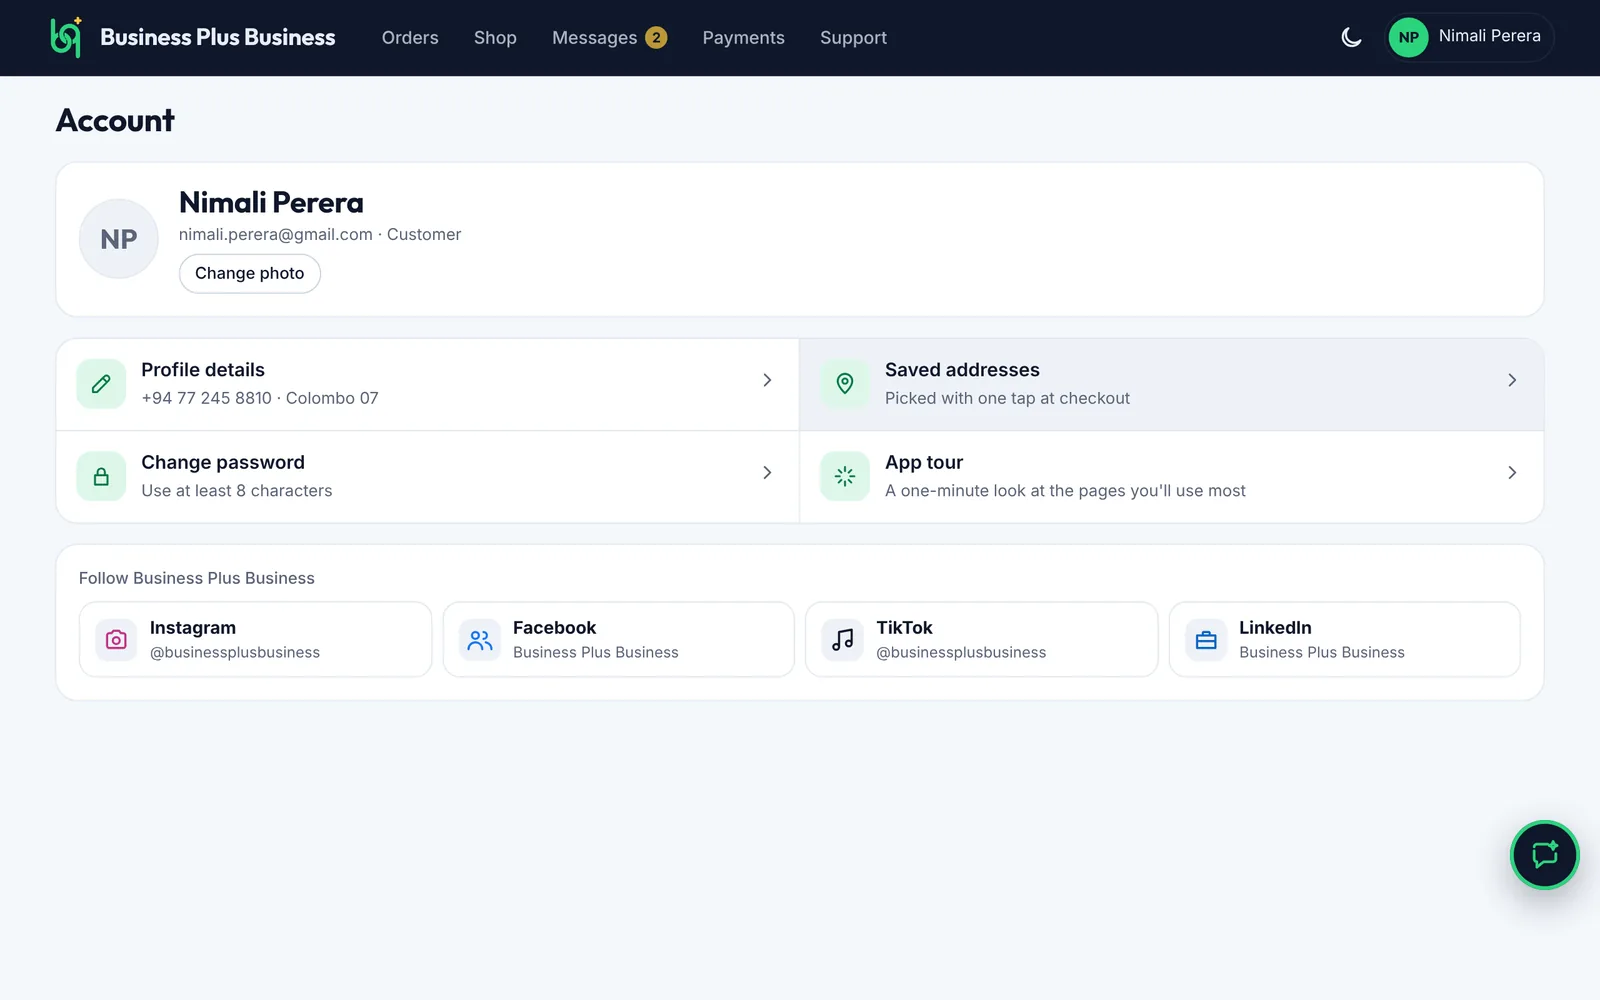
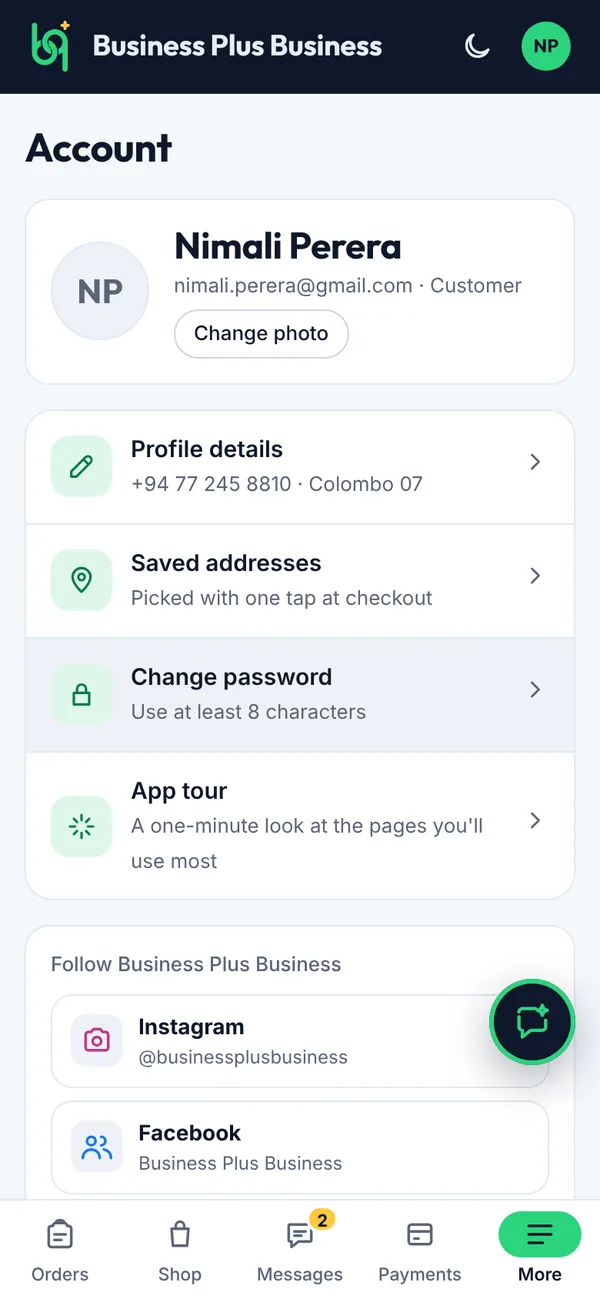
3.11How to update your account and addresses

Keep your details up to date so deliveries reach you.

Steps

  1. Profile details: change your name, WhatsApp number, country and currency.
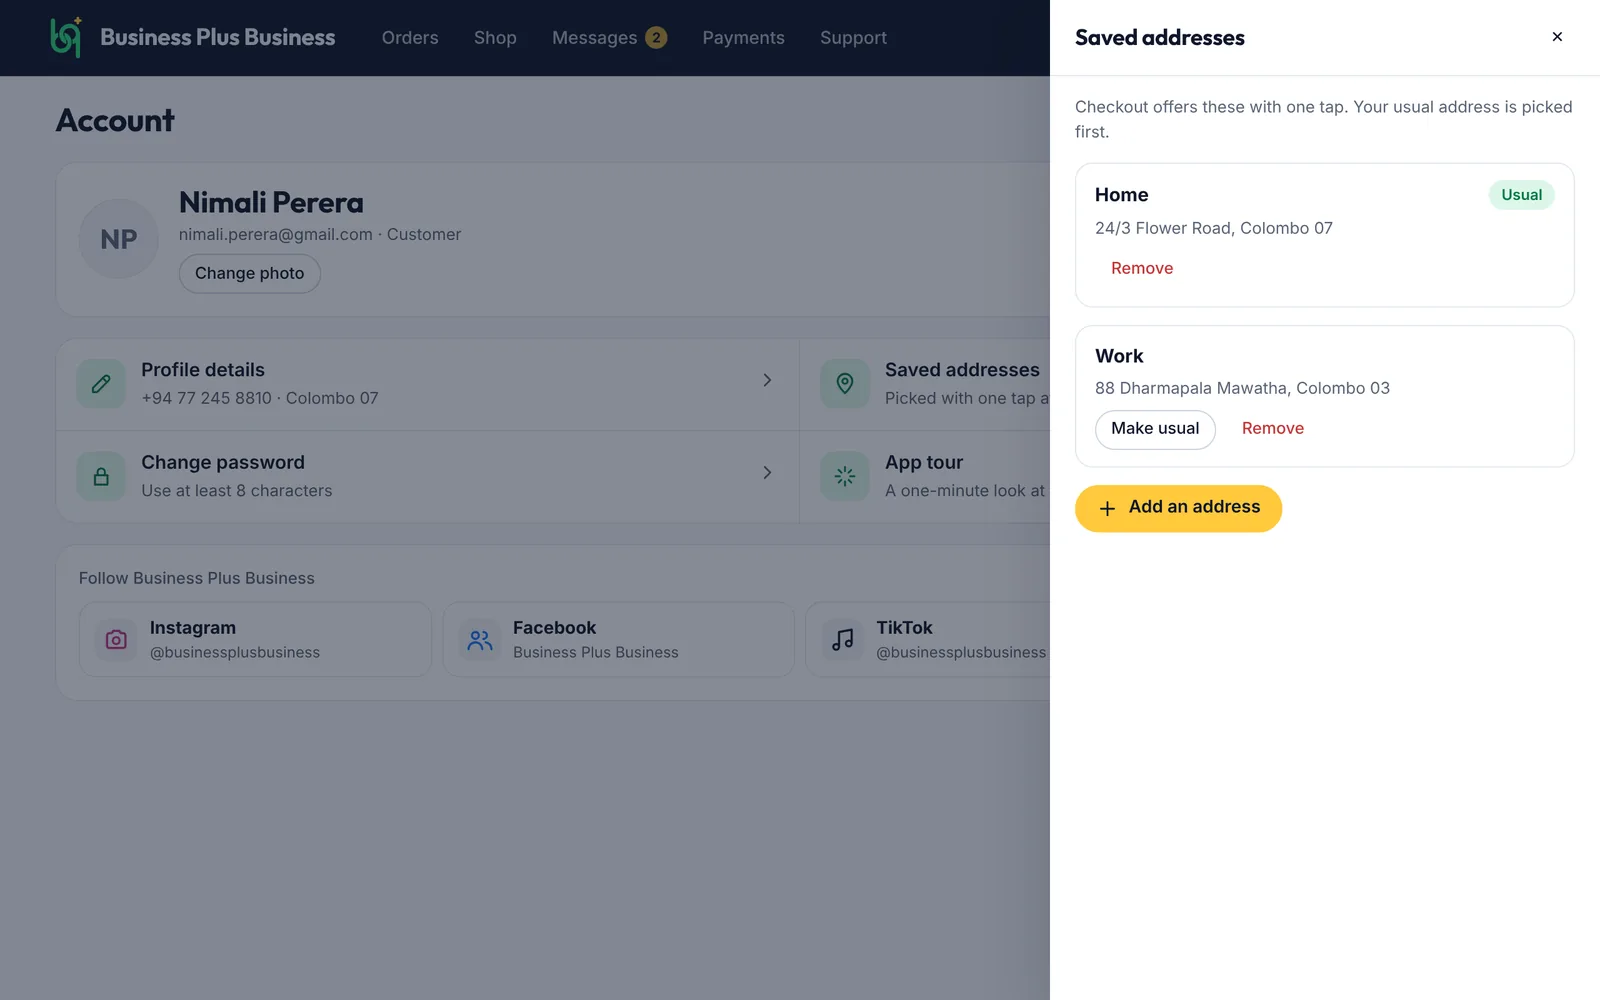
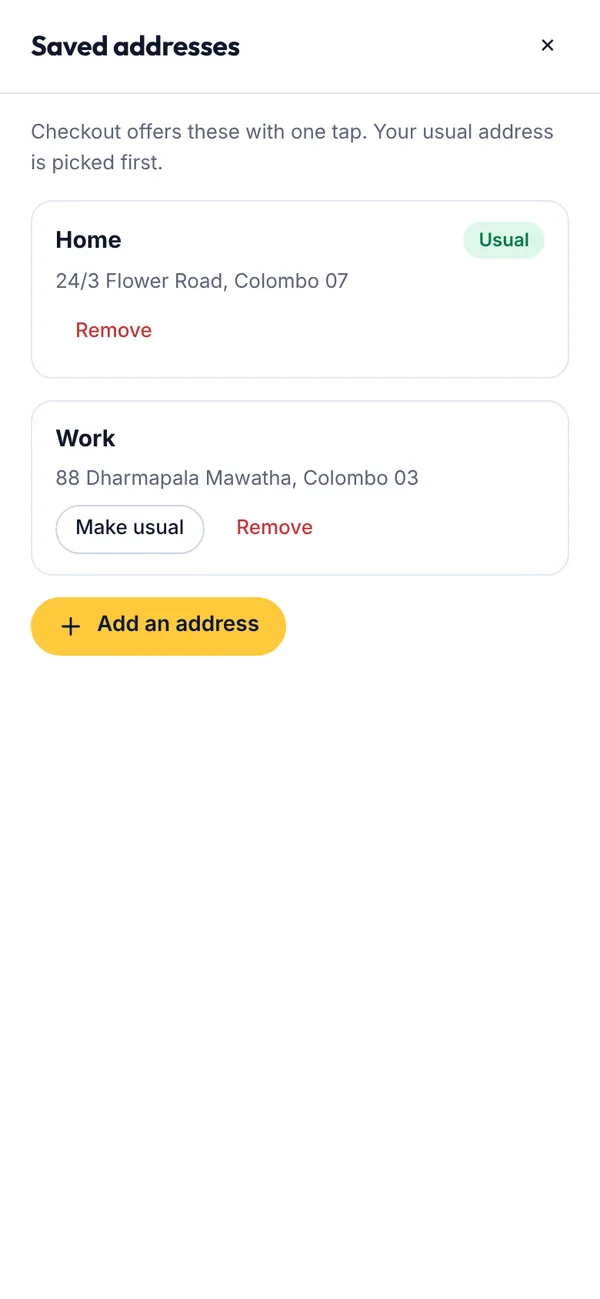
  2. Saved addresses: places you order to often.
  3. Change password: type your new password twice.
  4. App tour: see the tour again.
Account on a computer
Account on a phone
Figure 3.17Account
Saved addresses on a computer
Saved addresses on a phone
Figure 3.18Saved addresses
What you’ll see

Under Saved addresses, tap Make usual to choose the address picked first at checkout, or Add an address.

Section 4 · For businesses

4Business owners and sub-owners

Set up your business, add products, handle orders and deliveries, and keep track of every payment.

  1. 4.1How to set up your business
  2. 4.2Your Home page at a glance
  3. 4.3How to add a product
  4. 4.4How to upload products from Excel
  5. 4.5How to share your QR code
  6. 4.6How to work through your orders
  7. 4.7How to schedule a delivery
  8. 4.8How to suggest a new time or decline an order
  9. 4.9How to enter an order yourself
  10. 4.10How to complete a delivery and collect payment
  11. 4.11How to add delivery people and handle requests
  12. 4.12How to settle payments
  13. 4.13How to read your Insights
  14. 4.14How to change your business settings and card payments
  15. 4.15How to add sub-owners
  16. 4.16How to run a service business (salons, repairs and more)
  17. 4.17How to run several businesses
  18. 4.18How to use categories, specials and options
  19. 4.19How to see your drivers' calendar

4.1How to set up your business

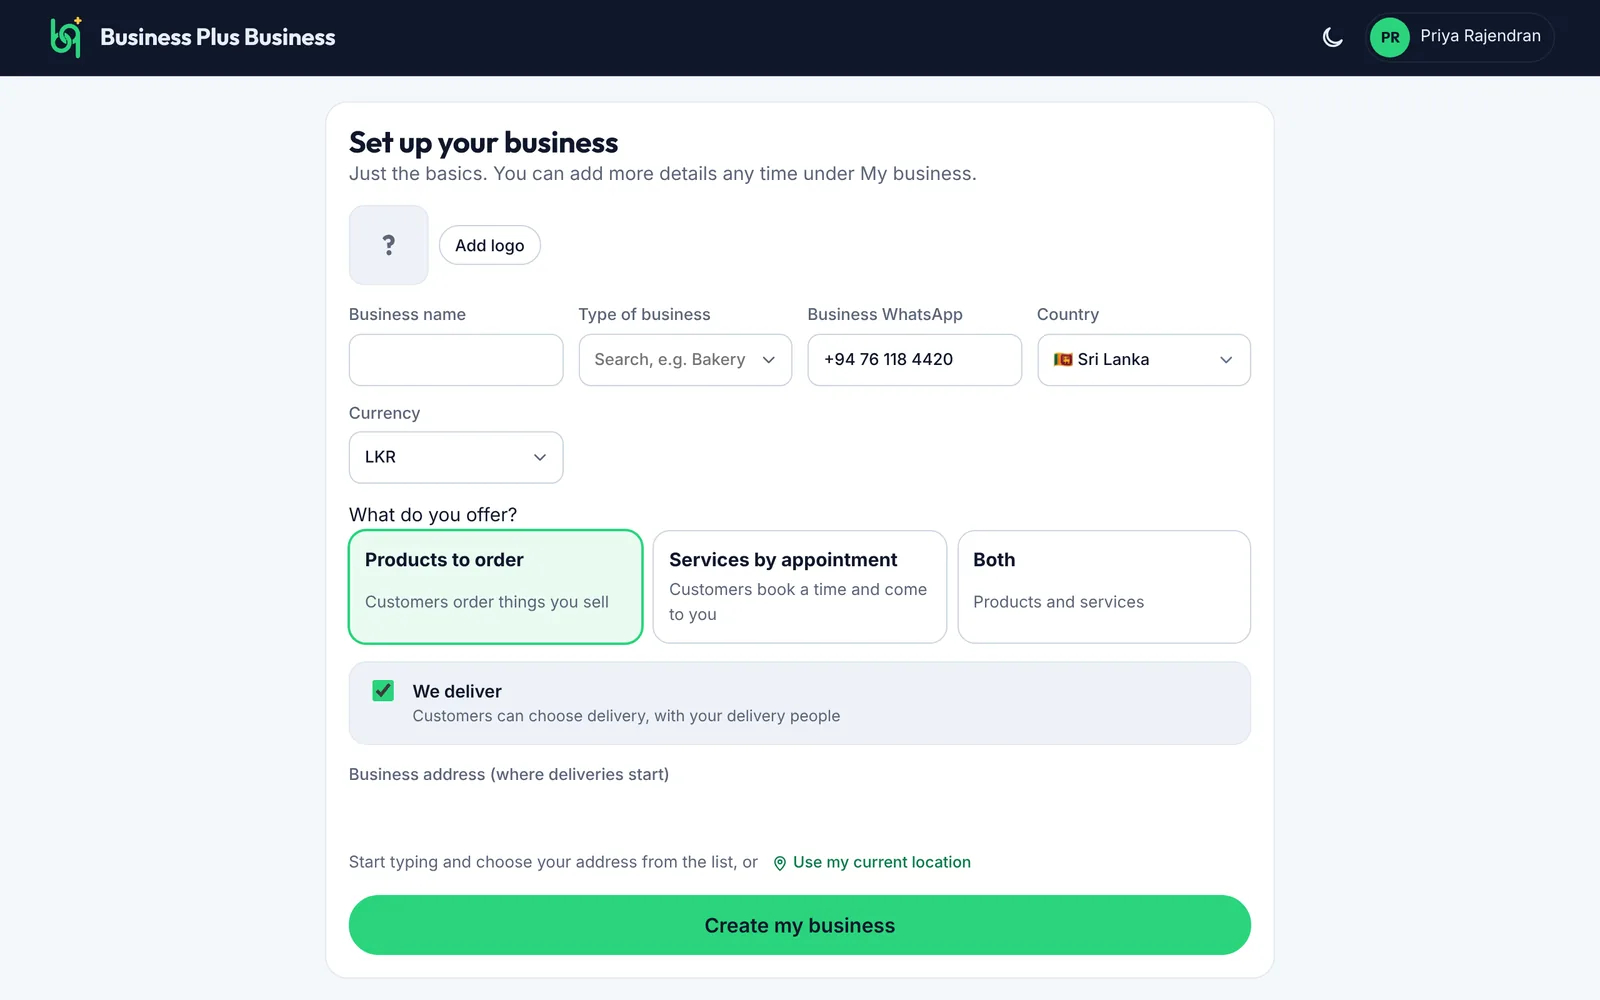
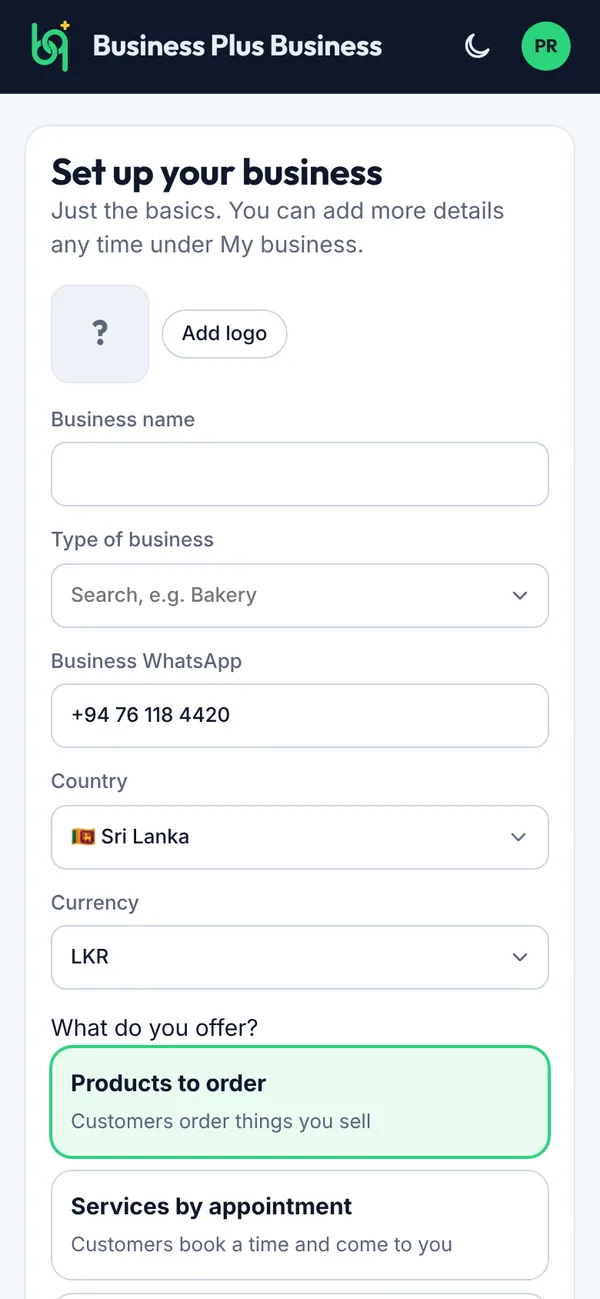
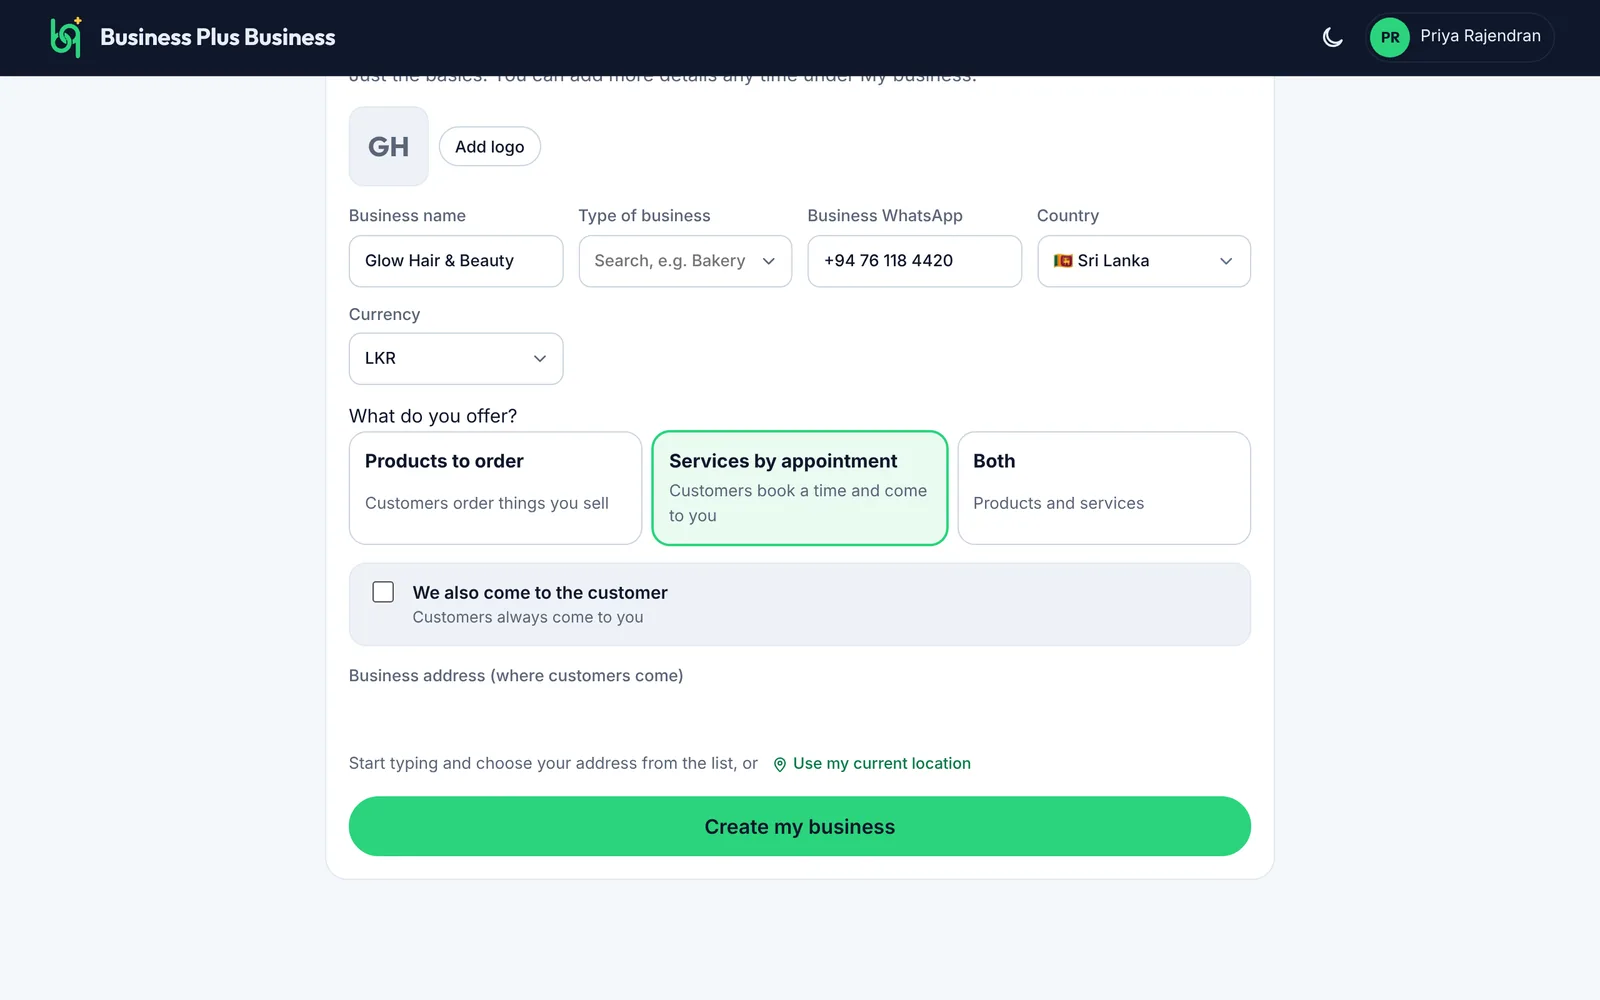
After you sign up as a business owner, the app asks for your business basics. You can add more later.

Steps

  1. Tap Add logo to upload your logo.
  2. Enter your business name and choose its type, such as Bakery, Restaurant or Hair salon.
  3. Enter the WhatsApp number customers should use. Check the country and currency.
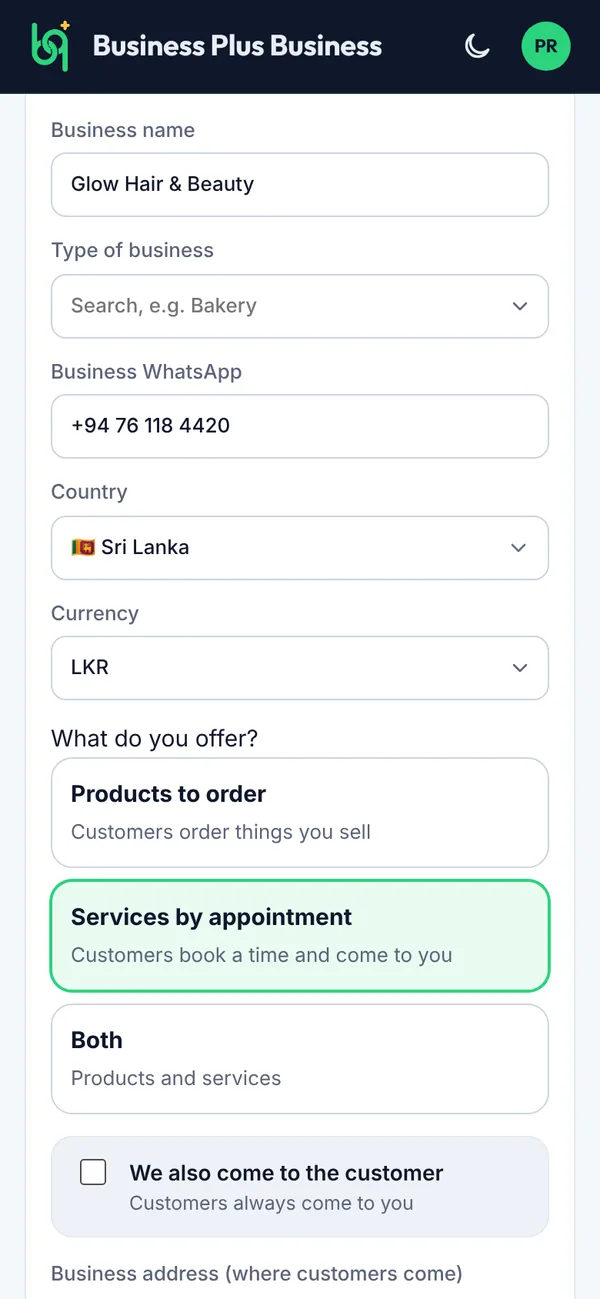
  4. Under What do you offer? choose products, services by appointment, or both. Tick We deliver if you deliver to customers.
  5. Enter your address and tap Create my business.
Set up your business on a computer
Set up your business on a phone
Figure 4.1Set up your business
What you’ll see

Your Home page opens with a Getting started list: add products, share your QR code, add delivery people and get your first order. Suggested categories for your type of business are added for you, such as Specials, Mains and Drinks for a restaurant.

4.2Your Home page at a glance

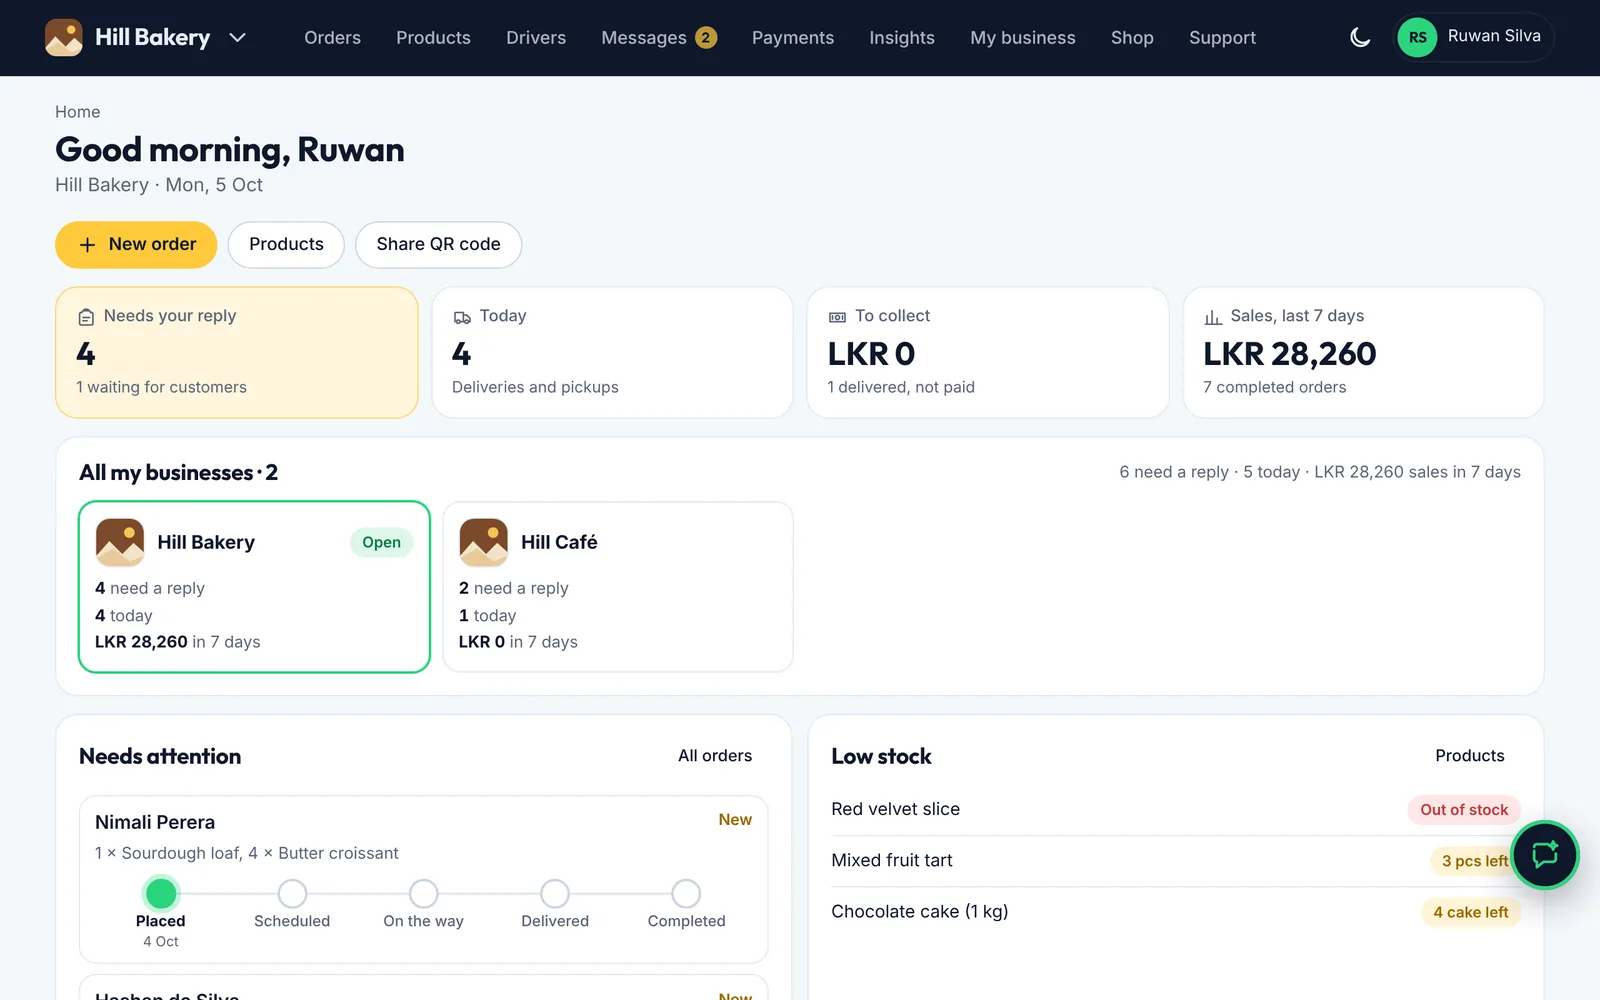
Home shows what needs your attention today.

Steps

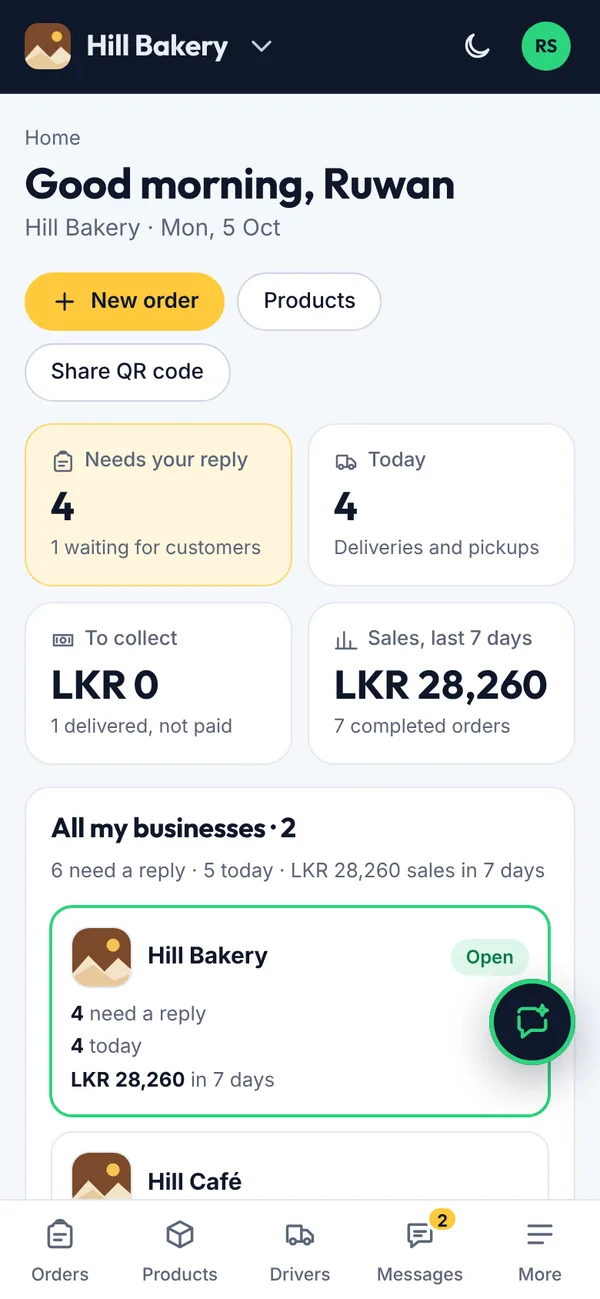
  1. New order, Products and Share QR code are at the top.
  2. The tiles show orders that need a reply, today's deliveries, money to collect and sales for the last 7 days.
  3. Needs attention lists new and late orders.
  4. Low stock warns you before something sells out.
Business Home page on a computer
Business Home page on a phone
Figure 4.2Business Home page

4.3How to add a product

Add products one at a time with a photo, price, stock and optional offer.

Before you start
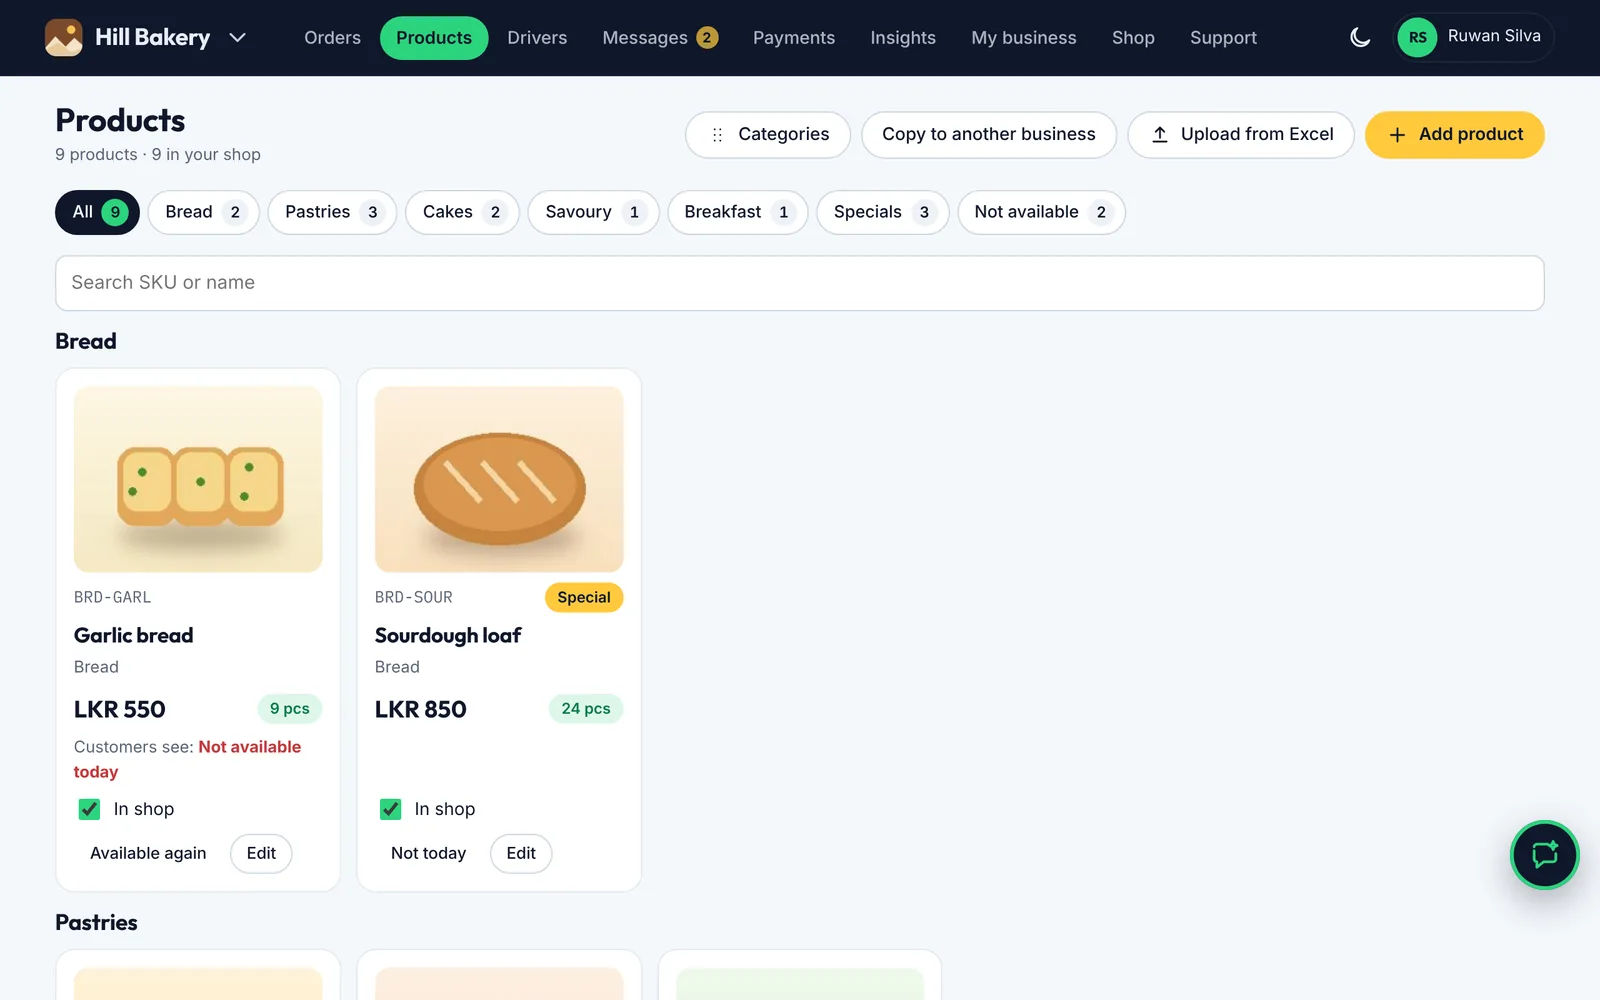
  • Open Products and tap Add product.

Steps

Products on a computer
Products on a phone
Figure 4.3Products
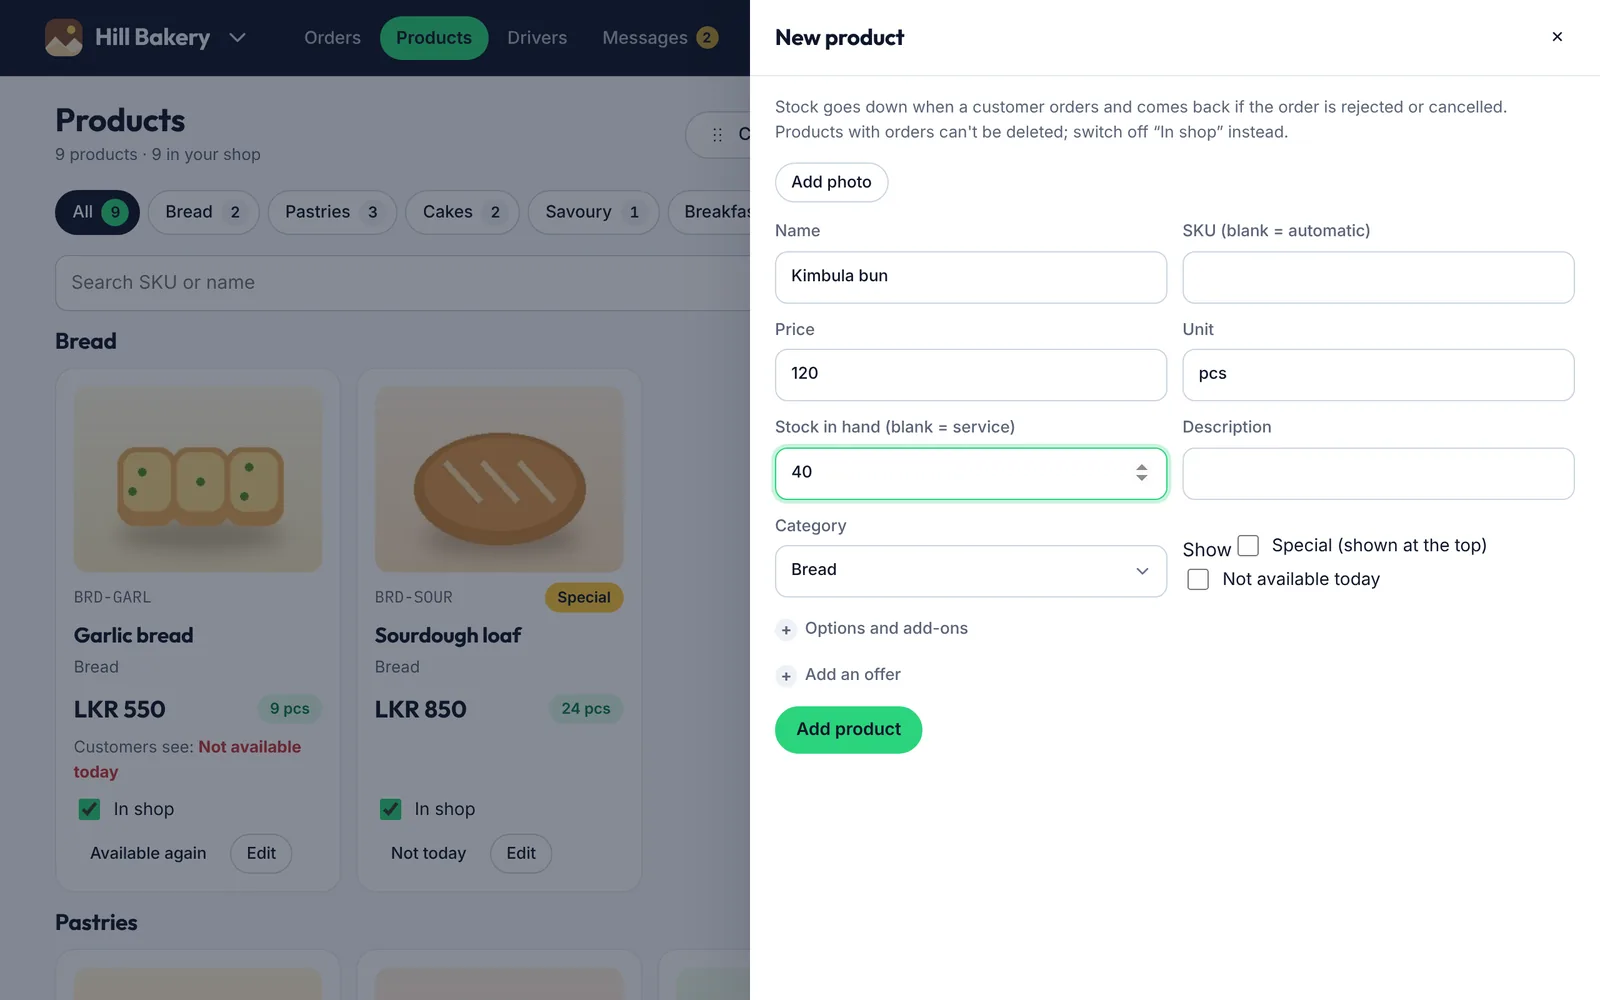
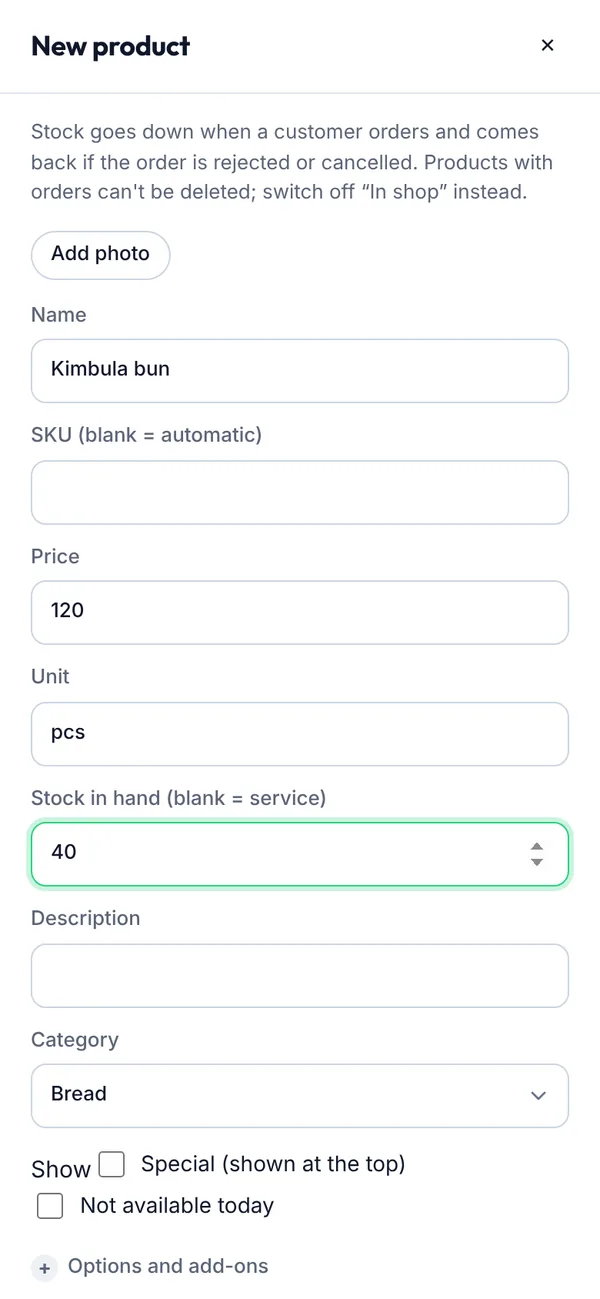
  1. Tap Add photo.
  2. Enter the name. Leave SKU blank and the app makes one.
  3. Enter the price and unit.
  4. Enter the stock you have. Leave it blank for services or items that never run out.
  5. Tap Add an offer for an amount or percentage off, with start and end dates.
  6. Choose its Category, and tick Special to show it at the top of your shop too (see 4.18).
  7. Tap Add product.
Adding a product on a computer
Adding a product on a phone
Figure 4.4Adding a product
What you’ll see

The product appears in your shop. Untick In shop to hide it, or tap Edit to change it. Products with orders can't be deleted; hide them instead. Each card shows what customers see, such as Only 3 left or Not available.

4.4How to upload products from Excel

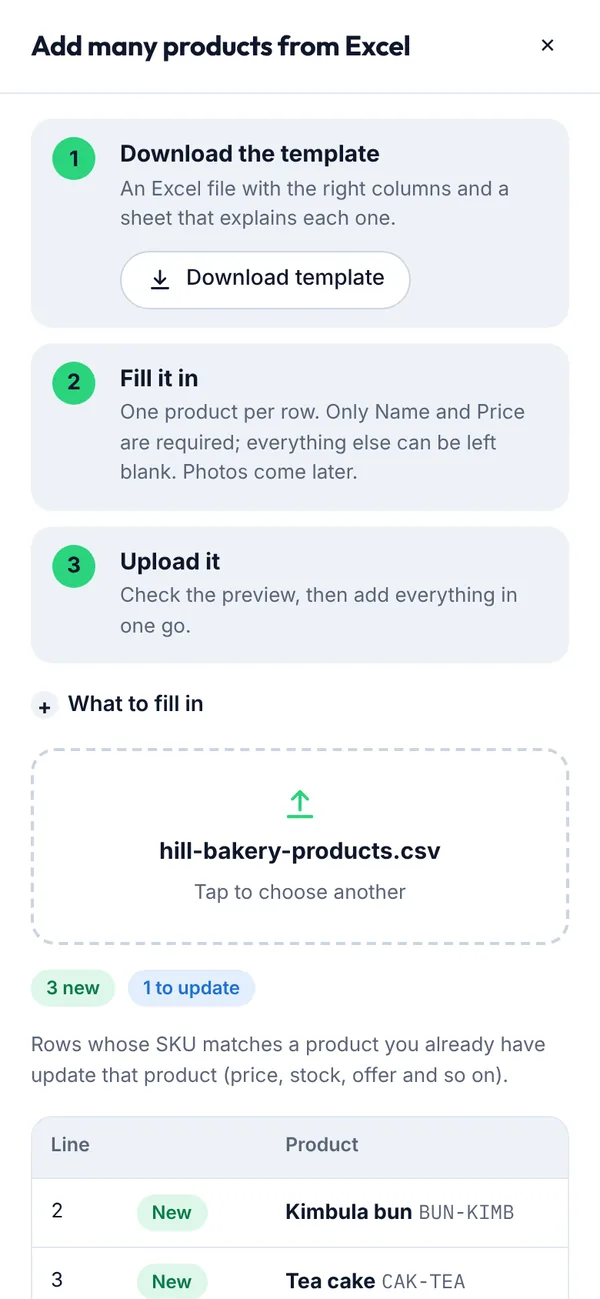
Add many products at once with our Excel template.

Before you start
  • Open Products and tap Upload from Excel.

Steps

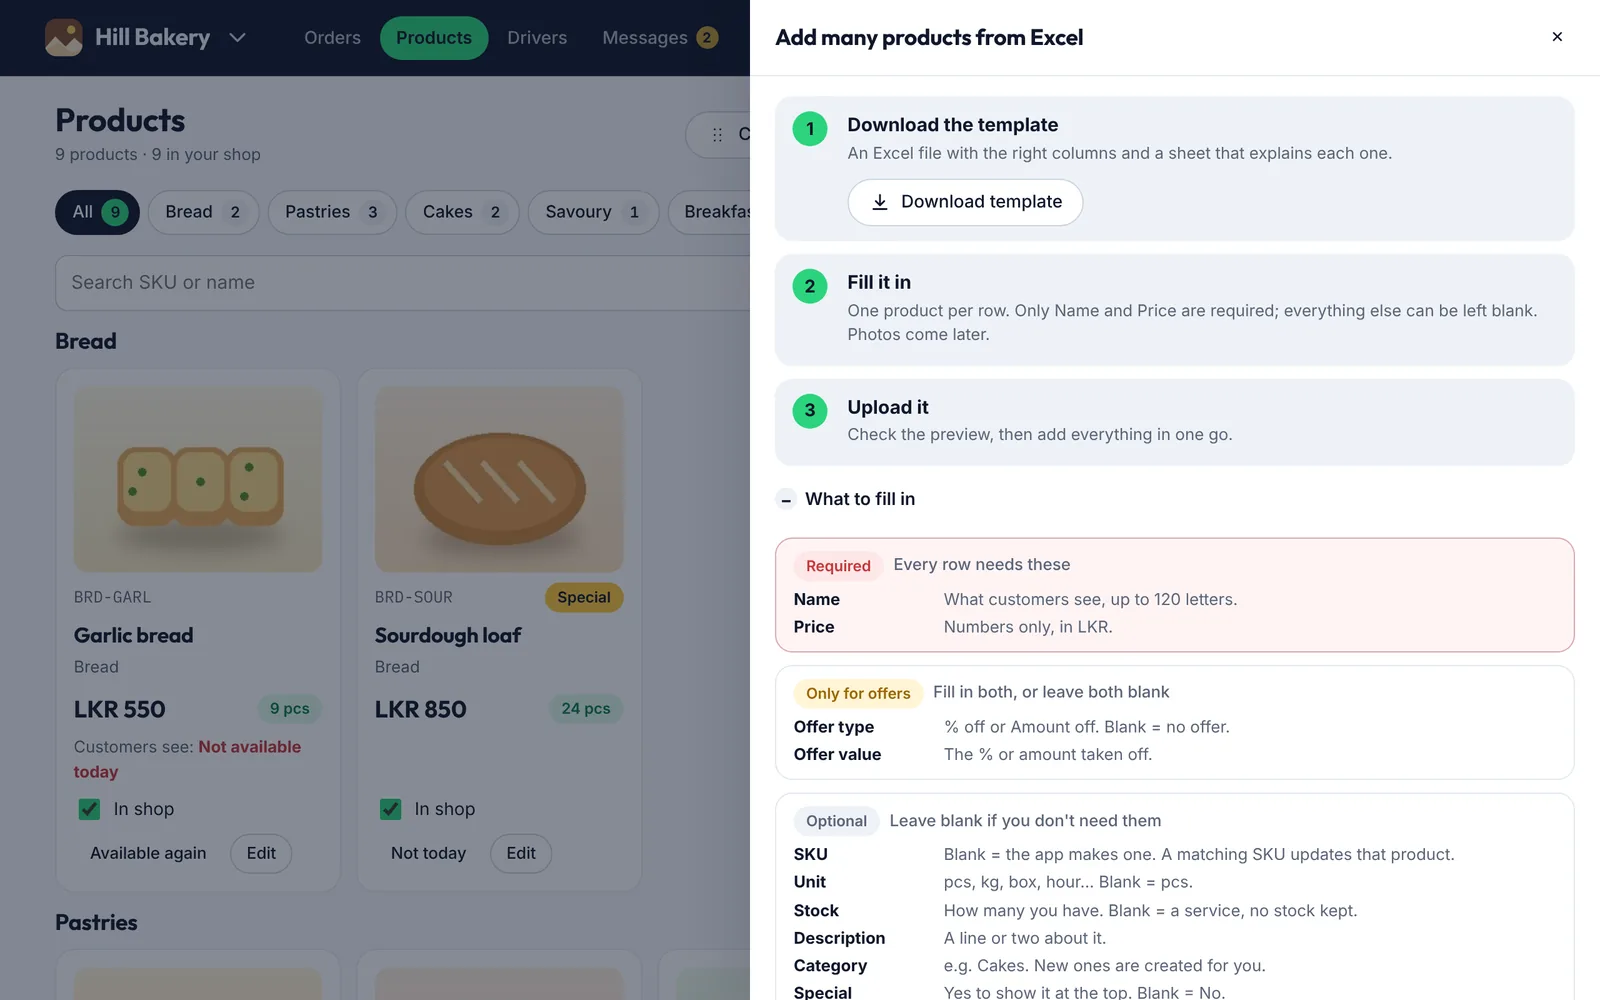
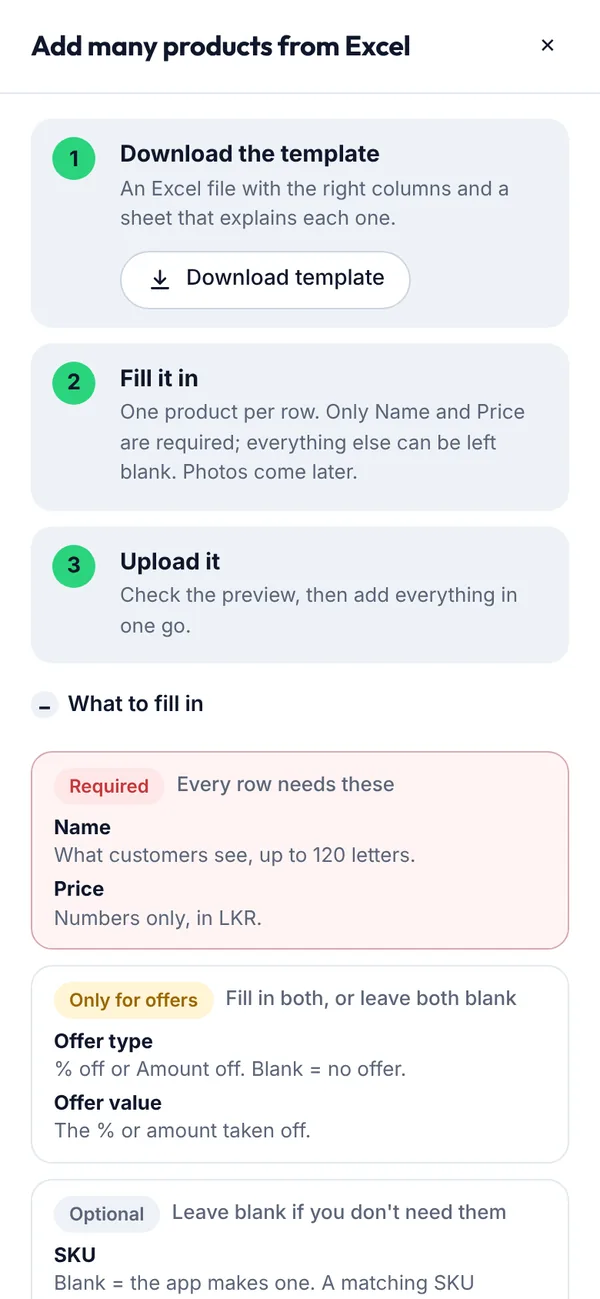
  1. Tap Download template. It has a sheet for your products and one that explains each column.
  2. Check What to fill in. Only Name and Price are required. Offer type and Offer value go together: fill in both for an offer, or leave both blank. Everything else is optional.
  3. Fill in one product per row. In the template, each heading is tagged (required), (for offers) or (optional), and hovering over a heading shows what to write.
What to fill in: required, offer and optional columns on a computer
What to fill in: required, offer and optional columns on a phone
Figure 4.5What to fill in: required, offer and optional columns
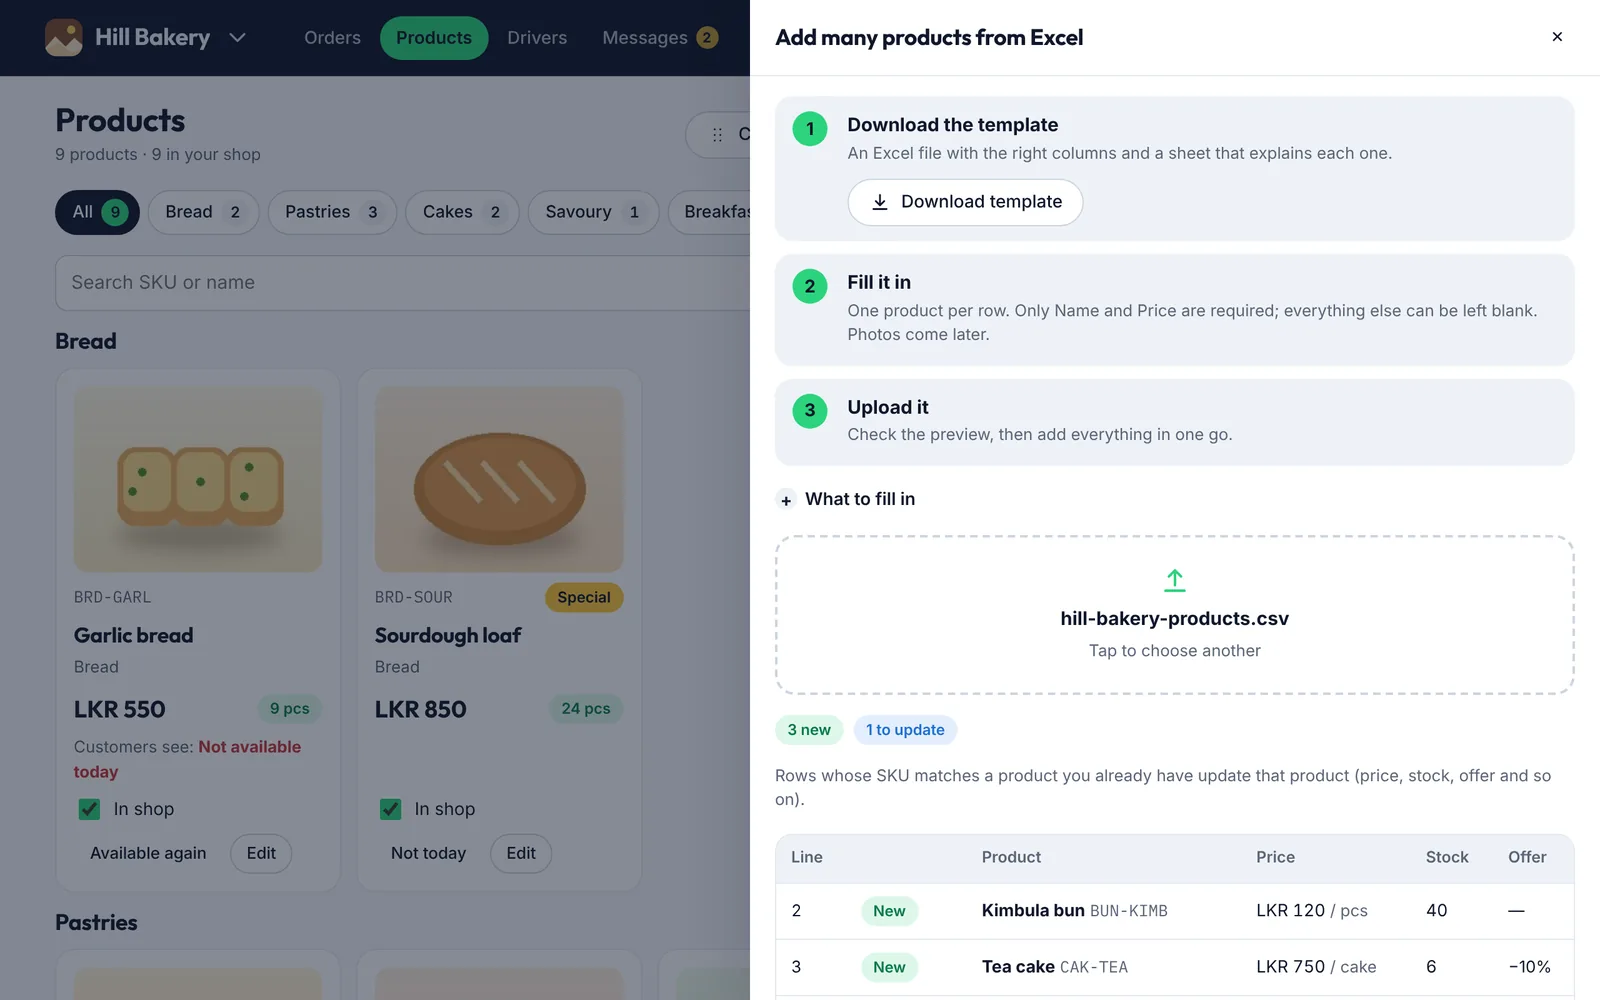
  1. Choose your filled-in file.
  2. Check the preview: new products, updates to products with the same SKU, and any rows with problems.
Checking the preview before adding products on a computer
Checking the preview before adding products on a phone
Figure 4.6Checking the preview before adding products
What you’ll see

Your products are added in one go. Use the Category column to put each product in a category (new ones are created for you) and type Yes under Special for specials. Photos, sizes and extras can be added later from each product.

4.5How to share your QR code

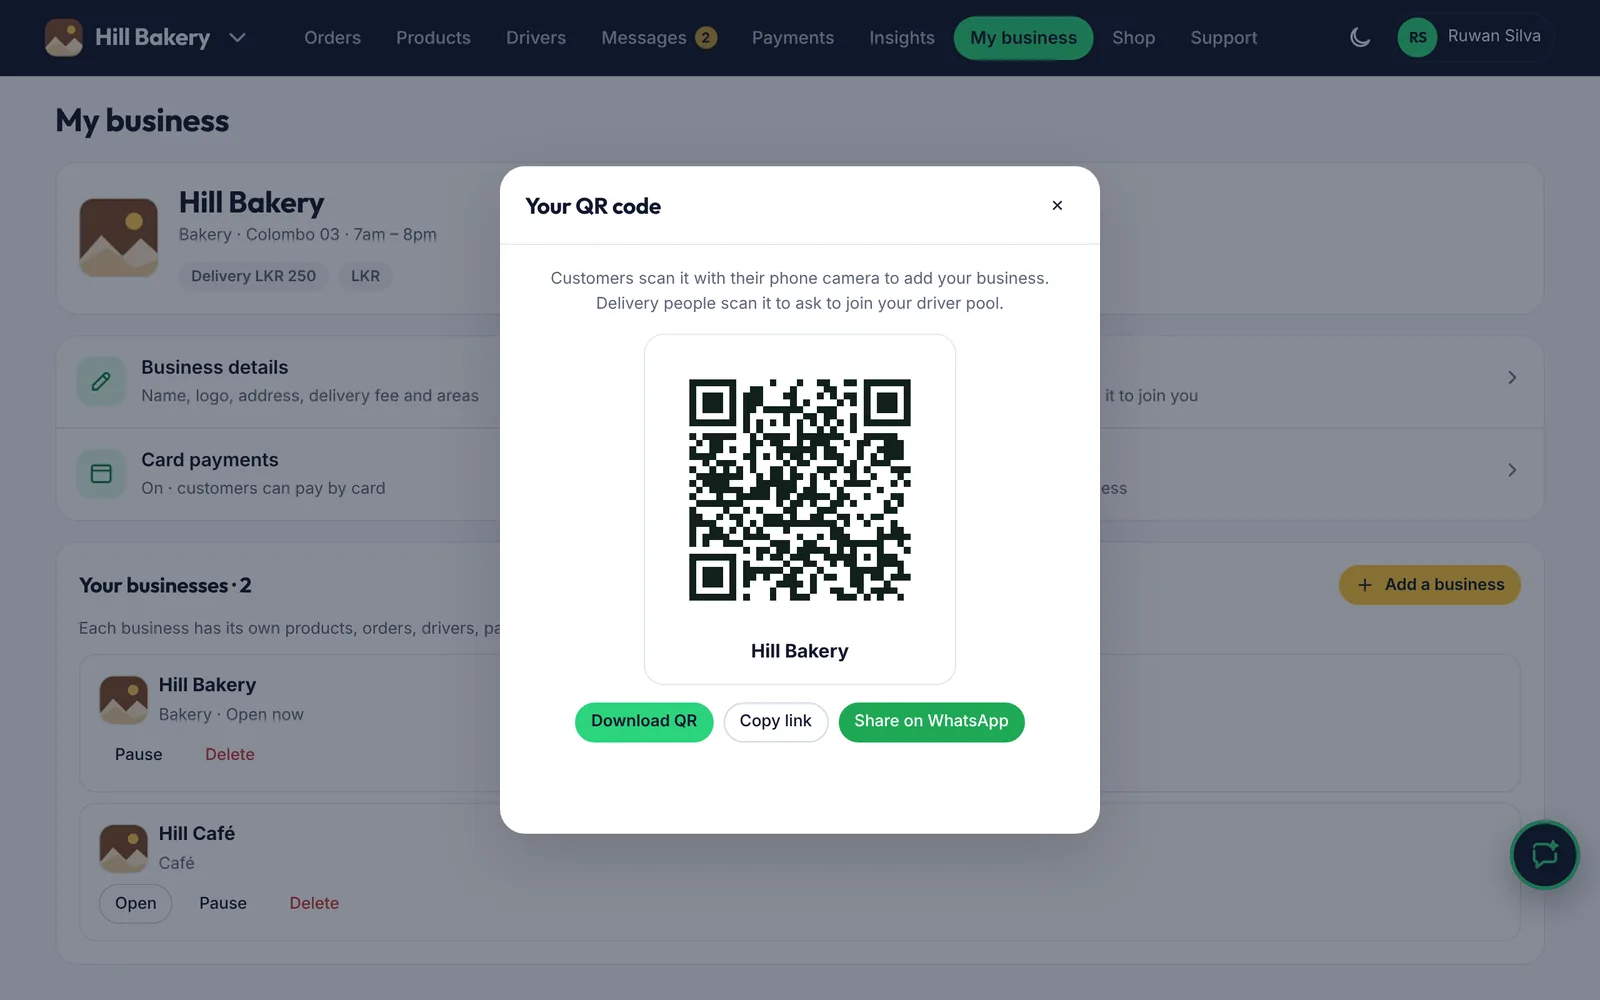
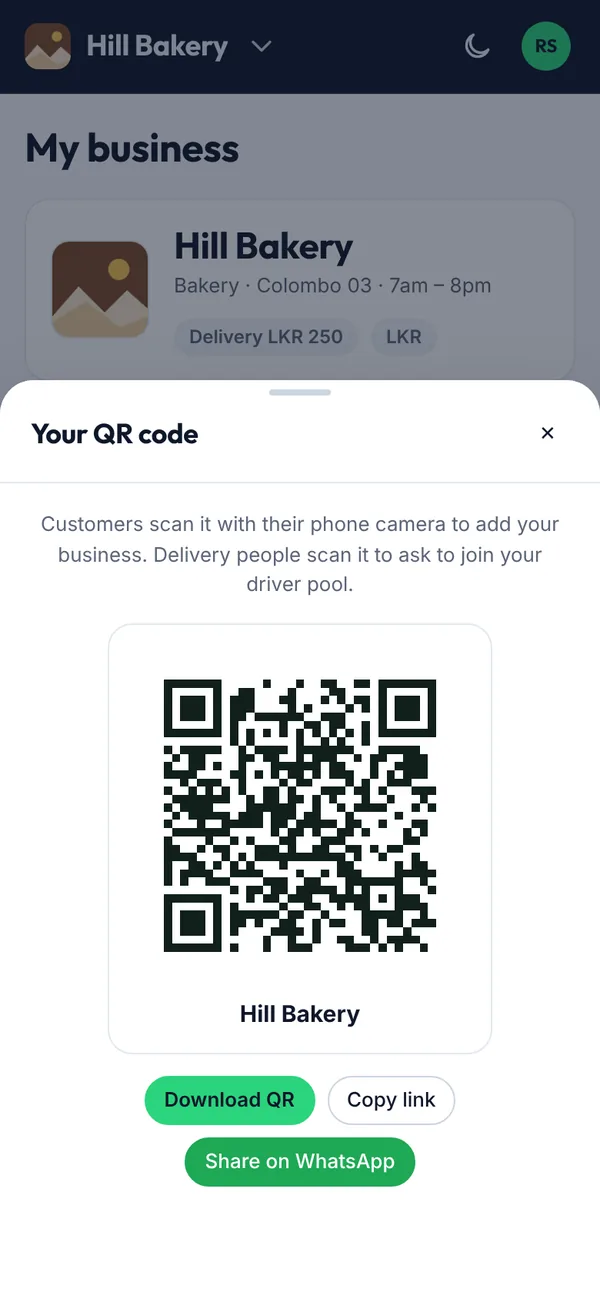
Your QR code lets customers add your business and lets delivery people ask to join you.

Before you start
  • Open My business → QR code.

Steps

  1. Tap Download QR to print it.
  2. Tap Share on WhatsApp to send your link.
Your QR code on a computer
Your QR code on a phone
Figure 4.7Your QR code
What you’ll see

Anyone who scans the code opens your business in the app.

4.6How to work through your orders

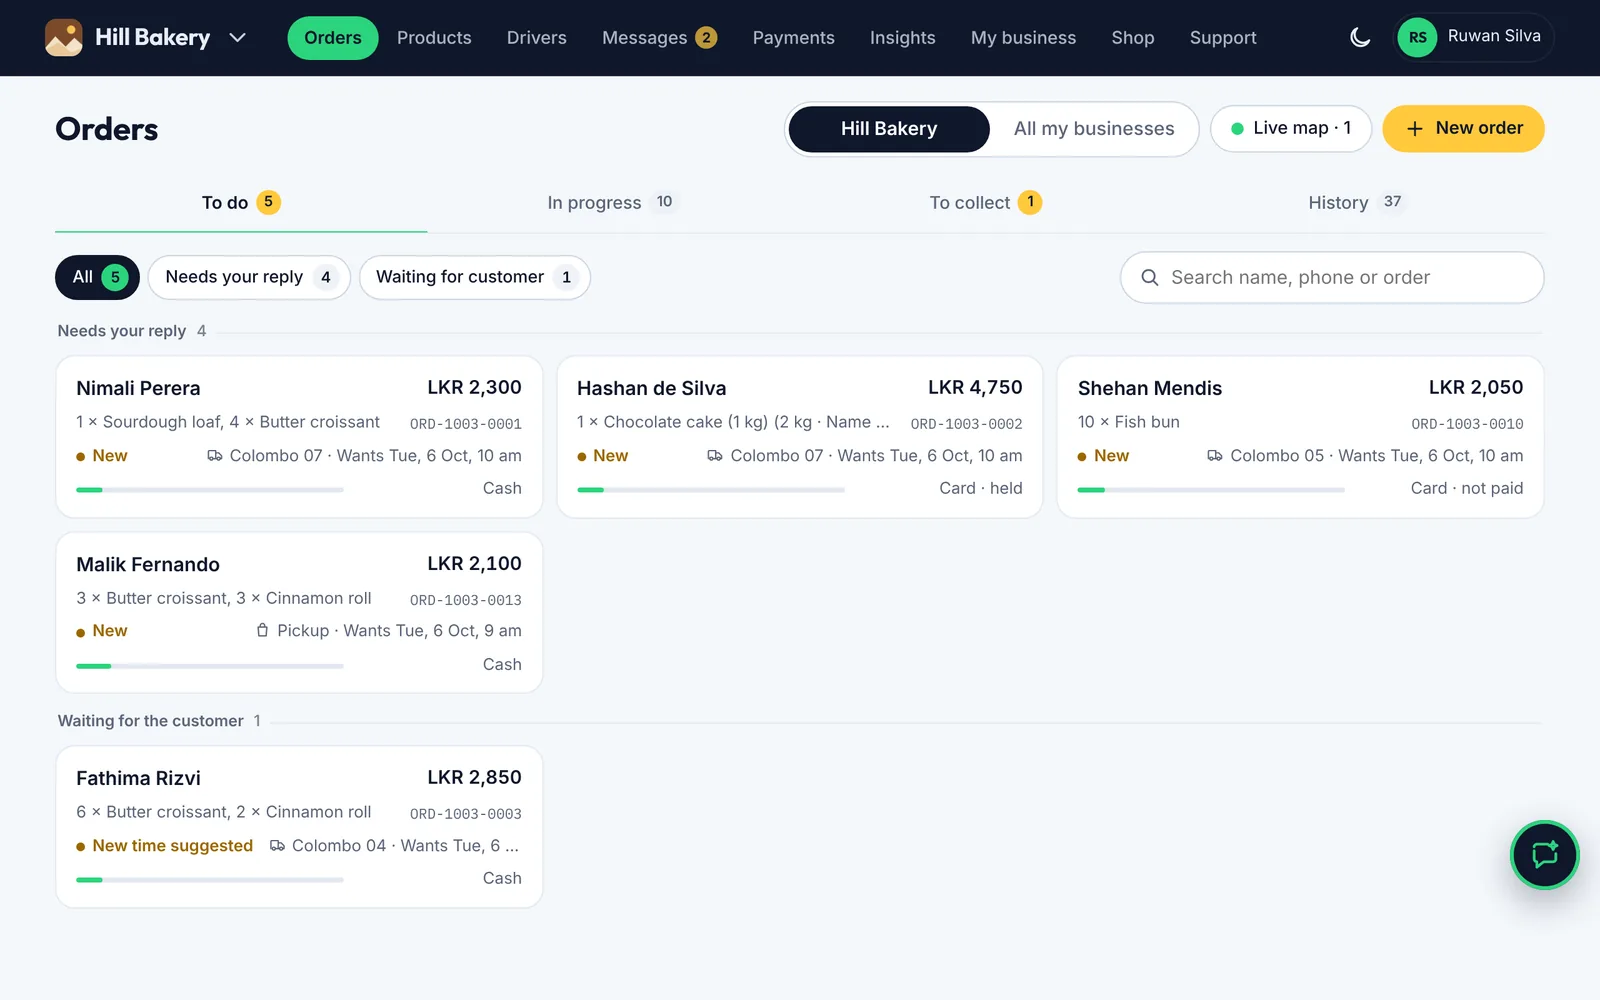
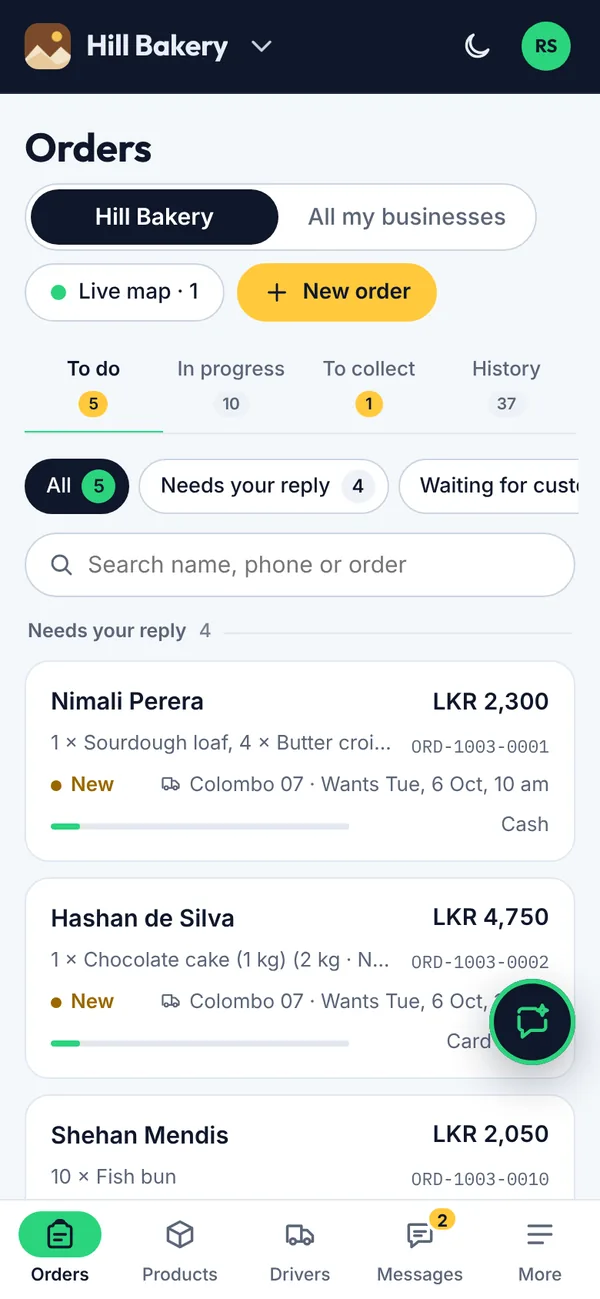
Orders are sorted by what you need to do next.

Steps

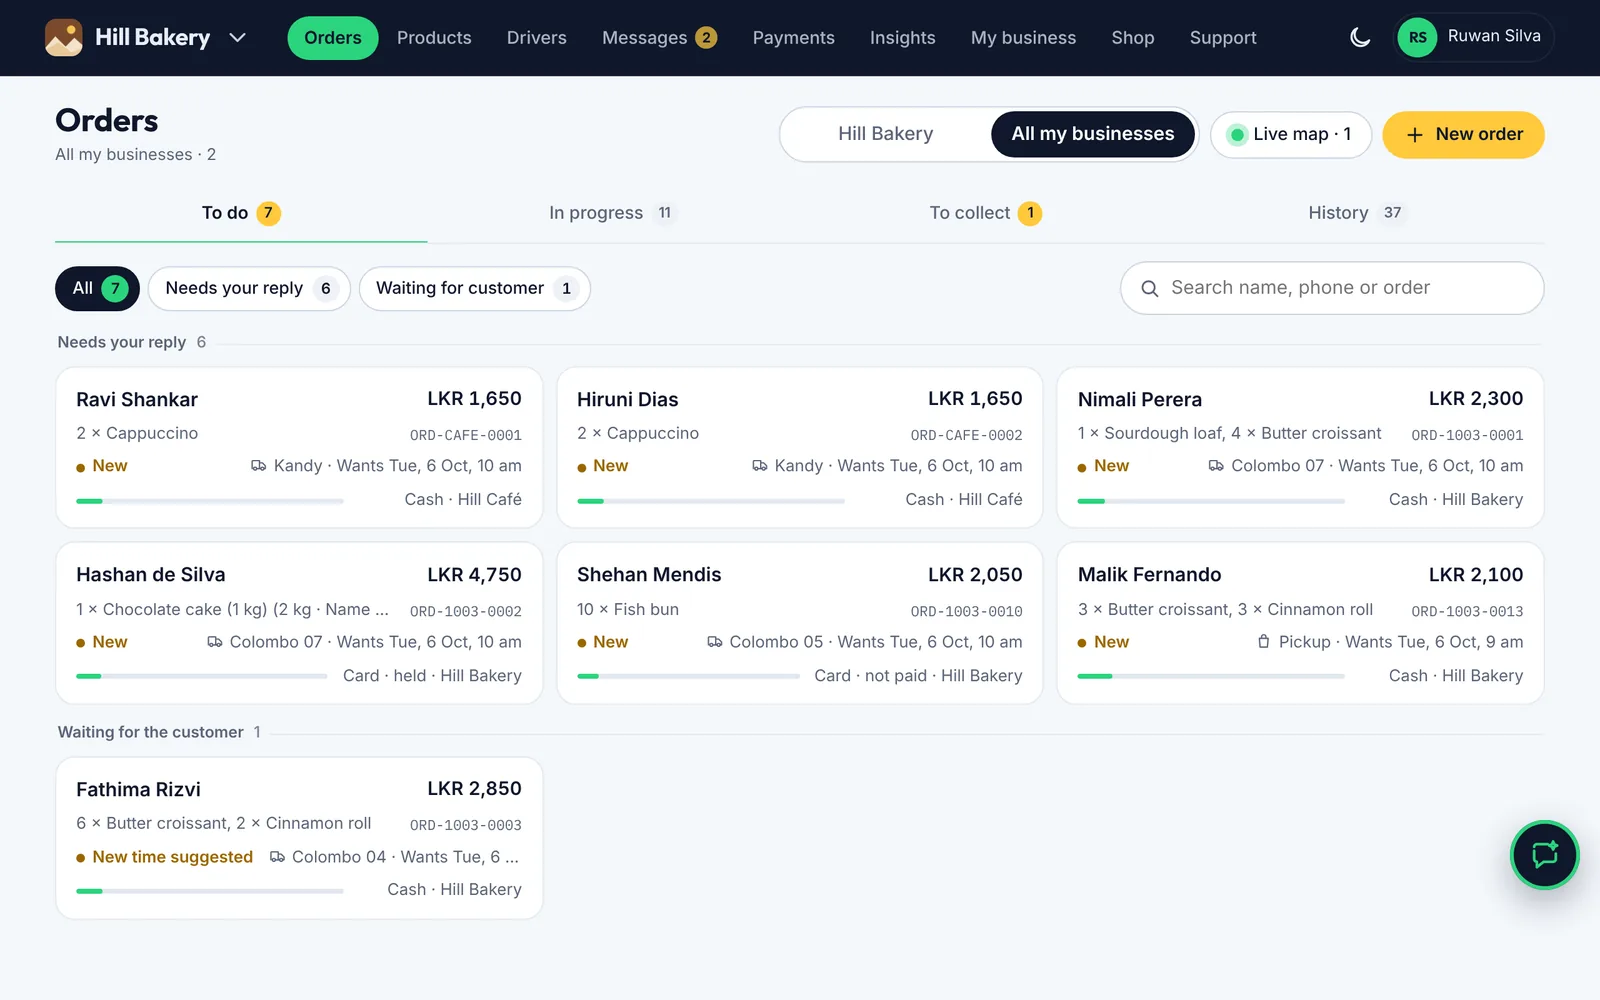
  1. To do: new orders that need a reply, and orders waiting for the customer.
  2. To collect: delivered orders that aren't paid yet. In progress and History hold the rest.
  3. Live map shows your delivery people on the road.
  4. New order lets you enter an order yourself (see 4.9).
  5. Tap an order to open it.
The orders board on a computer
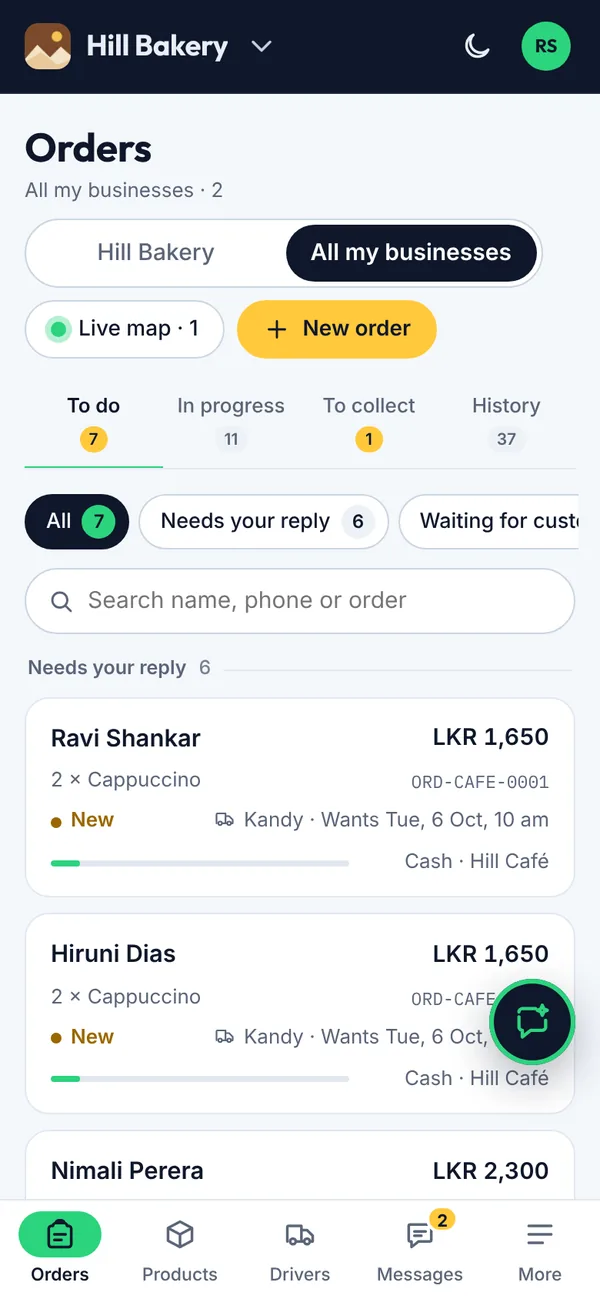
The orders board on a phone
Figure 4.8The orders board

Run more than one business? The board shows the business you have open. Choose All my businesses at the top to see every order together, with the business name on each one. See 4.17.

4.7How to schedule a delivery

Confirm when an order will arrive and who will deliver it. The customer and the delivery person are told straight away.

Before you start
  • Open a new order from To do.

Steps

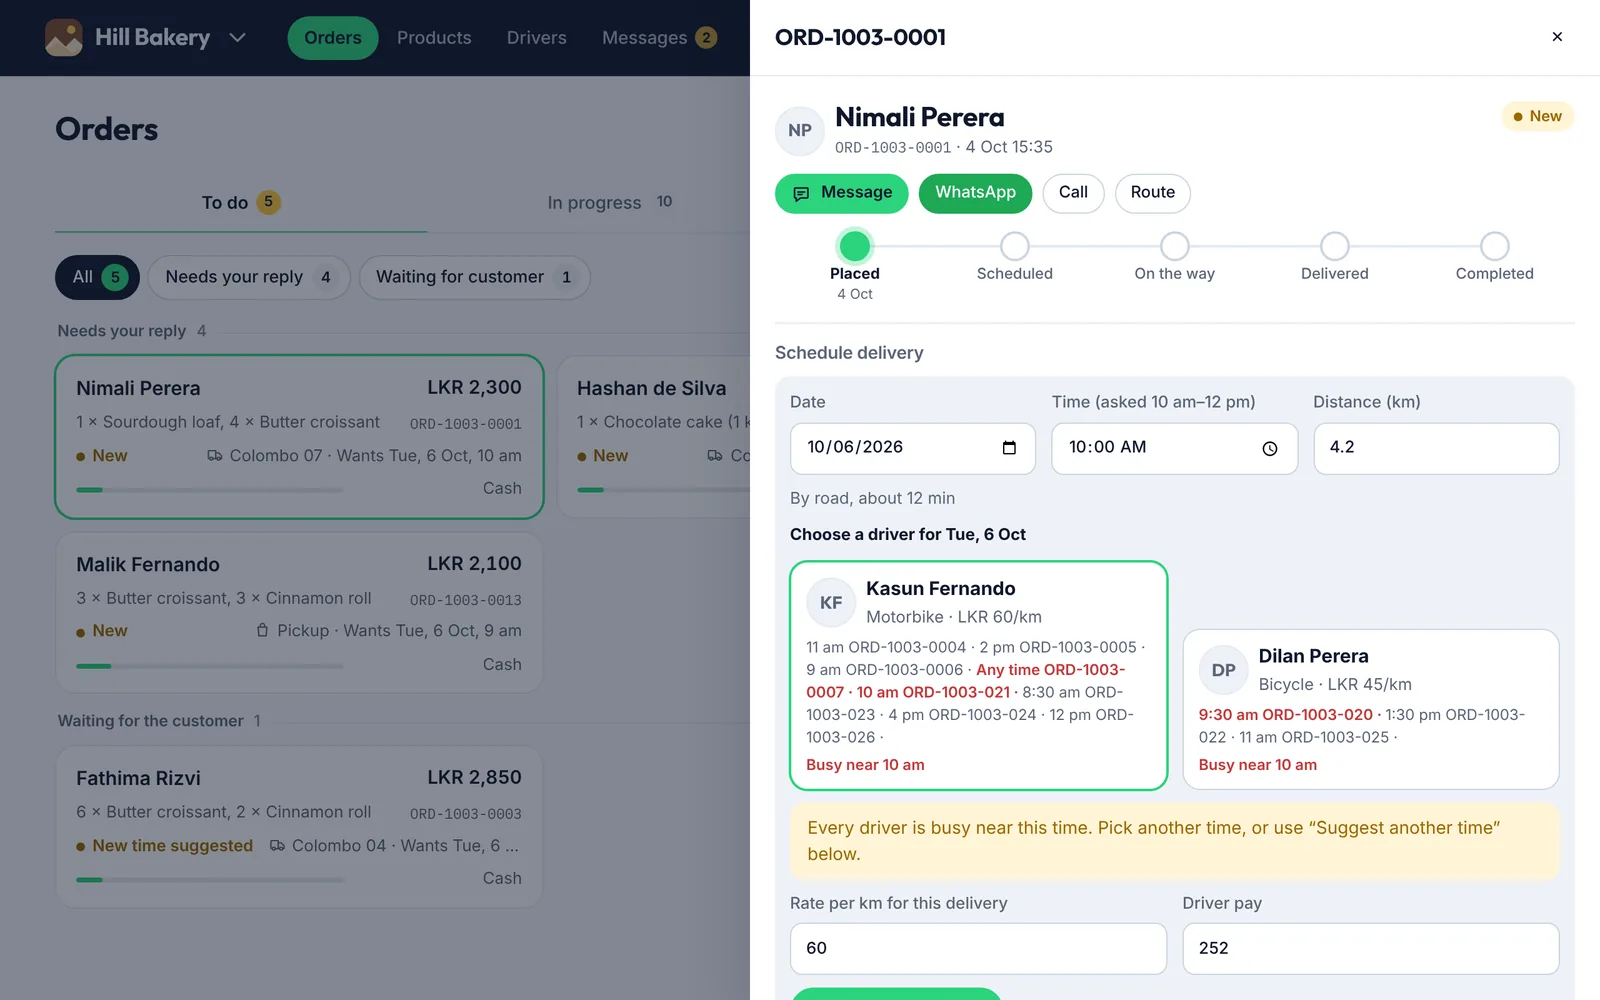
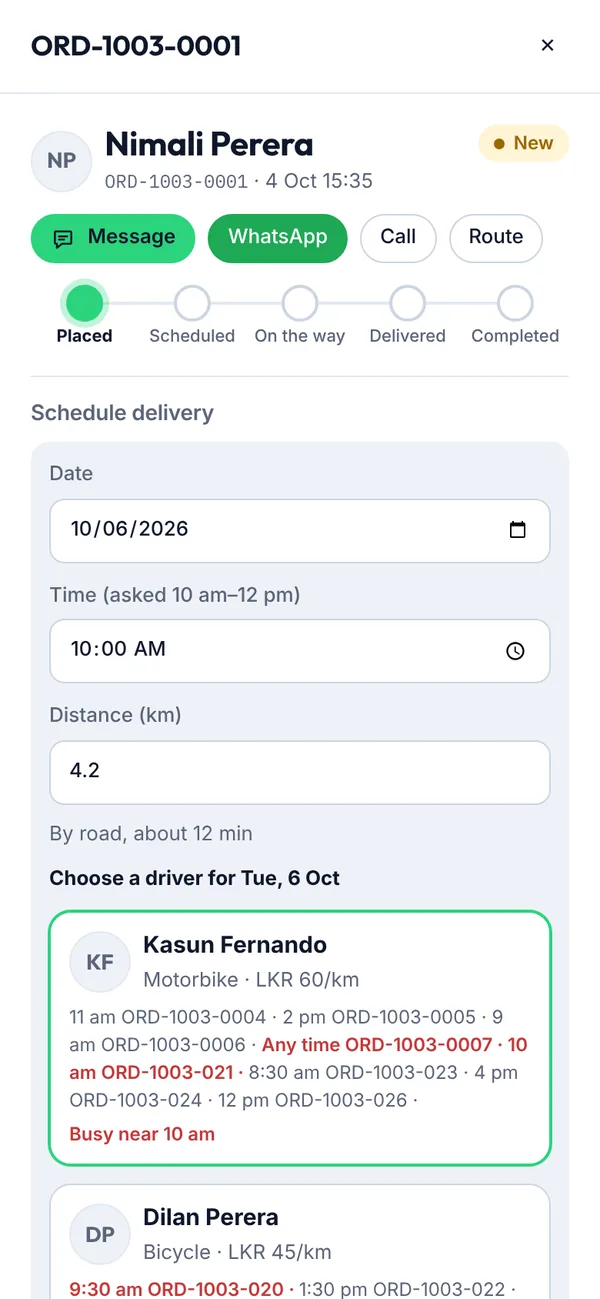
  1. Set the delivery date. The customer's preferred time is shown above.
  2. Set the time. The distance is worked out from the map.
  3. Choose a delivery person. Each card shows their vehicle, rate and other jobs that day.
  4. Check the rate and driver pay, then tap Assign & alert driver.
Scheduling a delivery on a computer
Scheduling a delivery on a phone
Figure 4.9Scheduling a delivery
What you’ll see

The order moves to In progress. For pickups, set the time it will be ready instead. Driver pay is distance × rate, up to your driver pay limit.

4.8How to suggest a new time or decline an order

If you can't meet the customer's time, suggest another. If you can't fill the order, decline it with a reason.

Before you start
  • Open the order and tap Suggest another time.

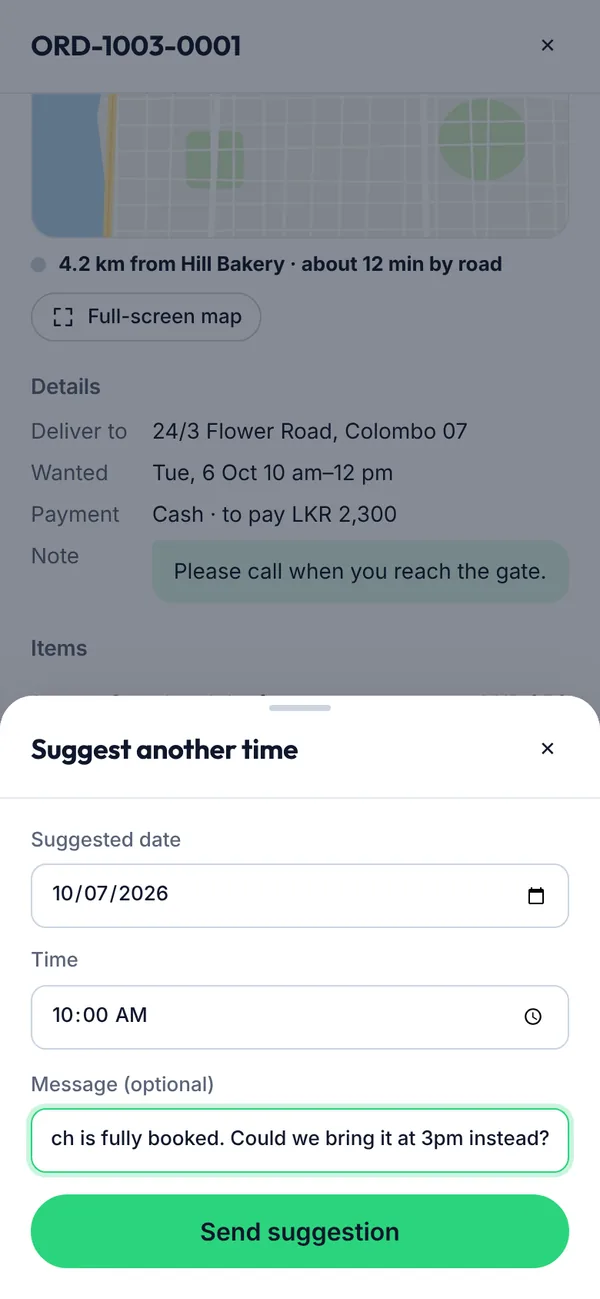
Steps

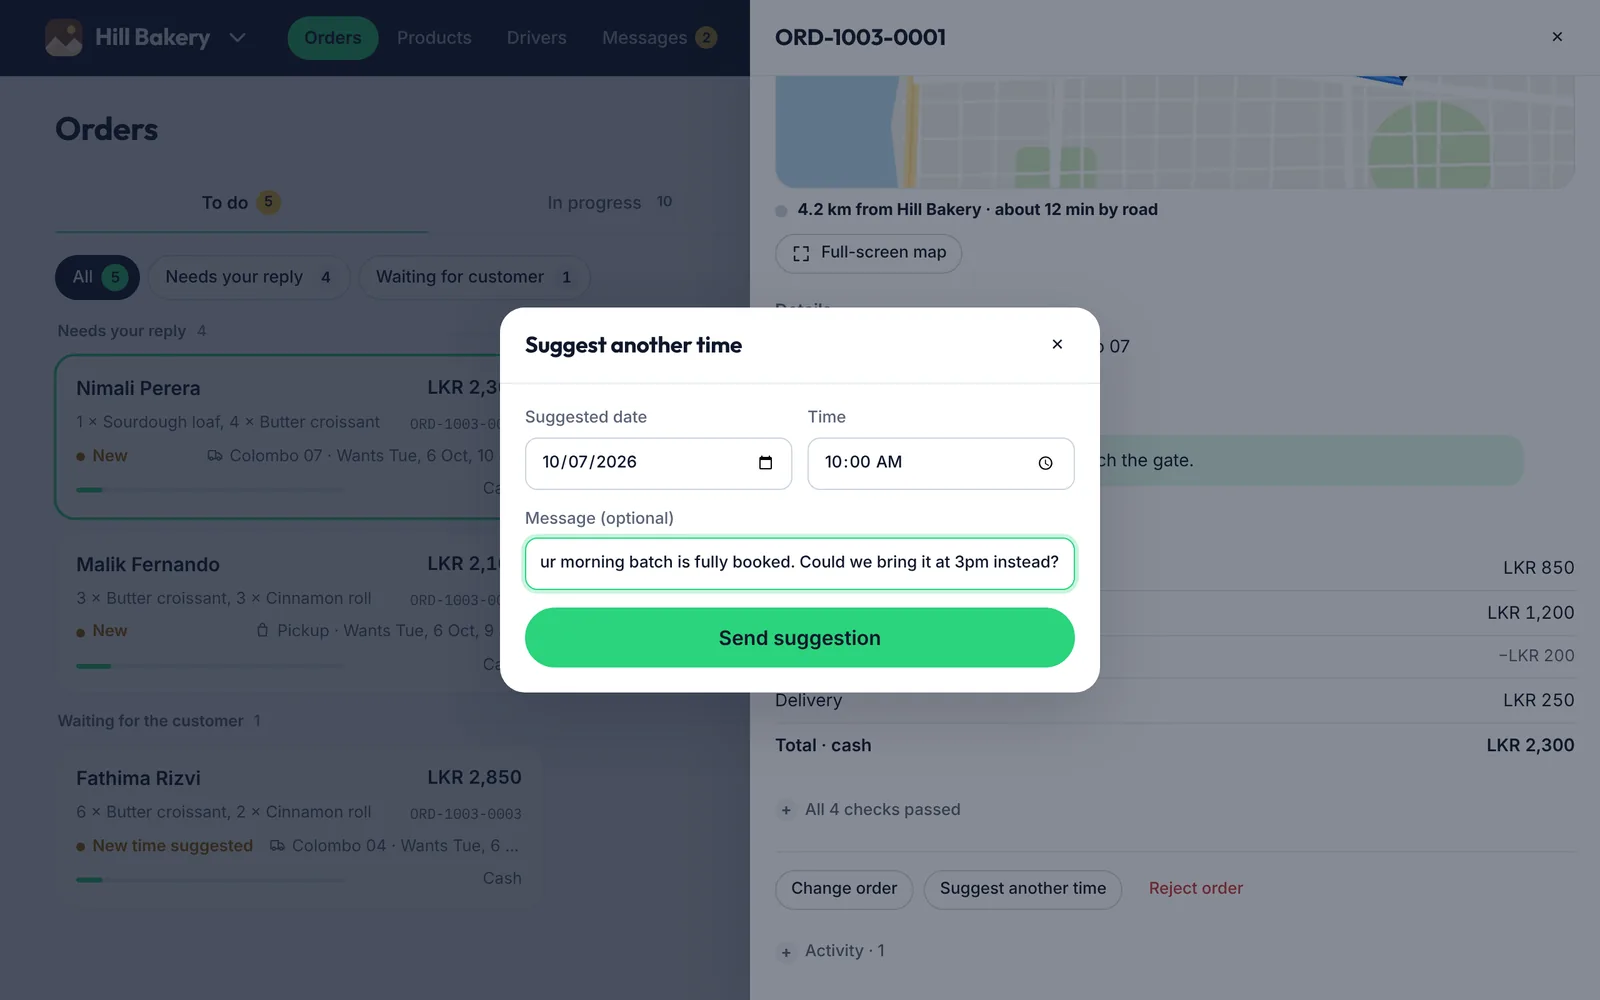
  1. Choose a new date and time.
  2. Add a short message explaining why.
  3. Tap Send suggestion.
Suggesting another time on a computer
Suggesting another time on a phone
Figure 4.10Suggesting another time
What you’ll see

The customer accepts or cancels. To decline instead, tap Reject order and give a reason; the items go back into stock and any card hold is released. To change items first, tap Change order.

4.9How to enter an order yourself

Use this for orders that come by phone, WhatsApp or at the counter.

Before you start
  • Tap New order on Home or Orders.

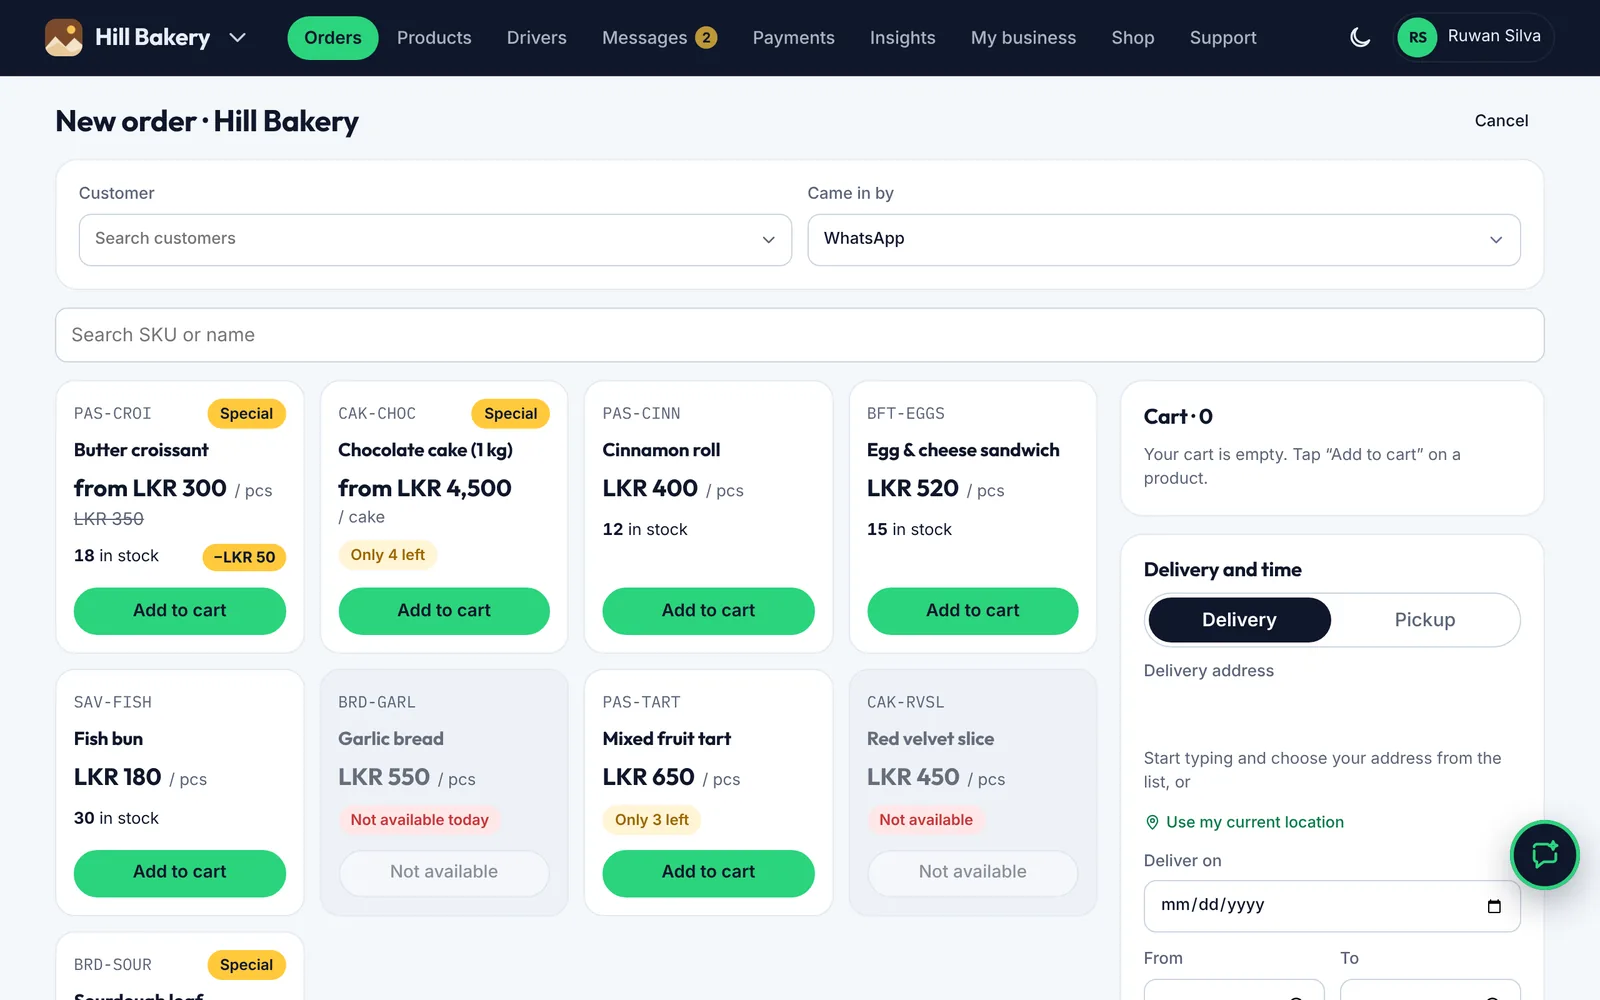
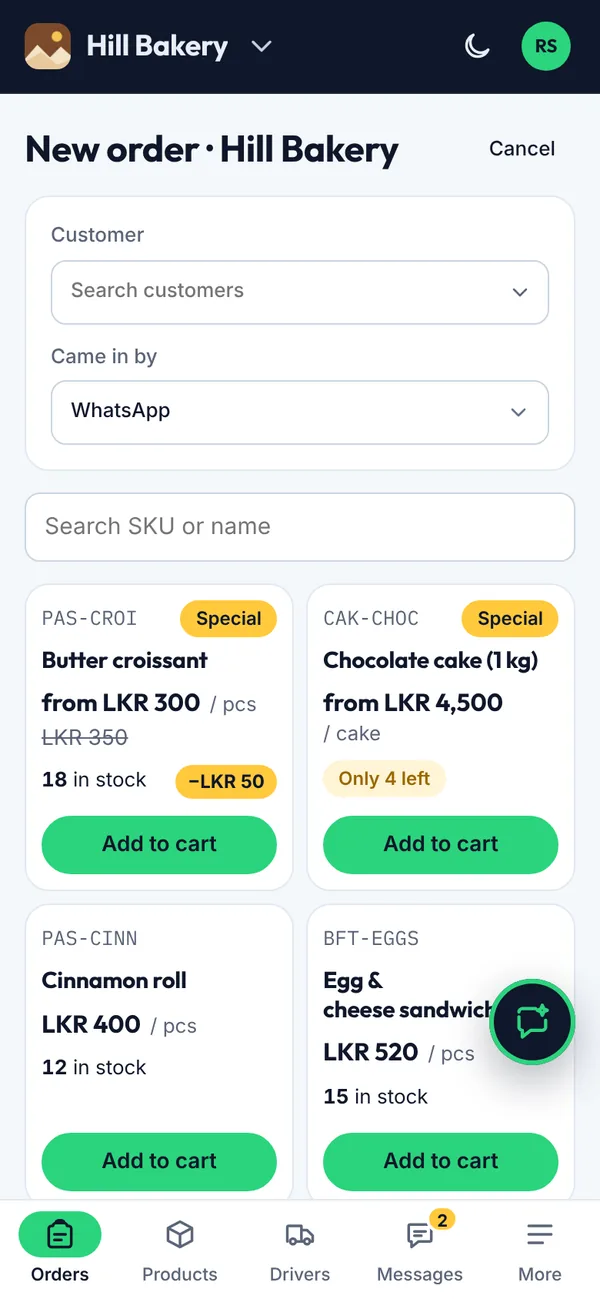
Steps

  1. Search for the customer, or add a new one with their name and phone number.
  2. Choose how the order came in.
  3. Tap Add to cart on each product.
  4. Choose delivery or pickup, then add the address, date, time and any note.
Entering an order yourself on a computer
Entering an order yourself on a phone
Figure 4.11Entering an order yourself
What you’ll see

The order is added to your board, ready to schedule.

4.10How to complete a delivery and collect payment

Delivery people usually update orders themselves. You can also do it from the order.

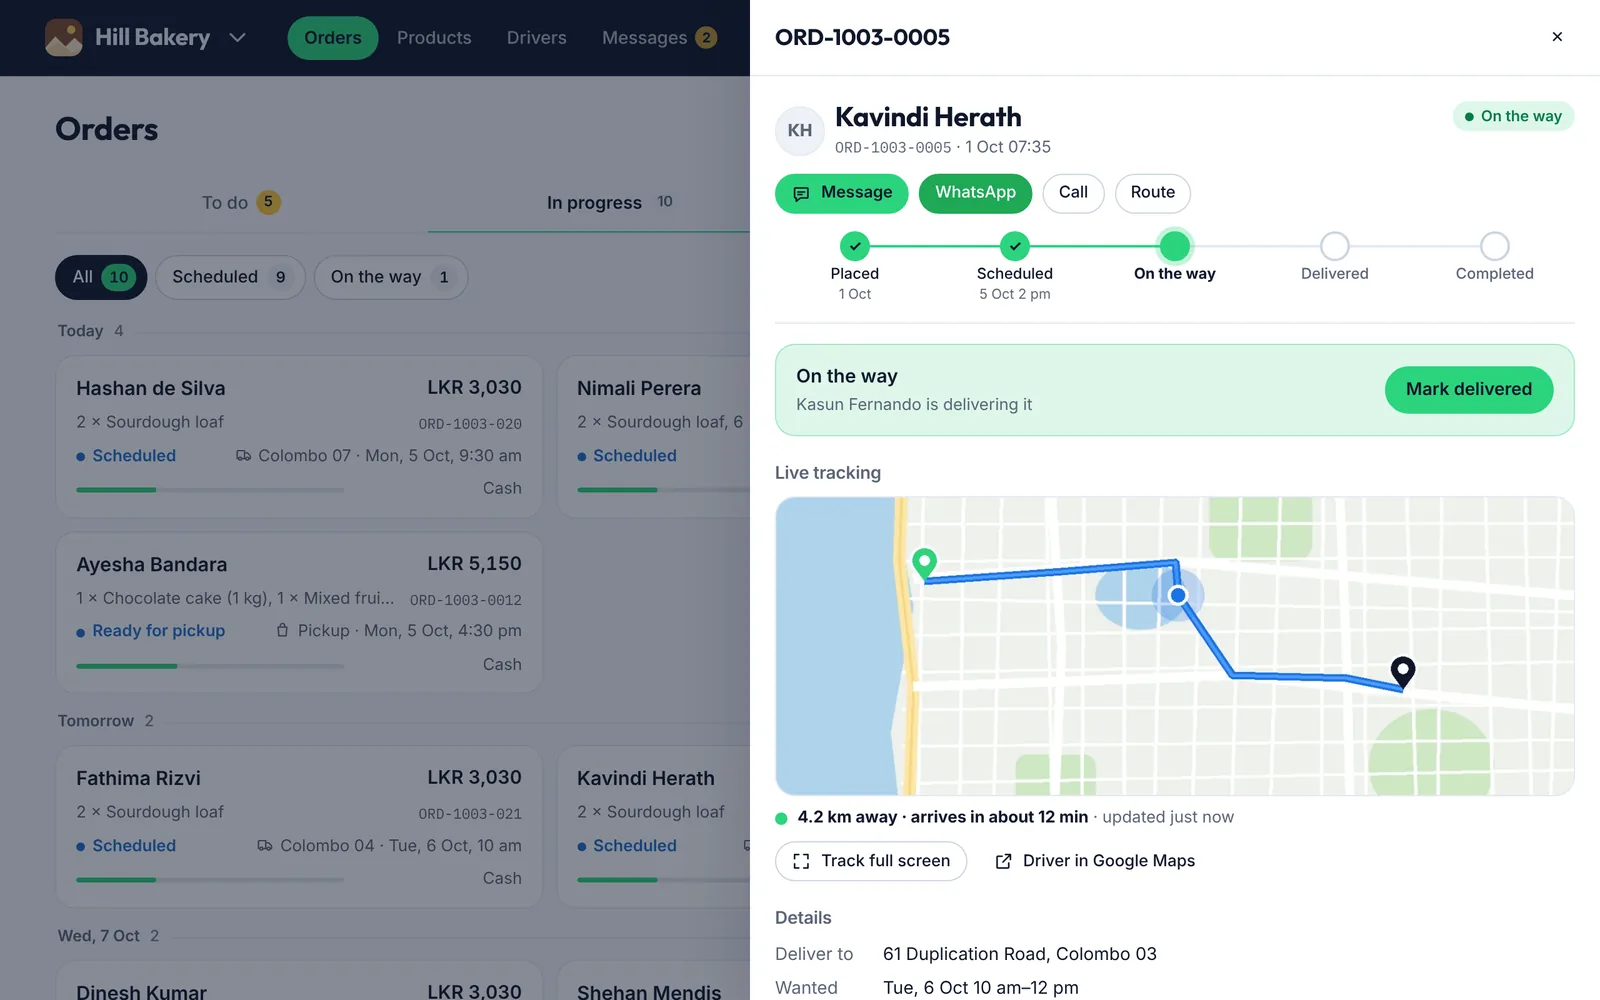
Steps

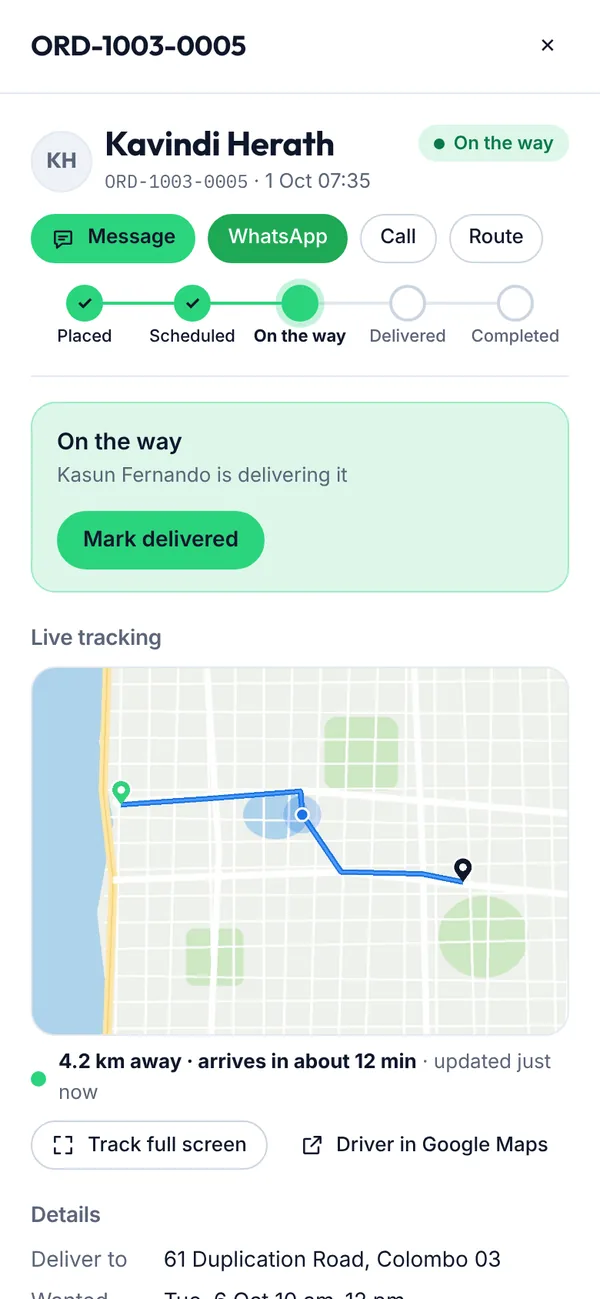
  1. When the order is on the way, tap Mark delivered once it arrives. For pickups, tap Customer collected it.
An order on the way on a computer
An order on the way on a phone
Figure 4.12An order on the way
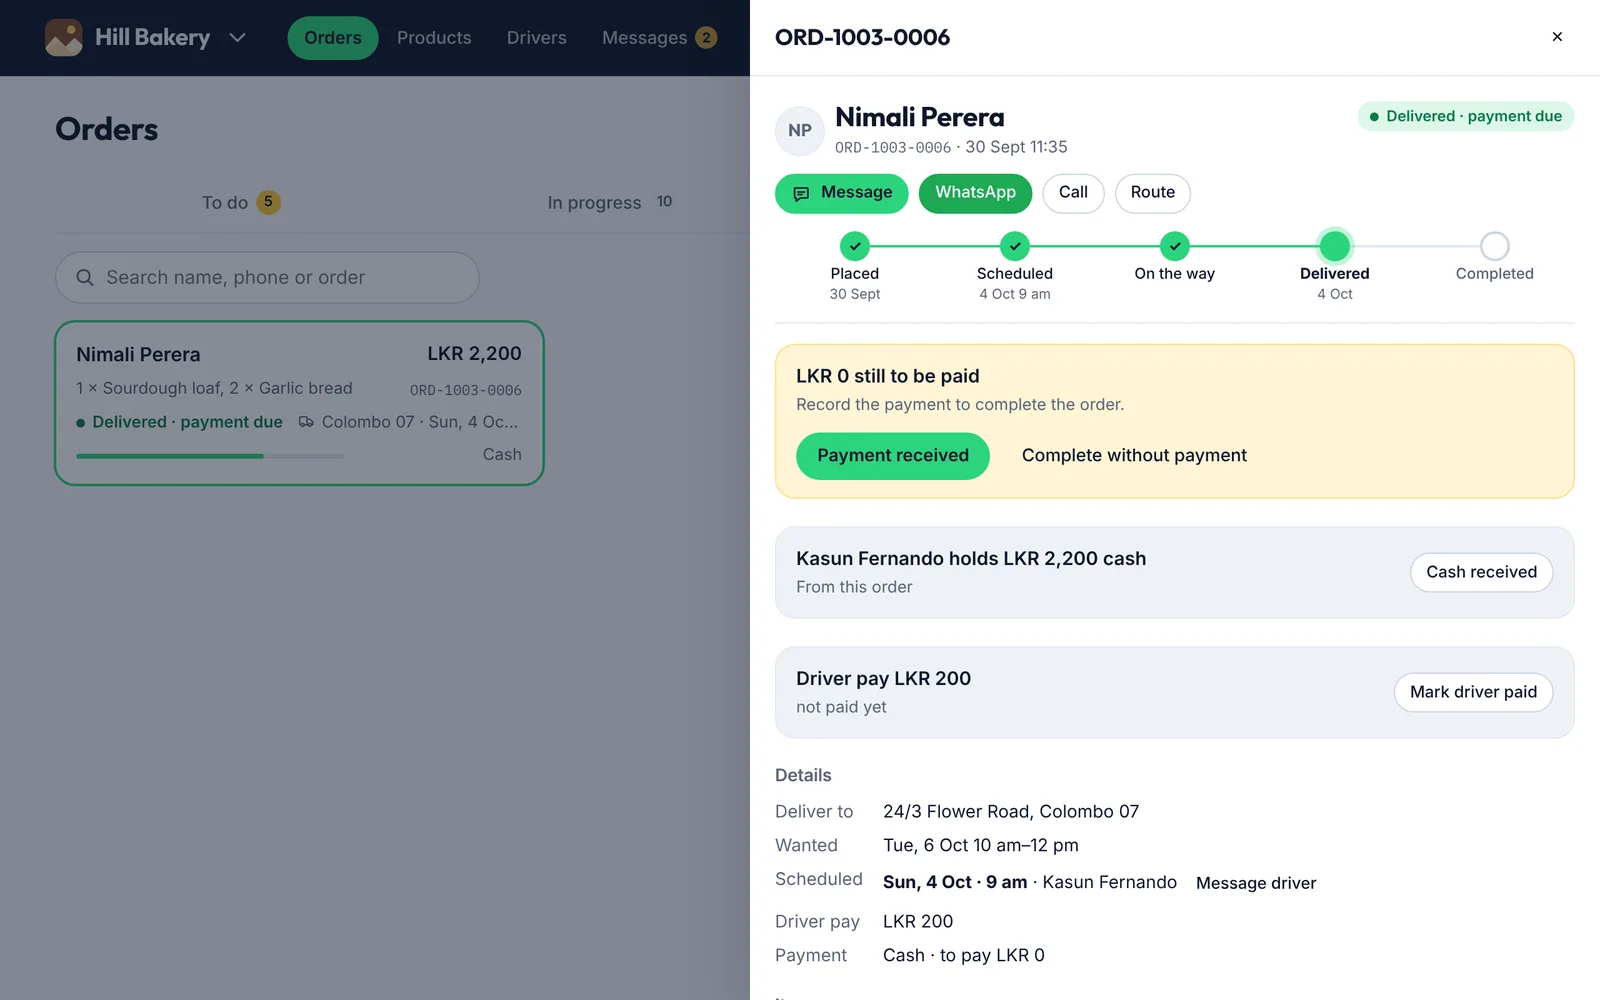
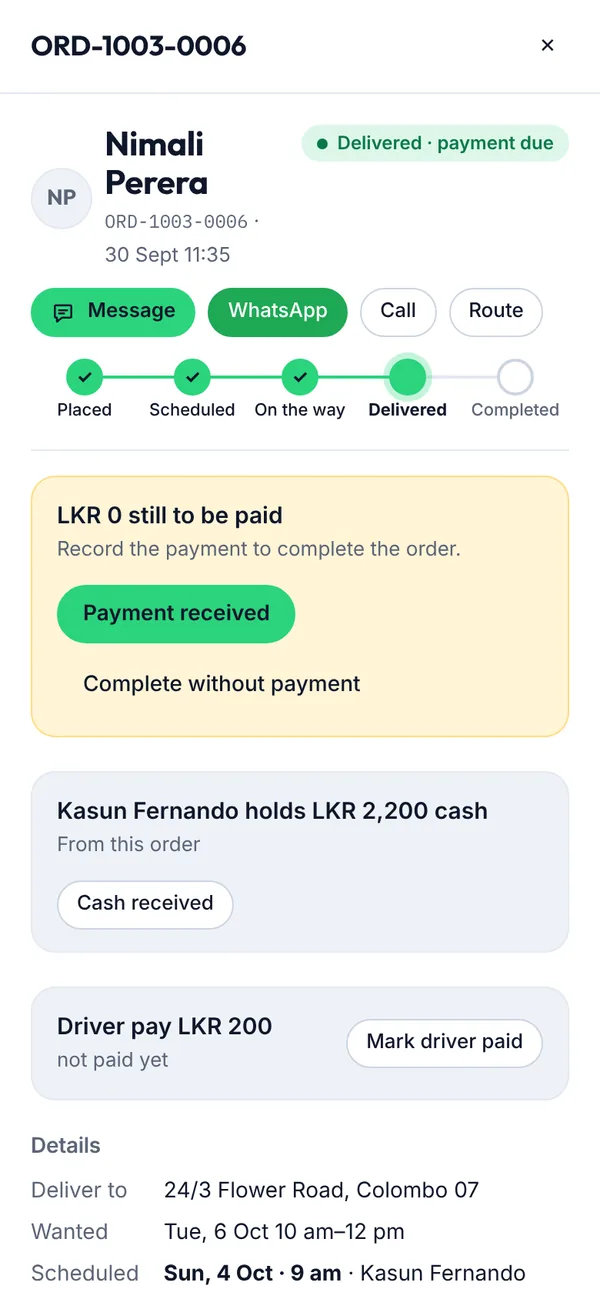
  1. Under To collect, tap Payment received when the customer pays you, or Cash received when the driver hands over the cash.
Recording a payment on a computer
Recording a payment on a phone
Figure 4.13Recording a payment
What you’ll see

Card orders are charged automatically when they're delivered. Once an order is delivered and paid, it completes by itself and moves to History.

4.11How to add delivery people and handle requests

Build your own pool of delivery people. They can ask to join you, or you can add them by email.

Steps

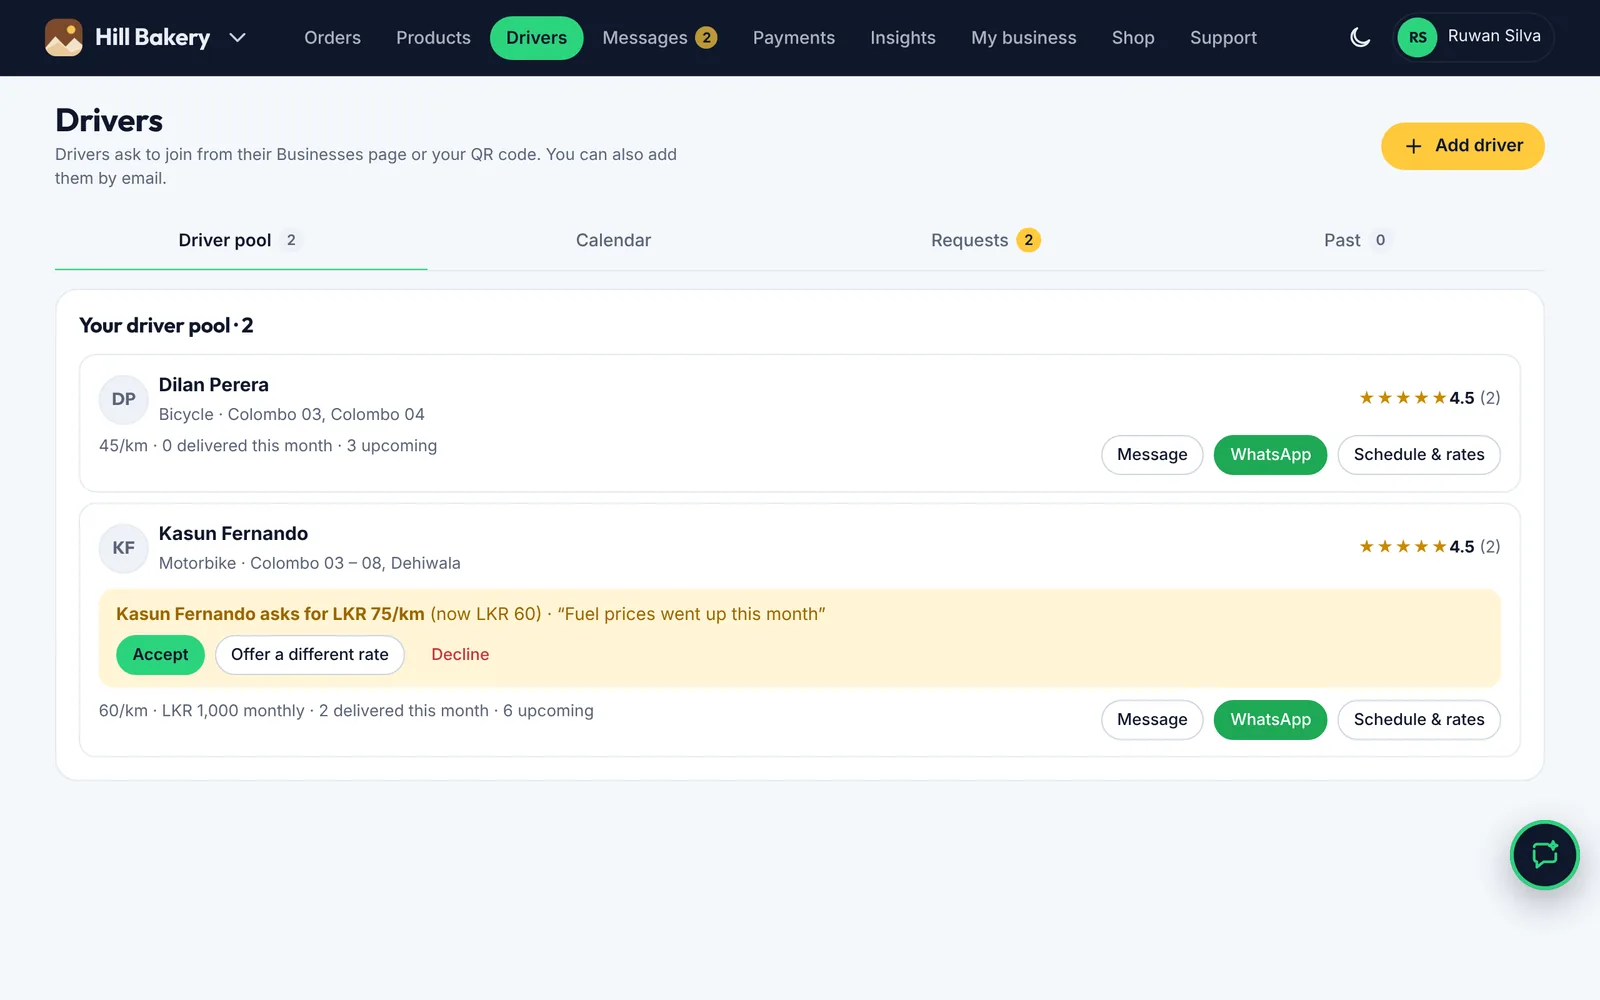
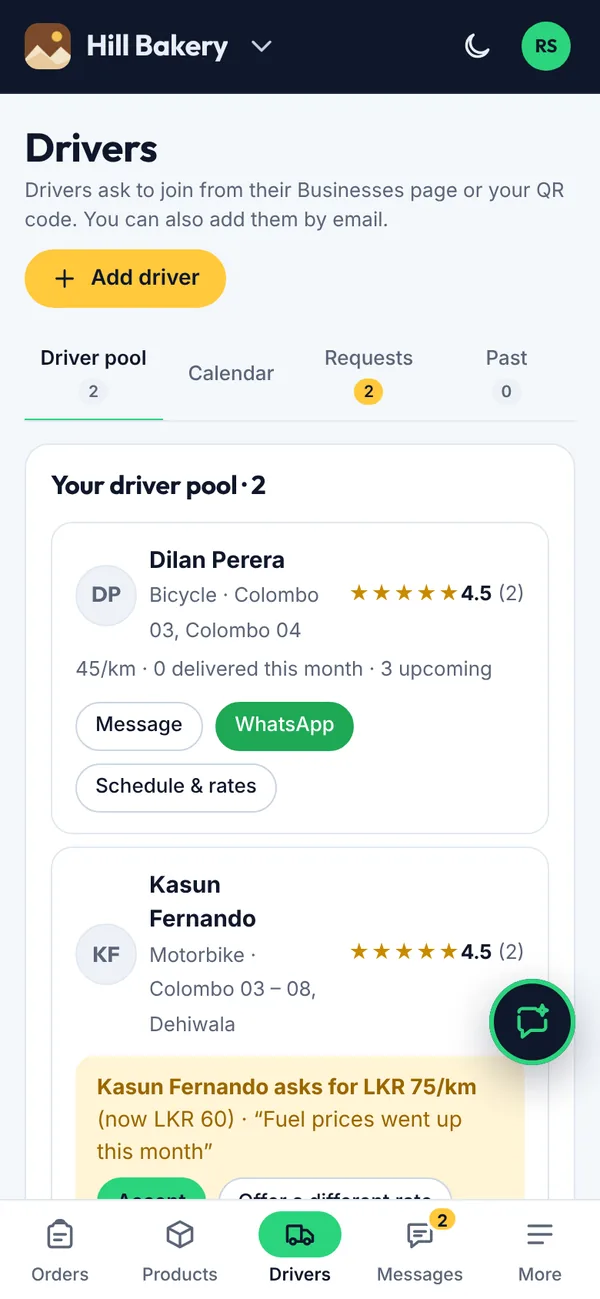
Your driver pool on a computer
Your driver pool on a phone
Figure 4.14Your driver pool
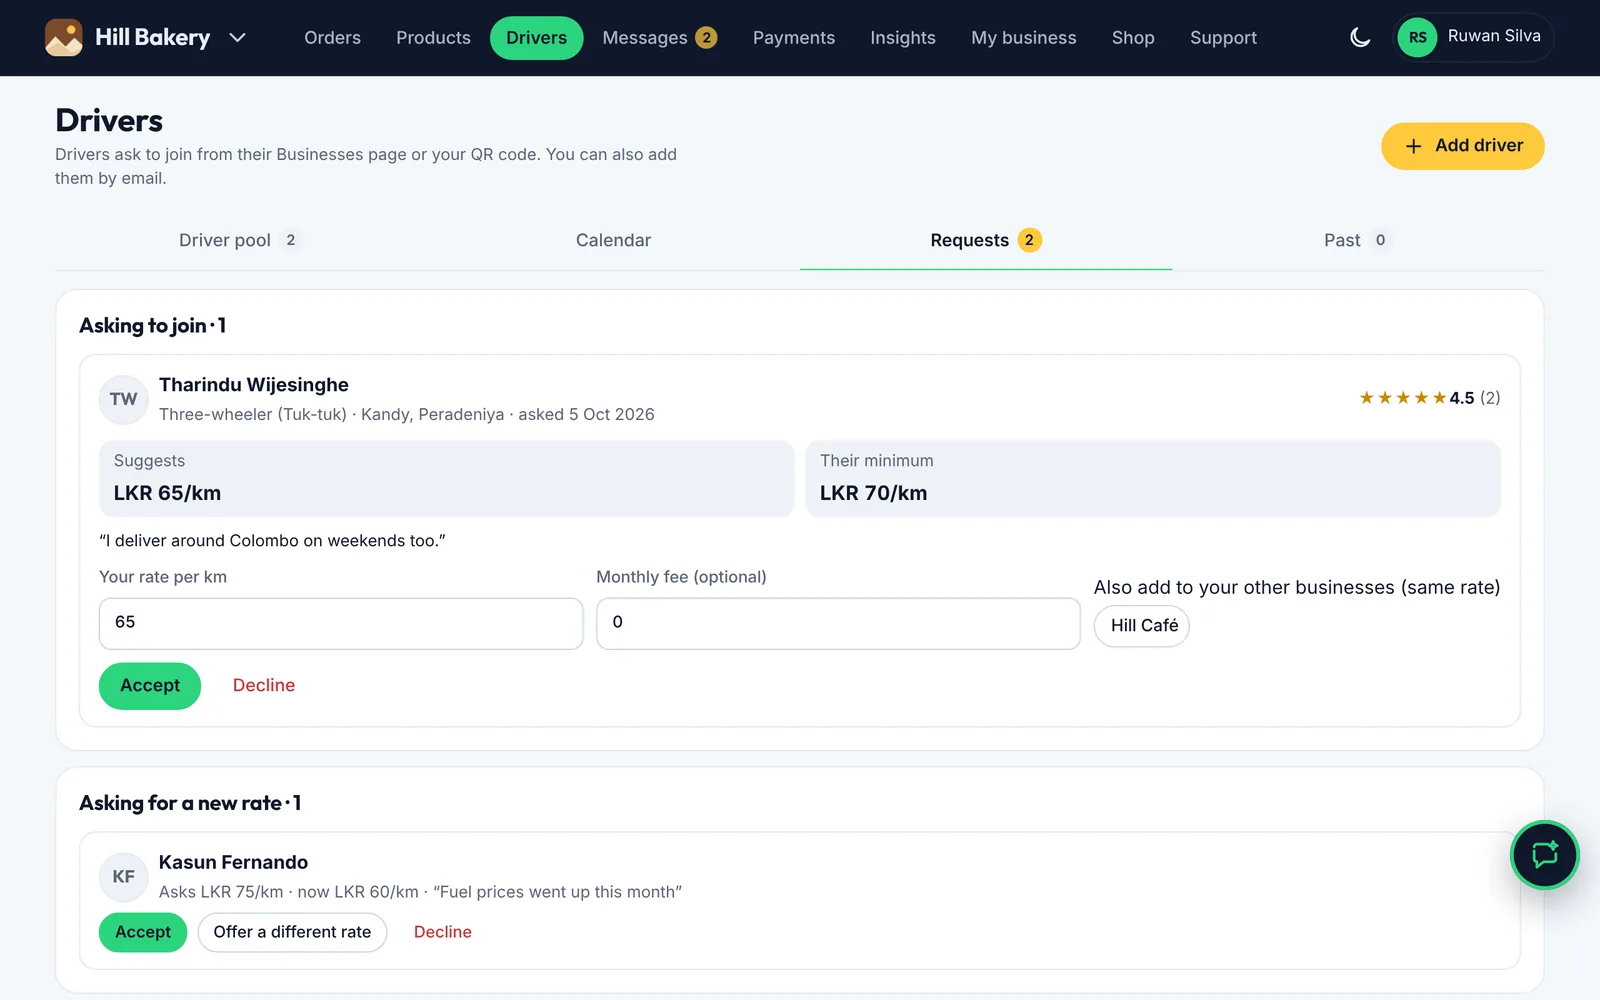
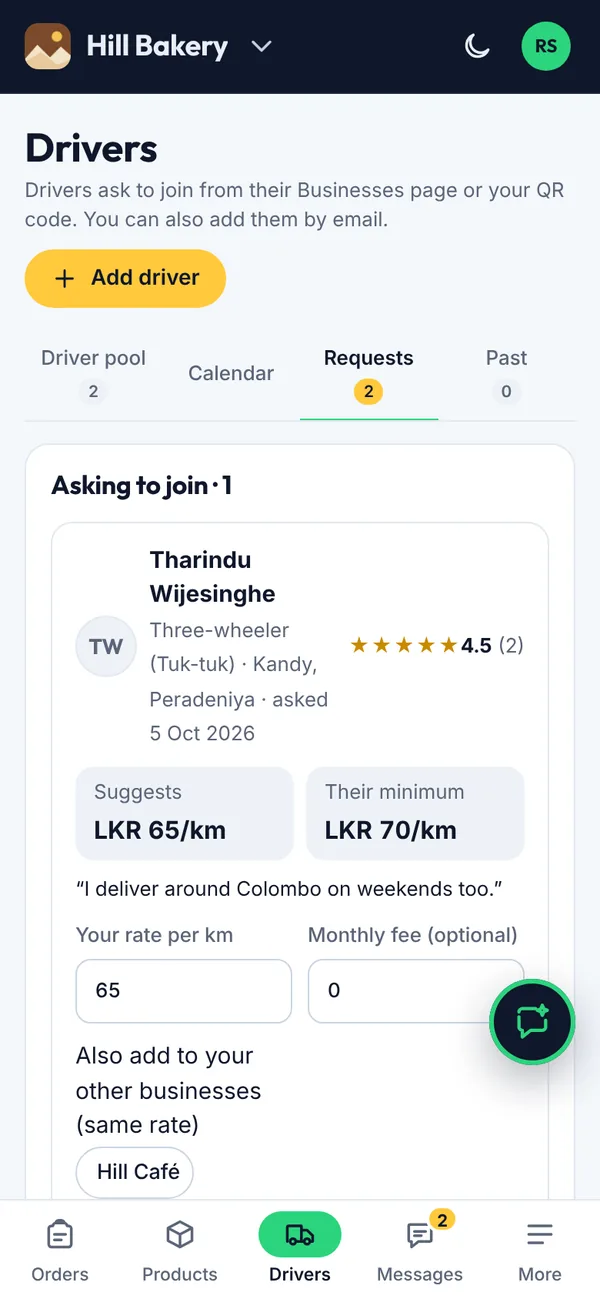
  1. Open Drivers and tap the Requests tab.
  2. Check the rate they suggest, set the rate and any monthly fee, then tap Accept (or Decline).
  3. When a driver asks for a new rate, tap Accept, Offer a different rate or Decline.
Requests to join and rate requests on a computer
Requests to join and rate requests on a phone
Figure 4.15Requests to join and rate requests
What you’ll see

Accepted delivery people appear in your Driver pool and can be chosen when you schedule. Tap Add driver to add someone by email. If you run several businesses, you can add them to your other businesses at the same time, each at its own rate.

4.12How to settle payments

Payments shows money you're owed and money you owe, so nothing is missed.

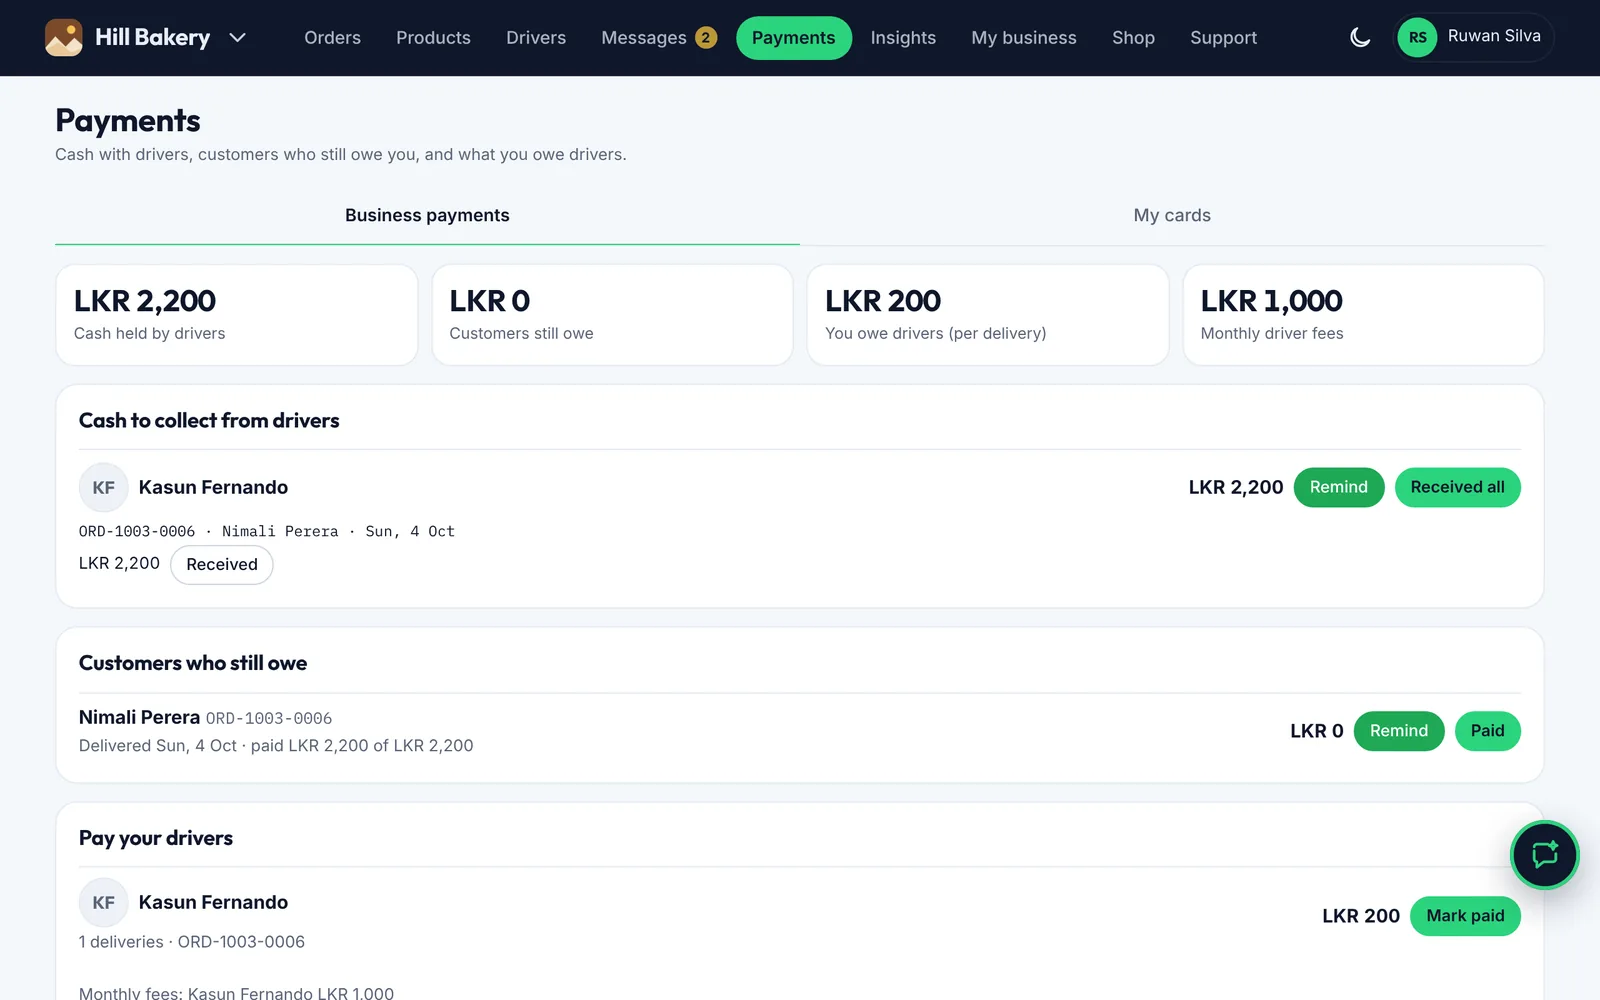
Steps

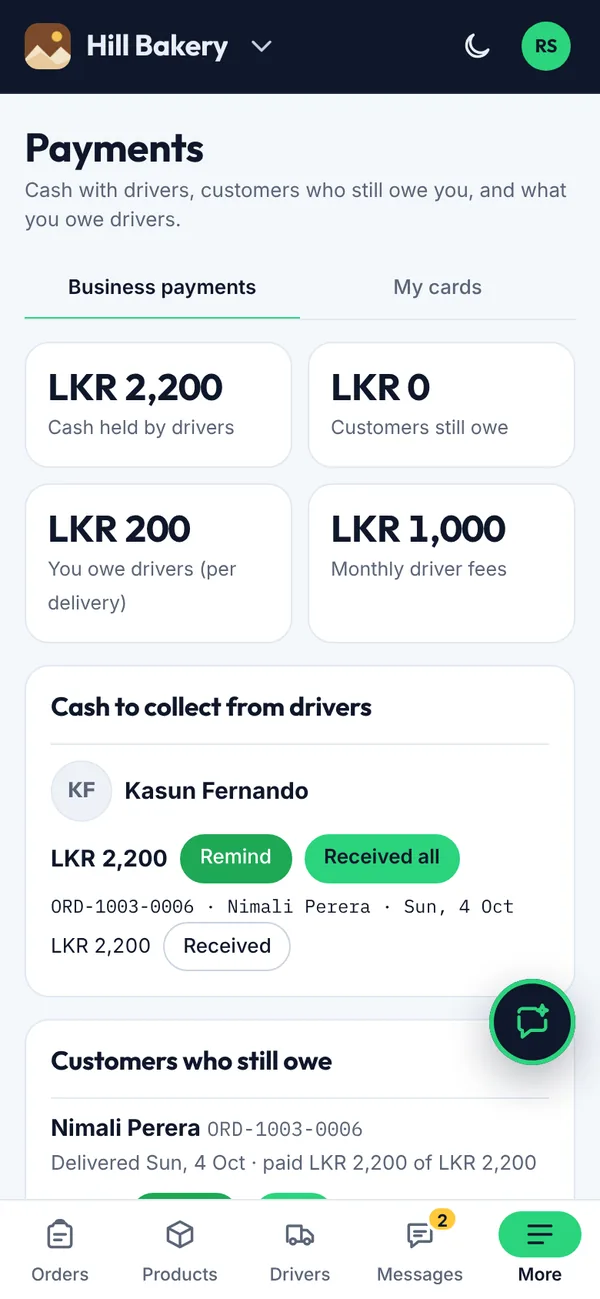
  1. Cash to collect from drivers: tap Received all when a driver hands over their cash.
  2. Customers who still owe: tap Paid when they pay. Remind opens a WhatsApp reminder.
  3. Pay your drivers: tap Mark paid after you pay their delivery fees.
Business payments on a computer
Business payments on a phone
Figure 4.16Business payments
What you’ll see

Settled items disappear from the list. My cards on the same page is your own wallet for ordering from other businesses.

4.13How to read your Insights

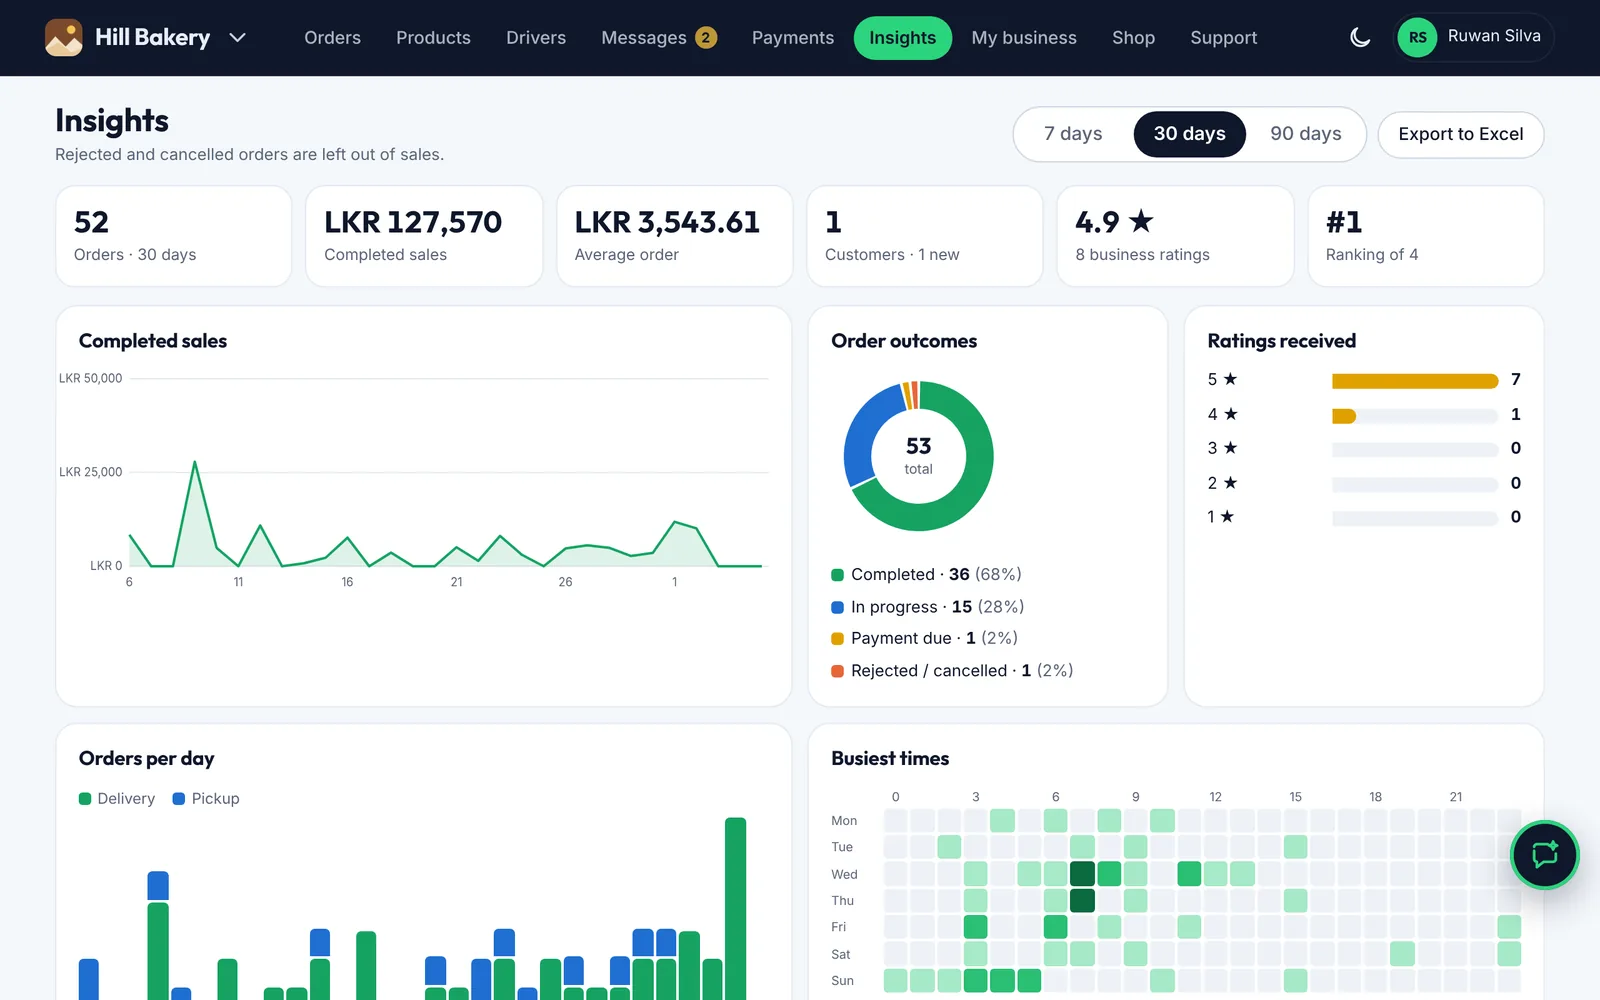
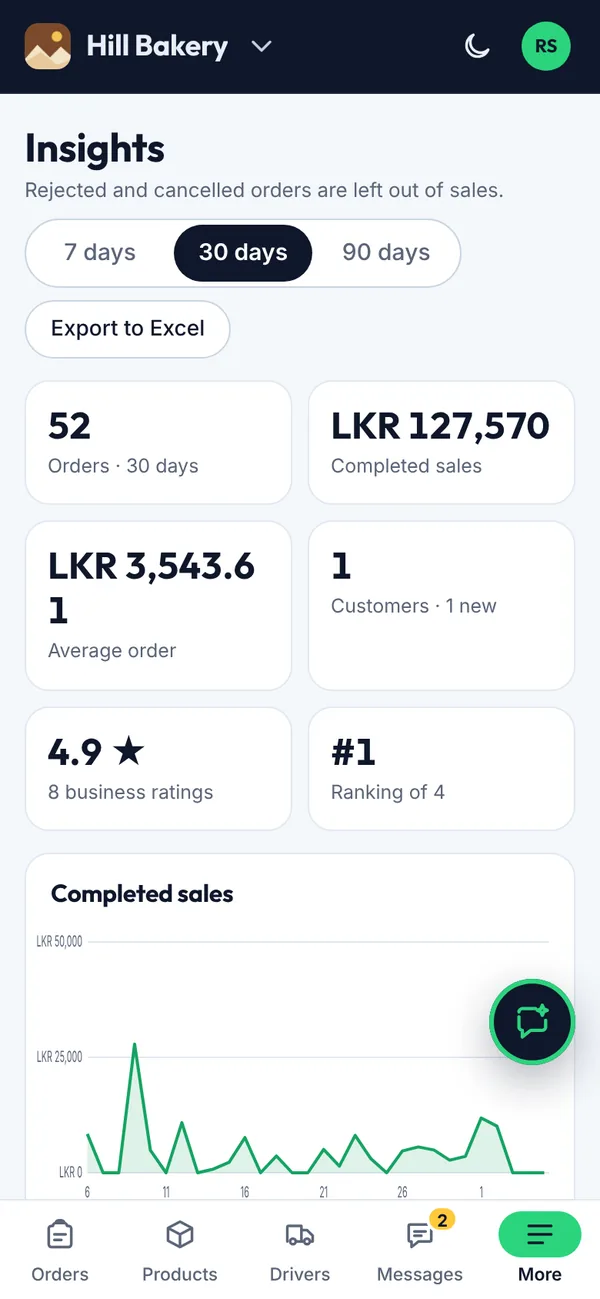
See how your business is doing. Sub-owners see Insights only if the owner allows it.

Steps

  1. Choose 7, 30 or 90 days.
  2. Tap Export to Excel to download the numbers.
Insights on a computer
Insights on a phone
Figure 4.17Insights
What you’ll see

You see orders, sales, average order, customers, your rating, your ranking, and your busiest days and times.

4.14How to change your business settings and card payments

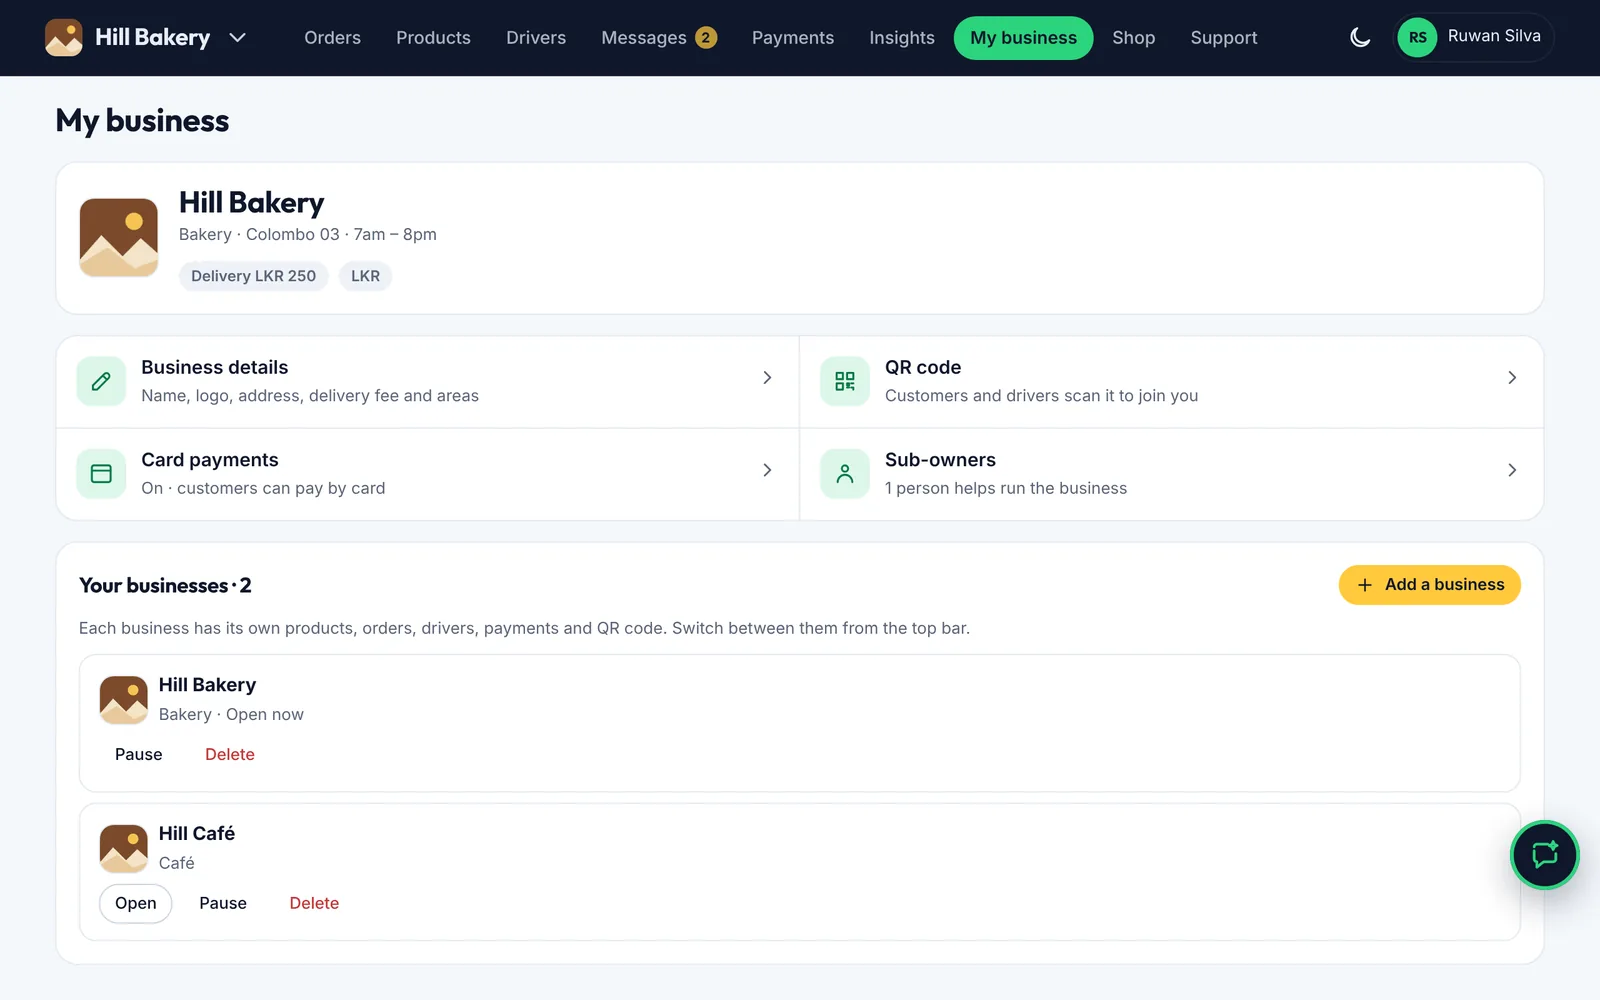
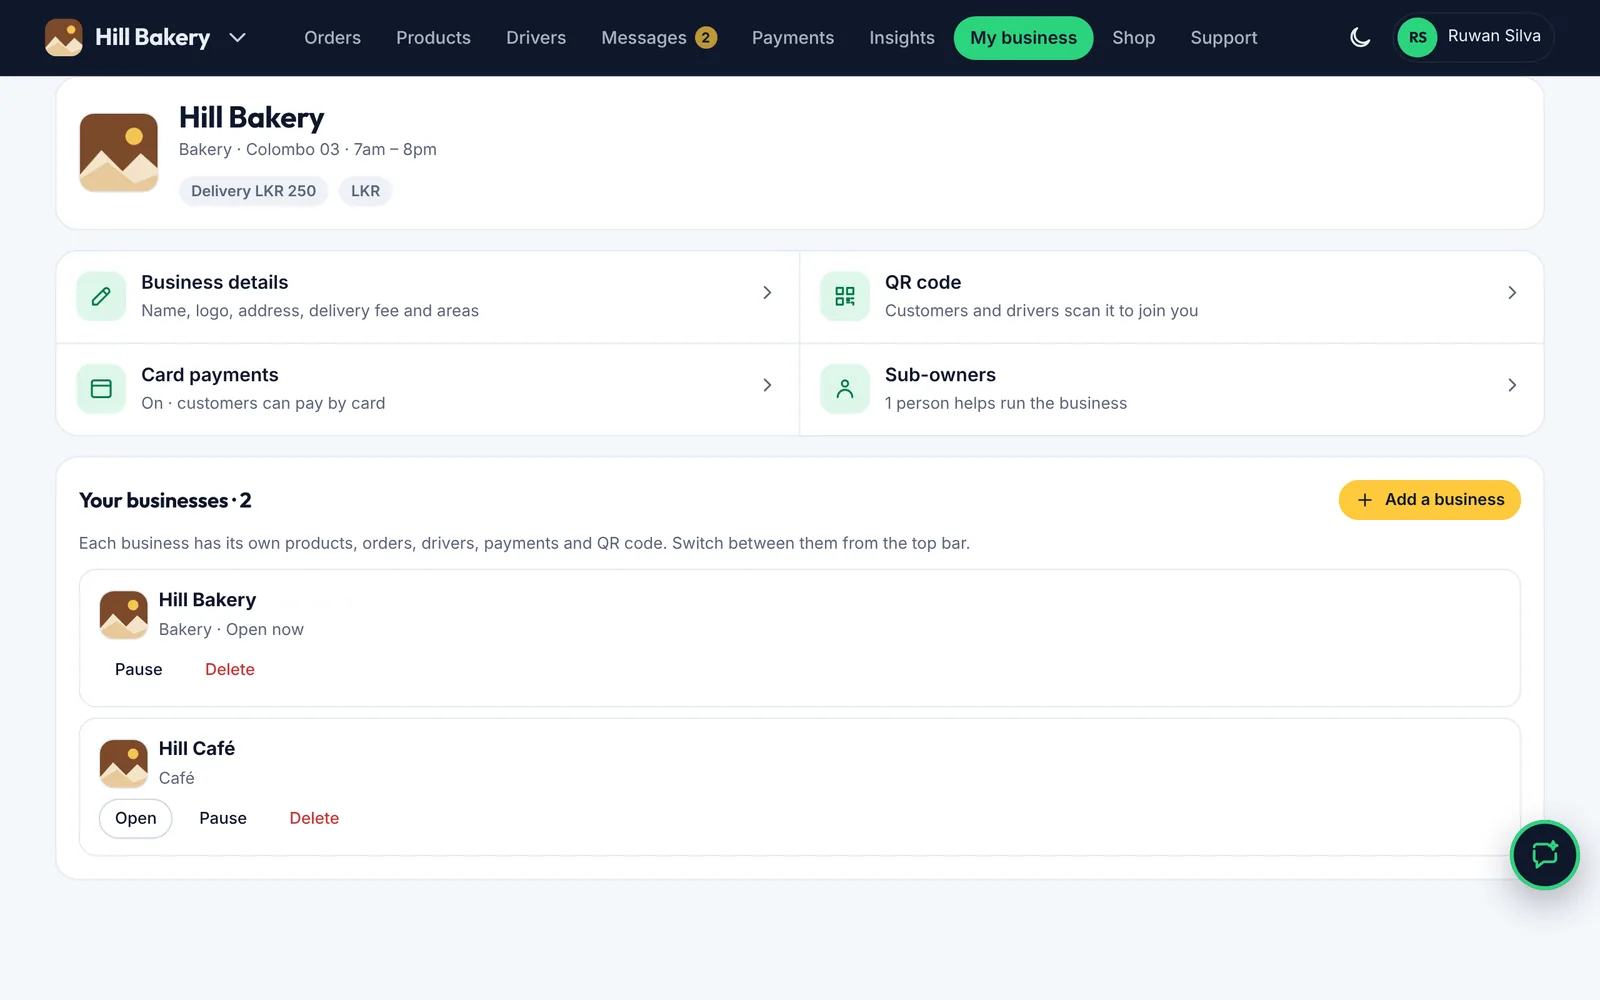
My business holds your details, QR code, card payments and team.

Steps

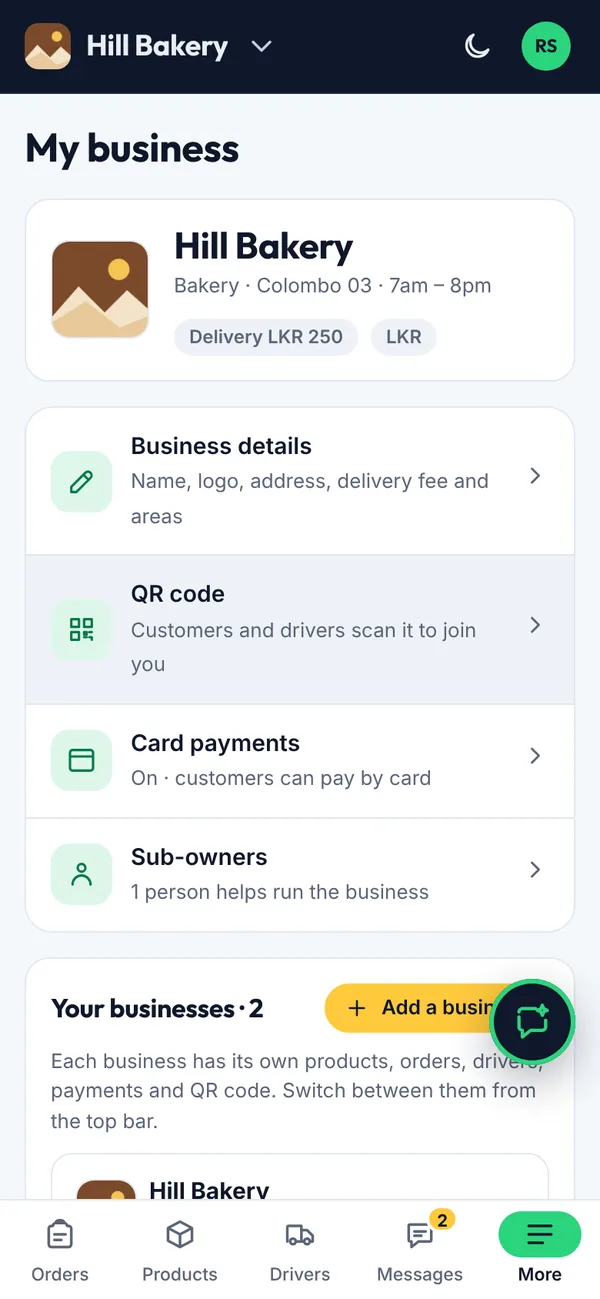
  1. Business details: name, logo, address, opening hours, delivery fee, delivery areas and driver pay limit.
  2. QR code: see 4.5.
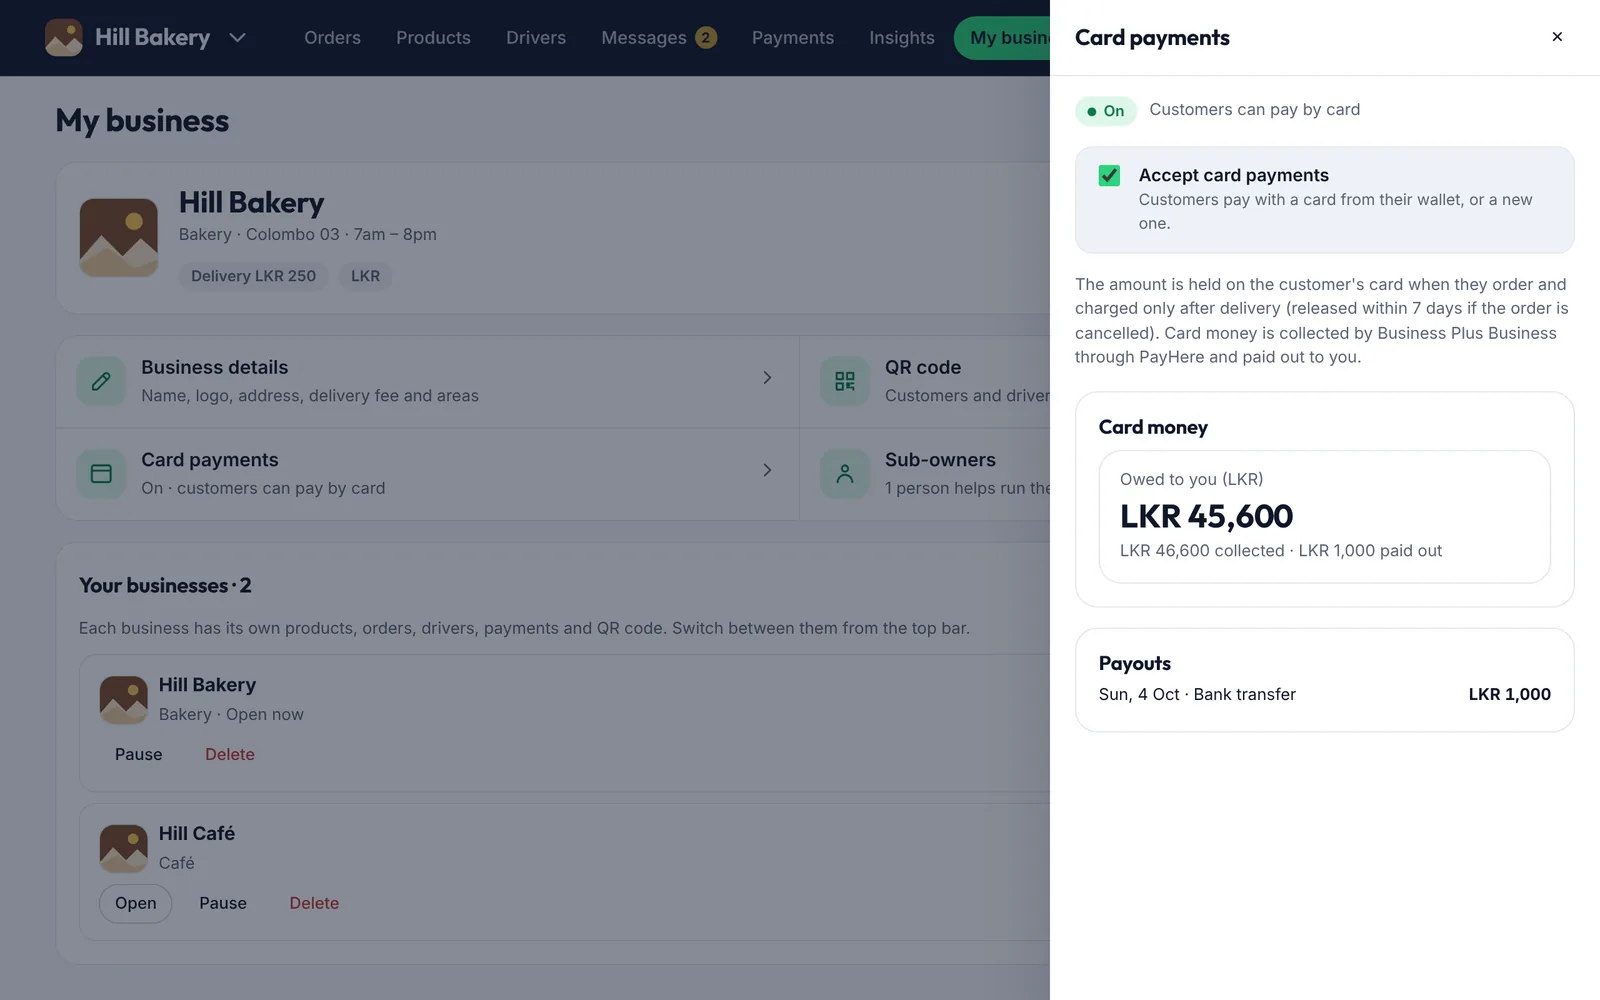
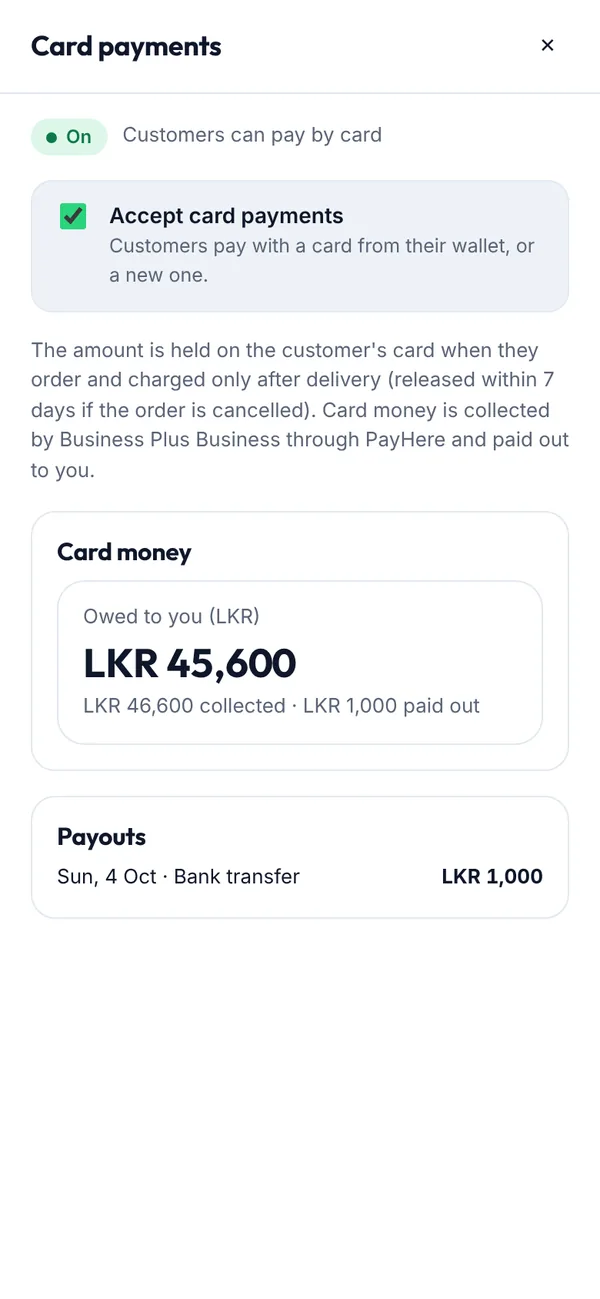
  3. Card payments: tick Accept card payments so customers can pay by card.
  4. Sub-owners: see 4.15.
My business on a computer
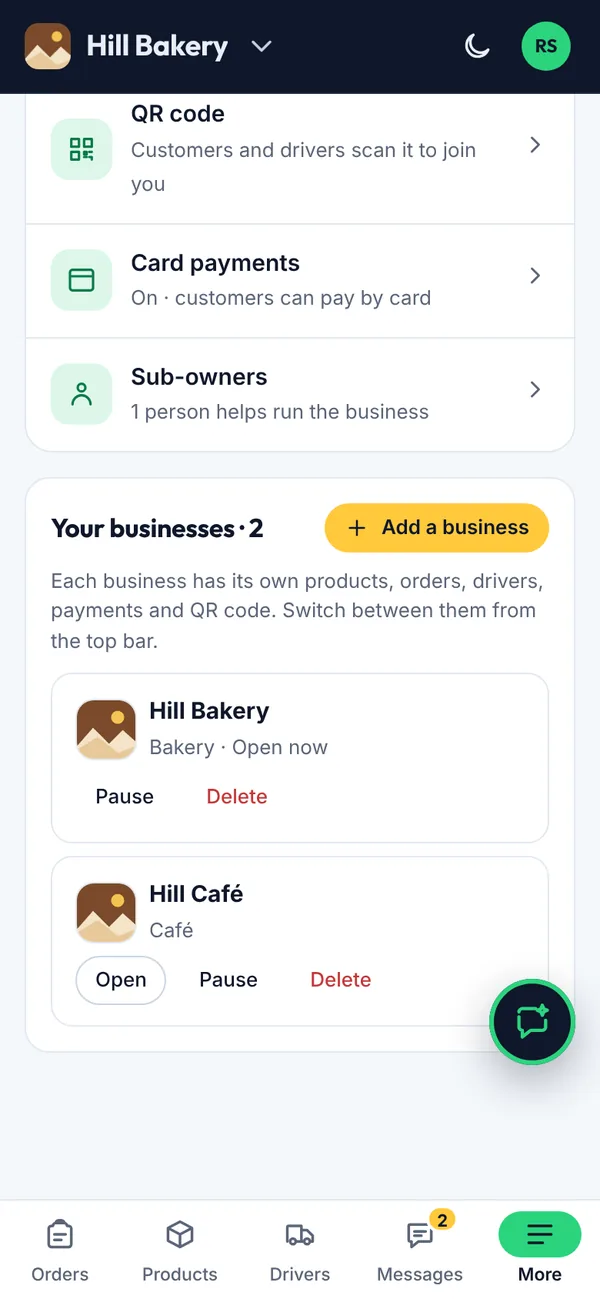
My business on a phone
Figure 4.18My business
Card payments on a computer
Card payments on a phone
Figure 4.19Card payments
What you’ll see

Card money is collected through PayHere and paid out to you. The Card payments sheet shows what you're owed and past payouts.

4.15How to add sub-owners

Sub-owners help run your business. Only the owner can add or remove them.

Before you start
  • Open My business → Sub-owners.

Steps

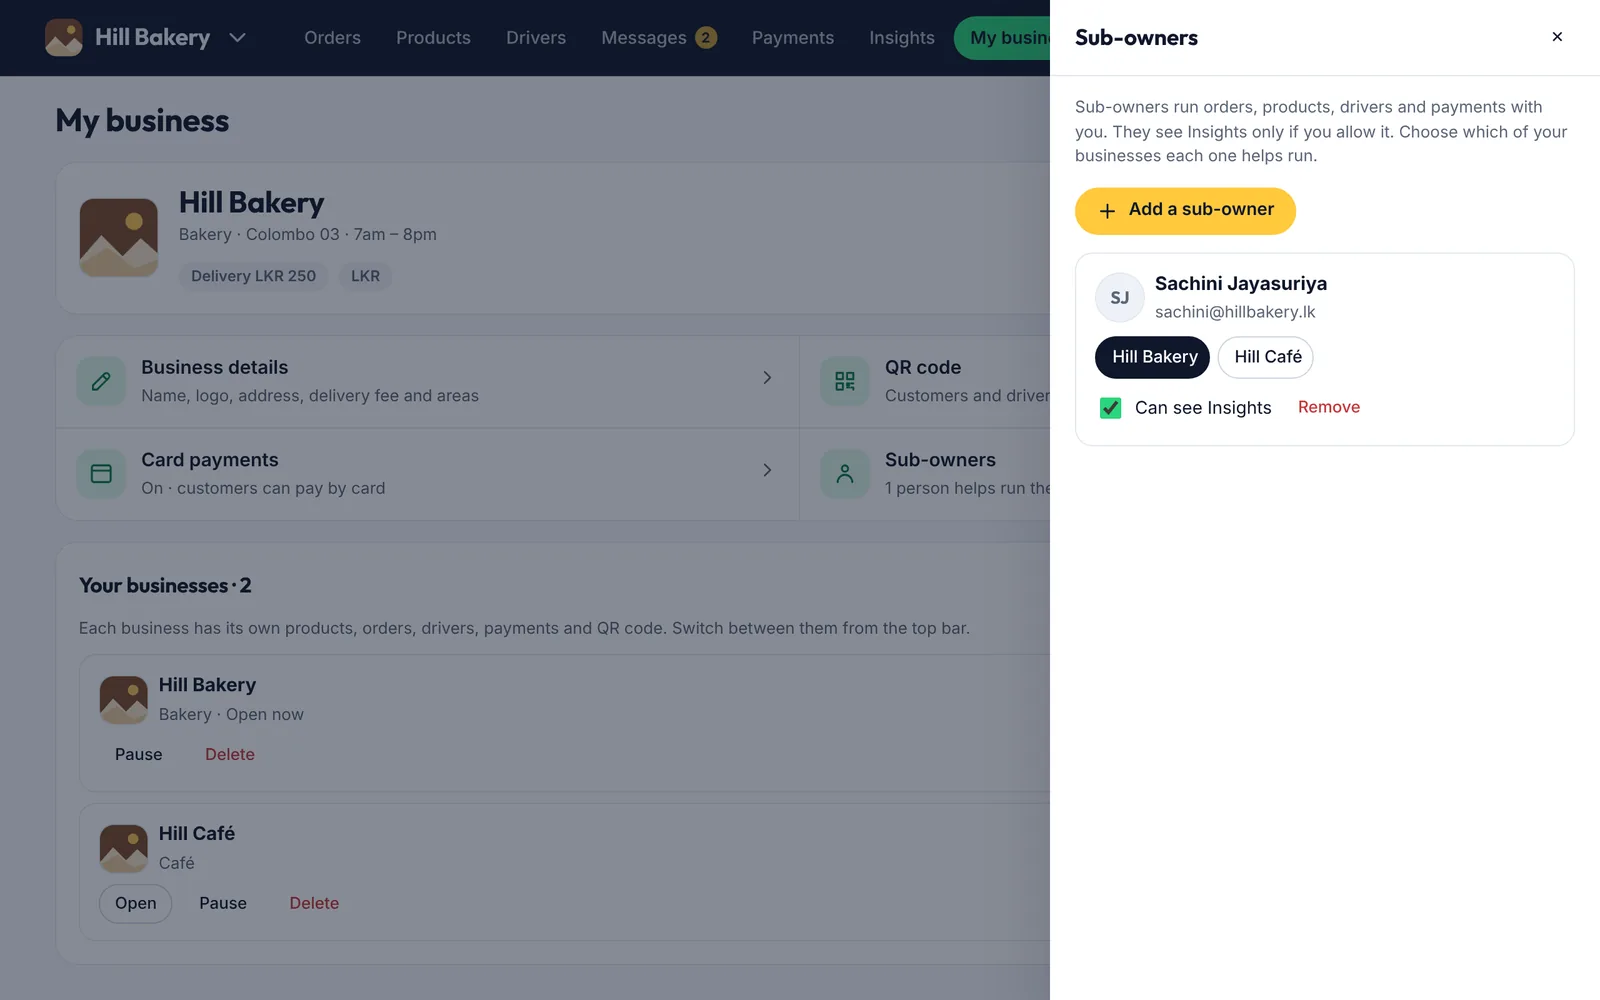
  1. Tap Add a sub-owner and enter their email.
  2. Tick Can see Insights if they should see your sales.
  3. Run several businesses? Tap the business names to choose which ones each sub-owner helps run.
Sub-owners on a computer
Sub-owners on a phone
Figure 4.20Sub-owners
Sub-owners can
  • Take, schedule and complete orders
  • Add and edit products
  • Manage delivery people and requests
  • Record payments
  • See Insights, if allowed
Only the owner can
  • Change the currency or country
  • Change the driver pay limit
  • Add or remove sub-owners
  • Add, pause, delete or restore businesses
What you’ll see

They get sign-in details to share by WhatsApp, and choose their own password the first time they sign in.

4.16How to run a service business (salons, repairs and more)

If customers come to you for a service, such as a hair salon, spa, clinic or repair shop, set your business up for services. Orders are then called bookings, and nothing is delivered.

Before you start
  • When you set up your business, pick a type such as Hair salon; services are chosen for you. You can change it any time in My business → Business details.

Steps

  1. Under What do you offer? choose Services by appointment (or Both if you also sell products). Leave We also come to the customer unticked if customers always come to you.
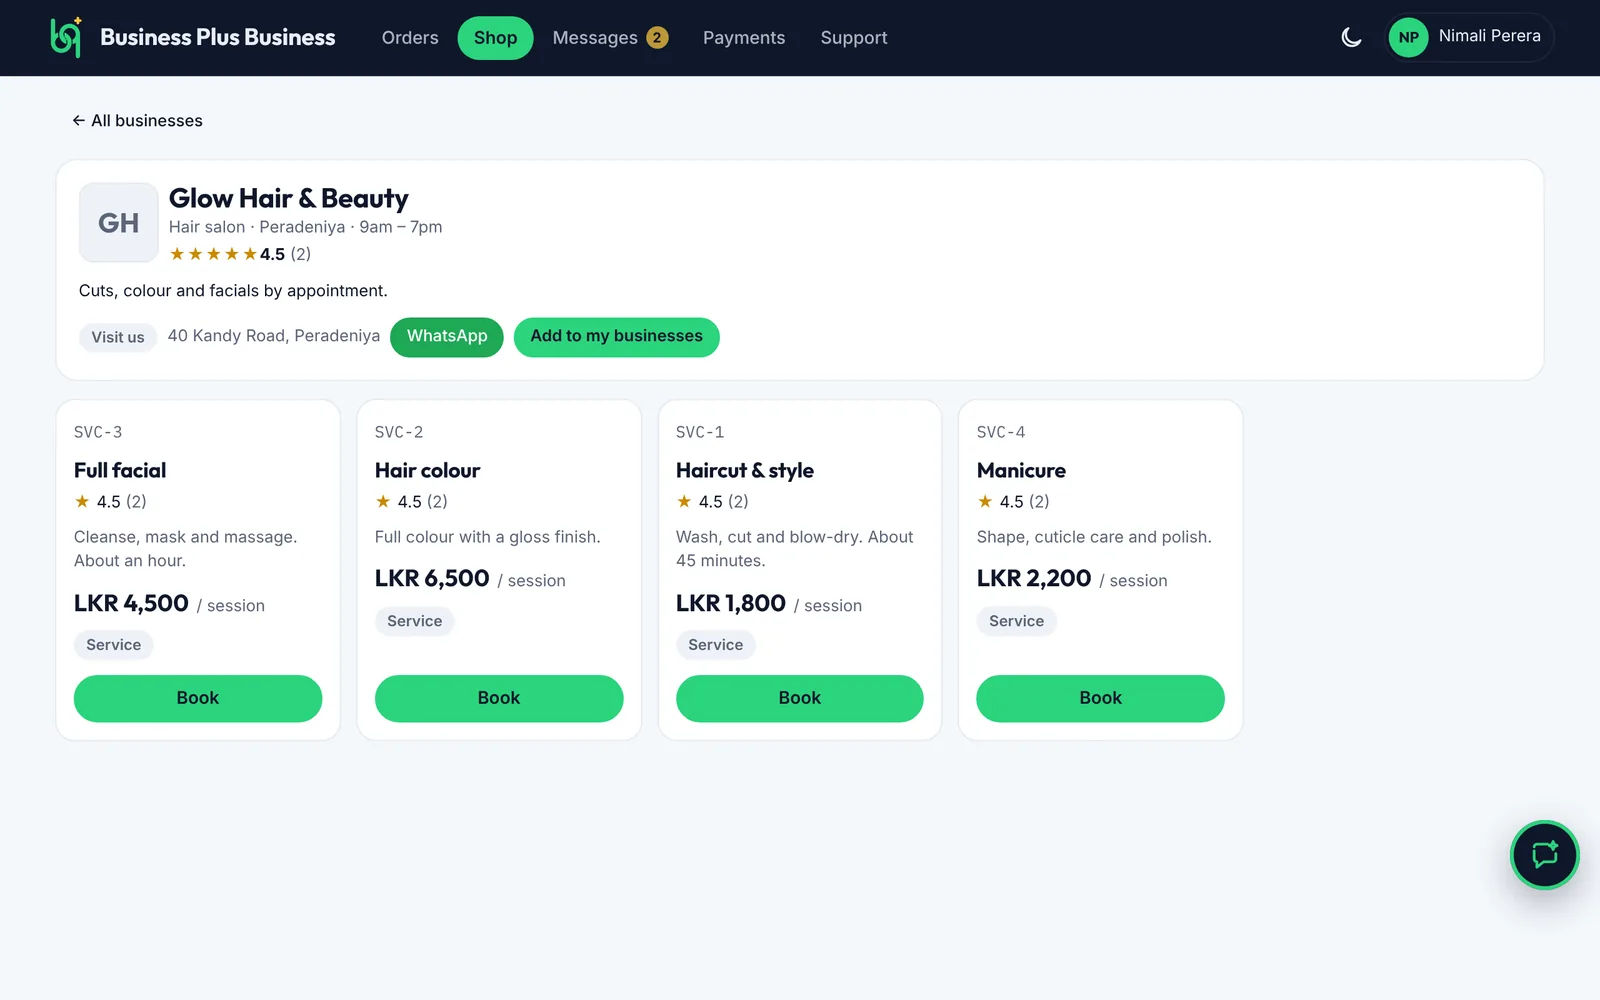
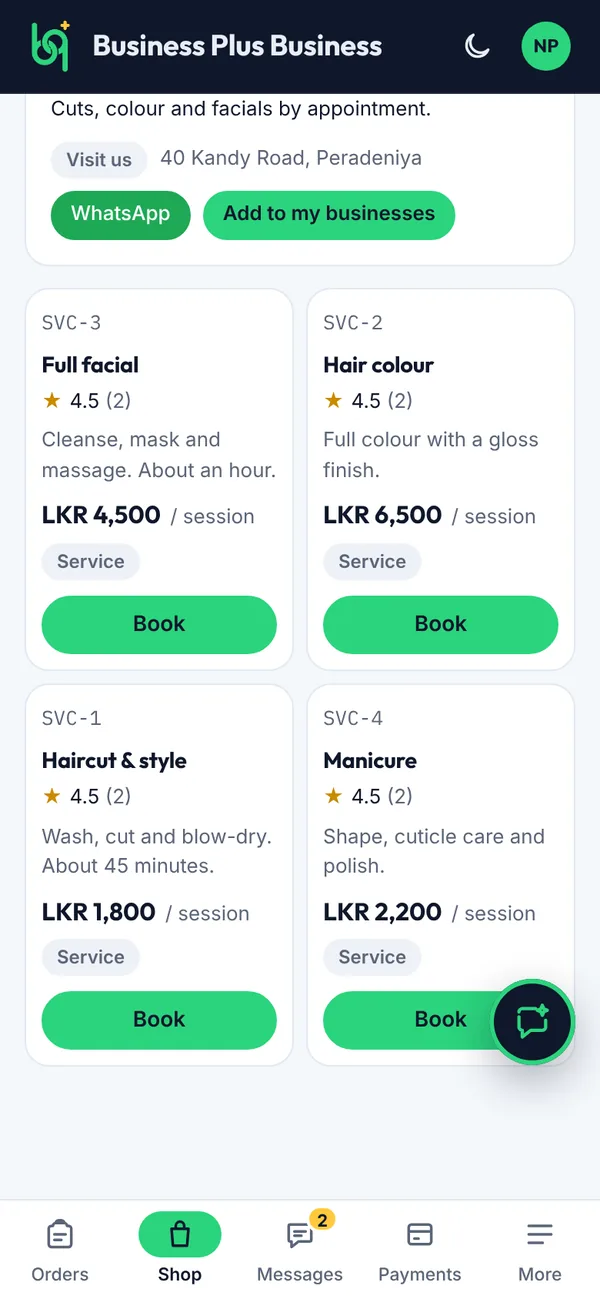
  2. Open Services and add each service with a price, for example “Haircut” or “Full facial”. The unit is a session.
Setting up a business for services on a computer
Setting up a business for services on a phone
Figure 4.21Setting up a business for services
  1. Share your QR code. Customers tap Book on a service, pick a day and a time window and tap Book now. They pay at their visit or by card.
A salon's services in the Shop on a computer
A salon's services in the Shop on a phone
Figure 4.22A salon's services in the Shop
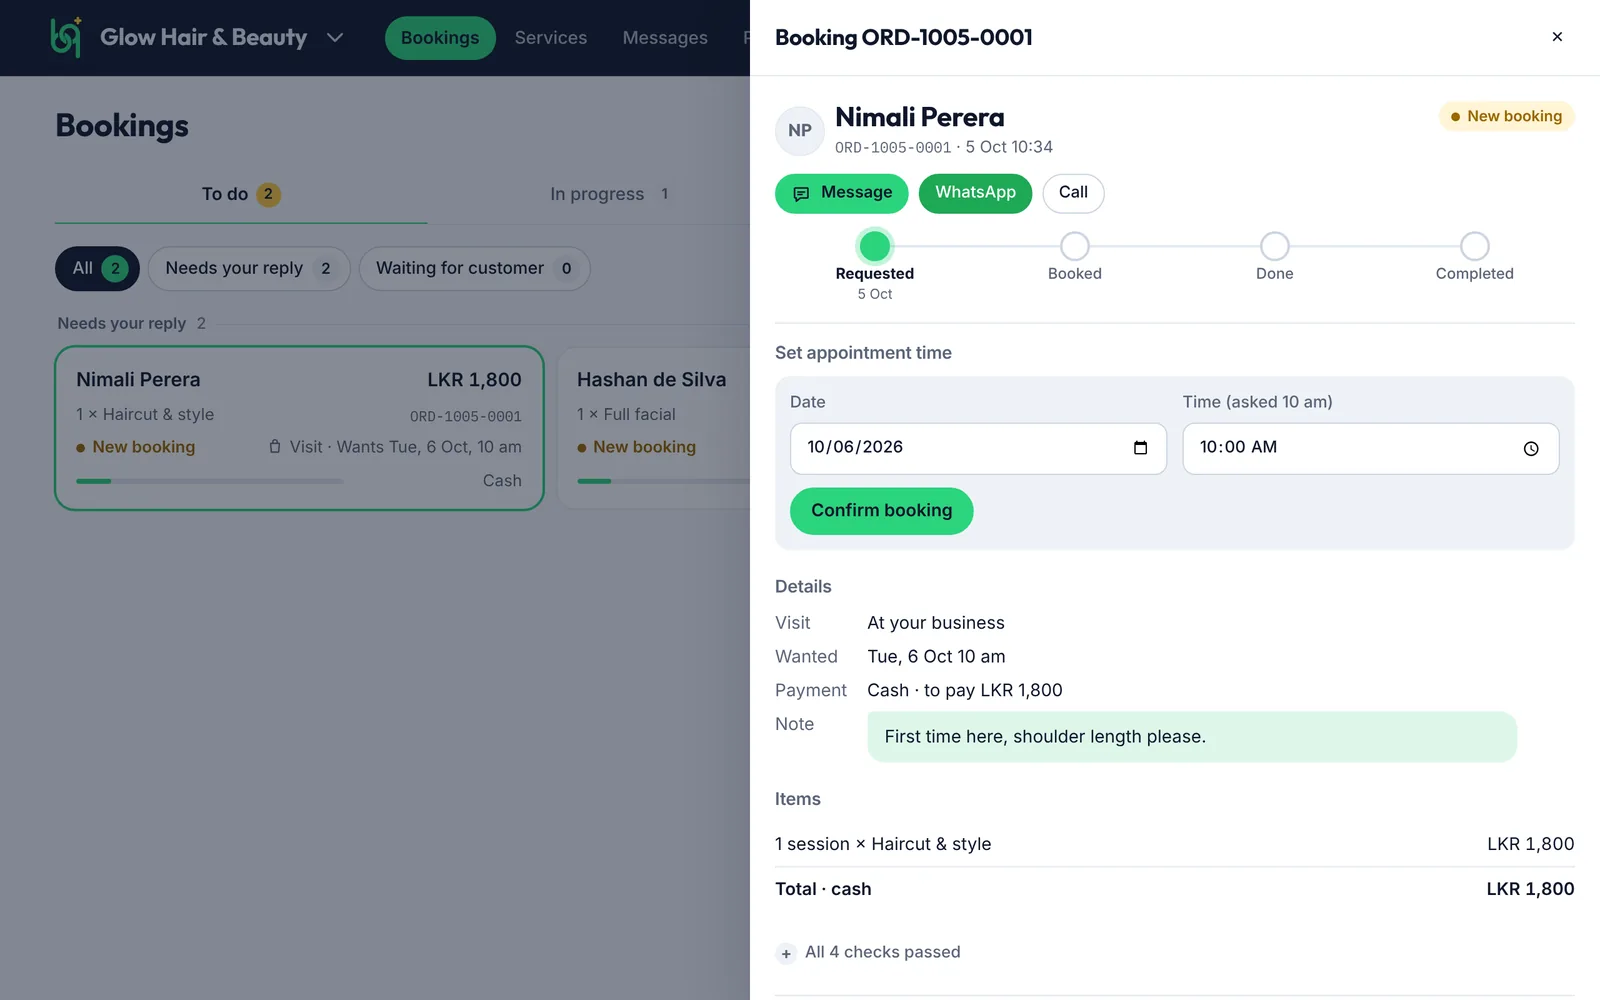
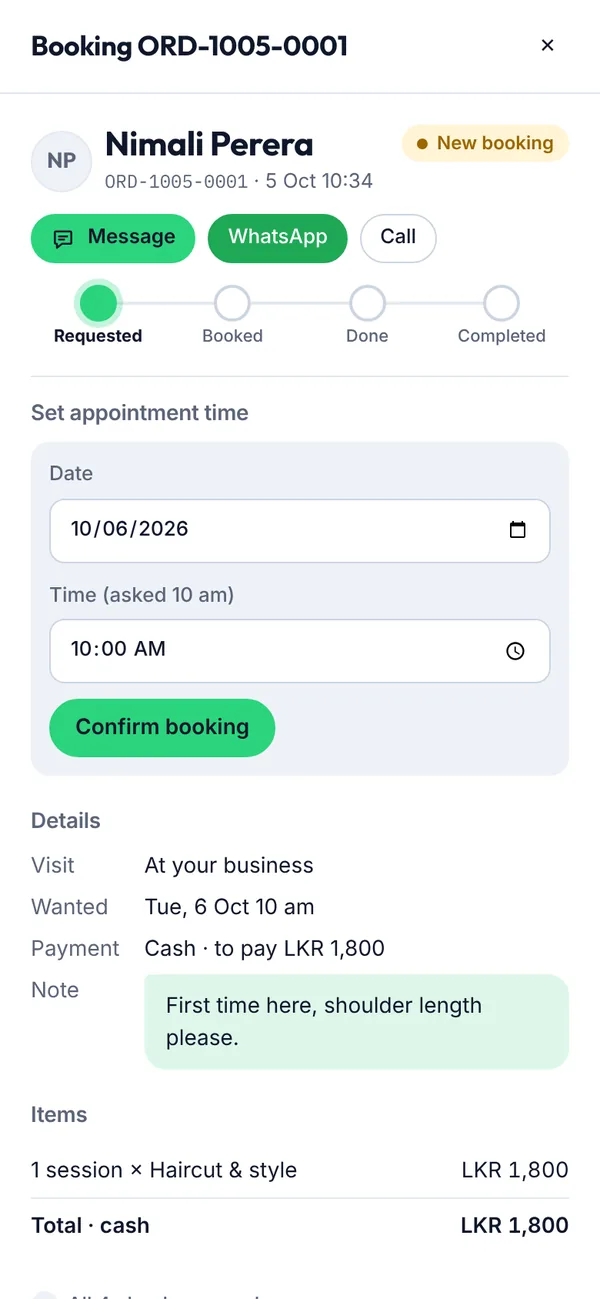
  1. New requests appear in Bookings. Open one, set the appointment time and tap Confirm booking. If another booking is already within half an hour of that time, a warning shows who it is, so you can pick another time.
  2. When the service is done, tap Service done and record the payment, as with any order.
Bookings for a salon on a computer
Bookings for a salon on a phone
Figure 4.23Bookings for a salon
What you’ll see

Your menu shows Bookings and Services instead of Orders and Products, and Drivers is hidden while you don't deliver. Customers see Book a visit on your shop instead of a delivery fee.

4.17How to run several businesses

One account can run several businesses, for example two branches, or a bakery and a café. Each business has its own products, orders or bookings, drivers, payments, QR code and settings.

Steps

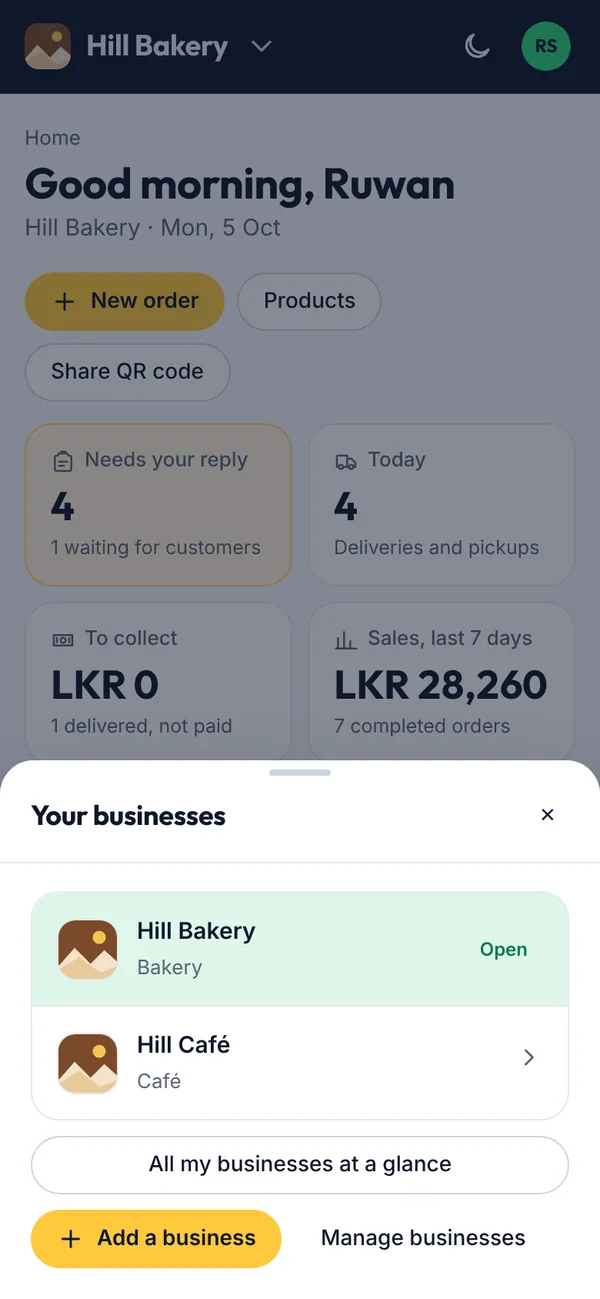
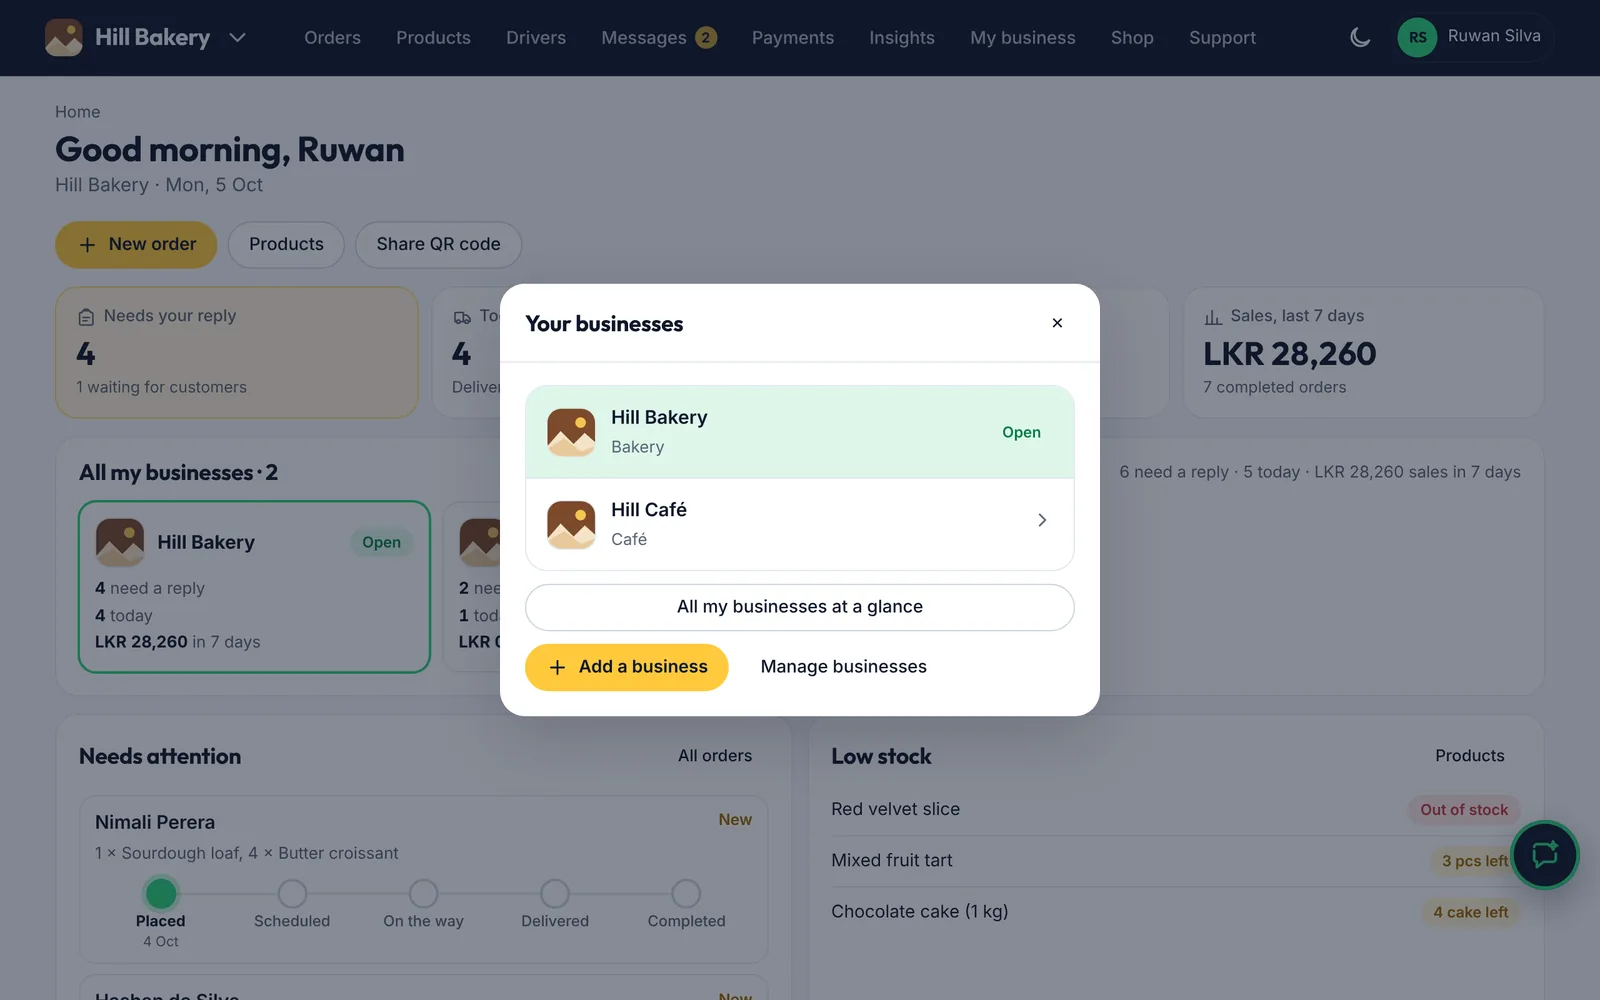
  1. Tap the small arrow next to your business name at the top to see your businesses.
  2. Tap a business to switch to it. The app remembers which one you last used.
  3. Tap Add a business and fill in the short form. The new business opens straight away.
Switching between your businesses on a computer
Switching between your businesses on a phone
Figure 4.24Switching between your businesses
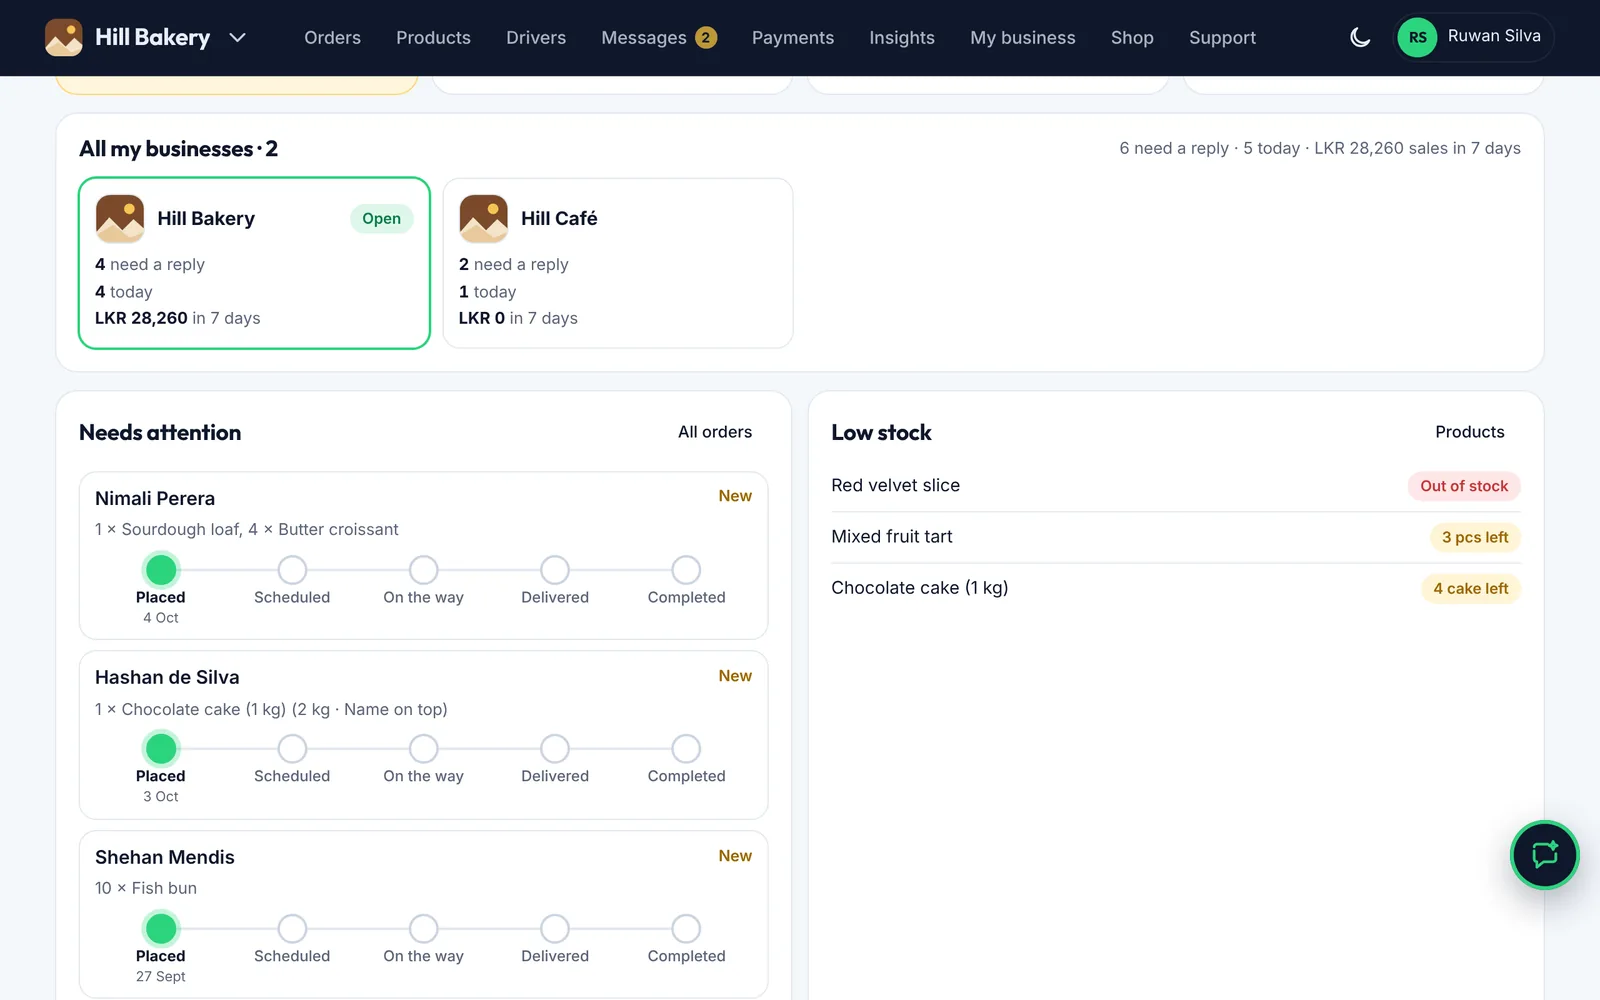
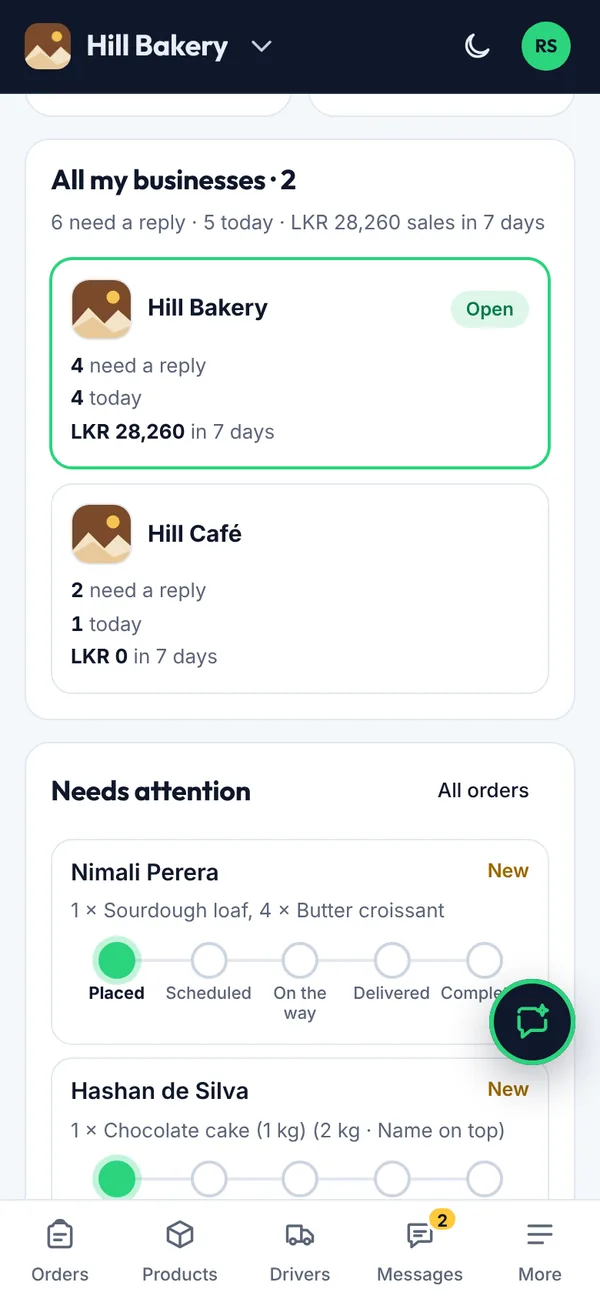
  1. On Home, All my businesses shows each one's new orders, today's work and sales. Tap one to open it.
All my businesses on Home on a computer
All my businesses on Home on a phone
Figure 4.25All my businesses on Home
  1. On Orders, choose All my businesses to see every order together. The business name shows on each order.
Orders from all your businesses on a computer
Orders from all your businesses on a phone
Figure 4.26Orders from all your businesses
  1. To pause a business (hidden from the Shop, no new orders), open My business, find Your businesses and tap Pause. Tap Switch back on any time.
  2. To delete one, tap Delete and type its name to confirm. All its orders must be finished and its payments settled first. You can restore it from the same list for 30 days; after that it's removed for good.
Pausing or deleting a business on a computer
Pausing or deleting a business on a phone
Figure 4.27Pausing or deleting a business
Sub-owners

Only you, the owner, can add, pause, delete or restore businesses. Under My business → Sub-owners you choose which of your businesses each sub-owner helps run.

4.18How to use categories, specials and options

Group what you sell into categories (for example Bread, Pastries and Cakes), mark specials, and let customers choose sizes and extras.

Steps

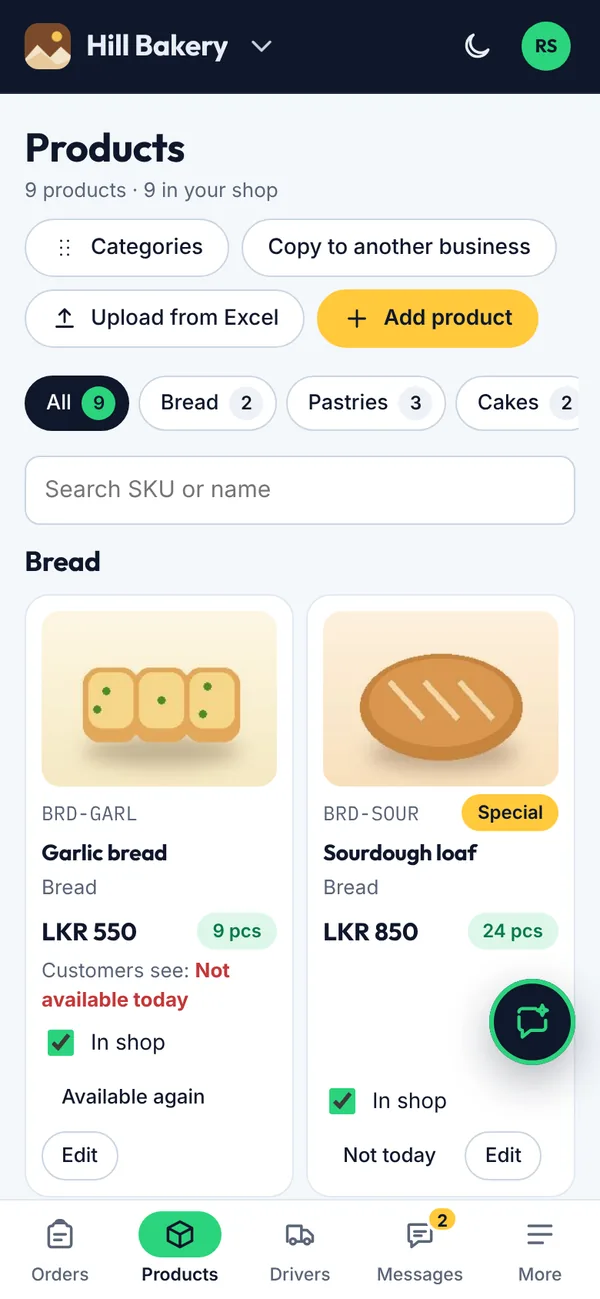
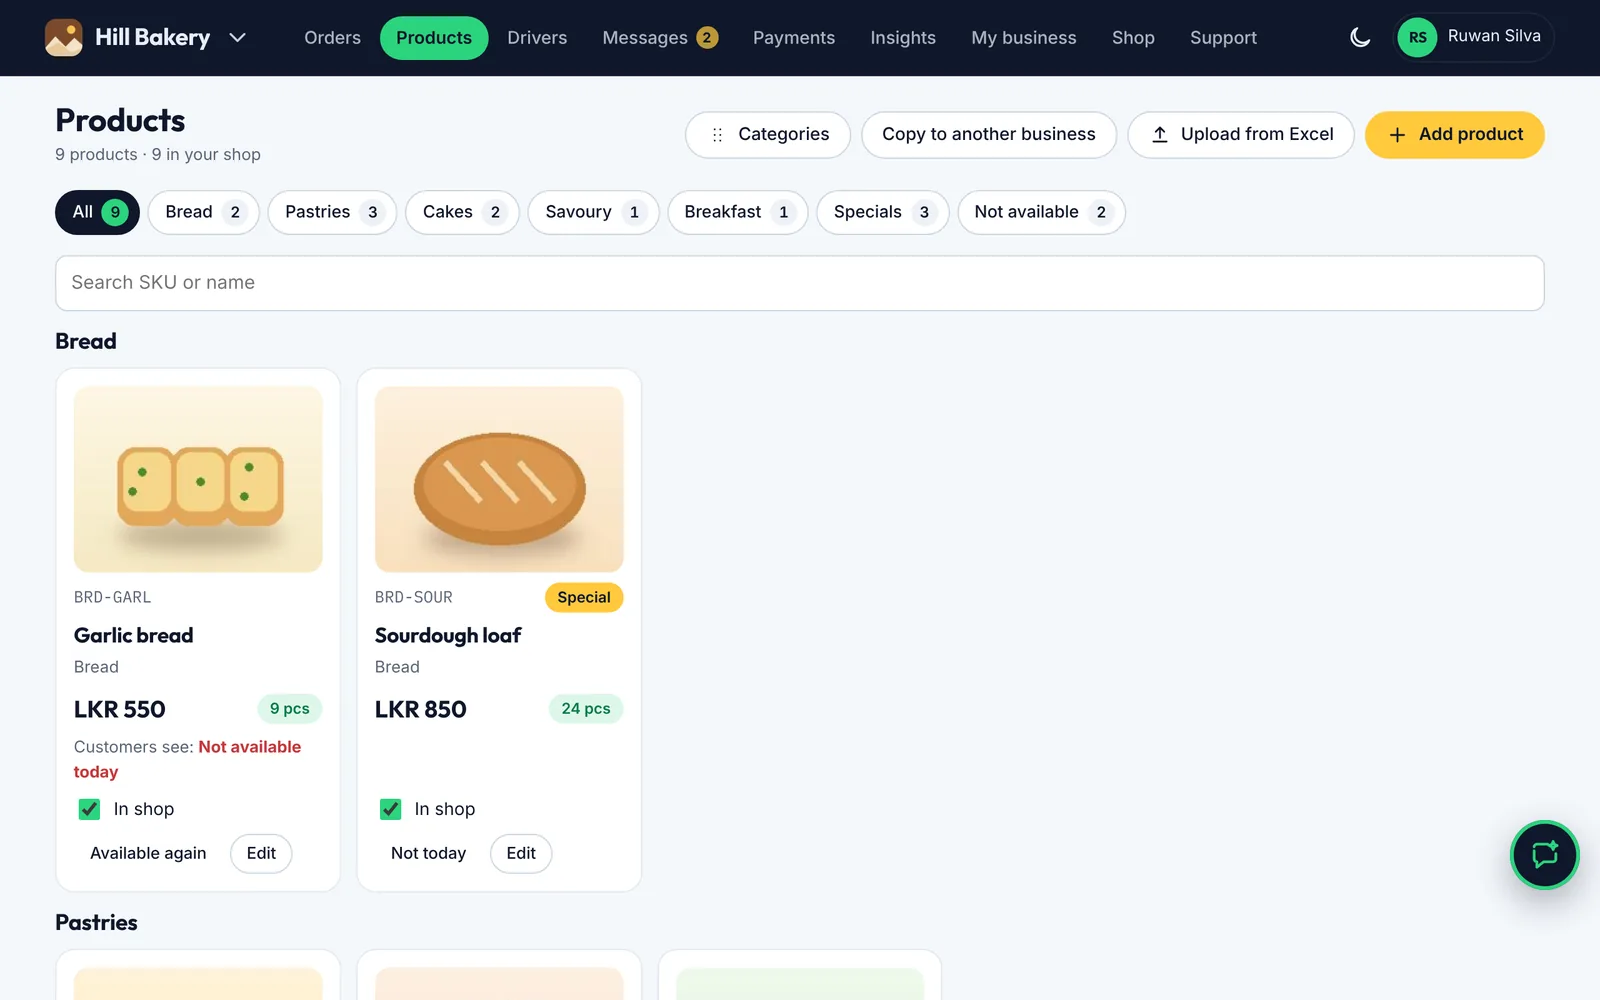
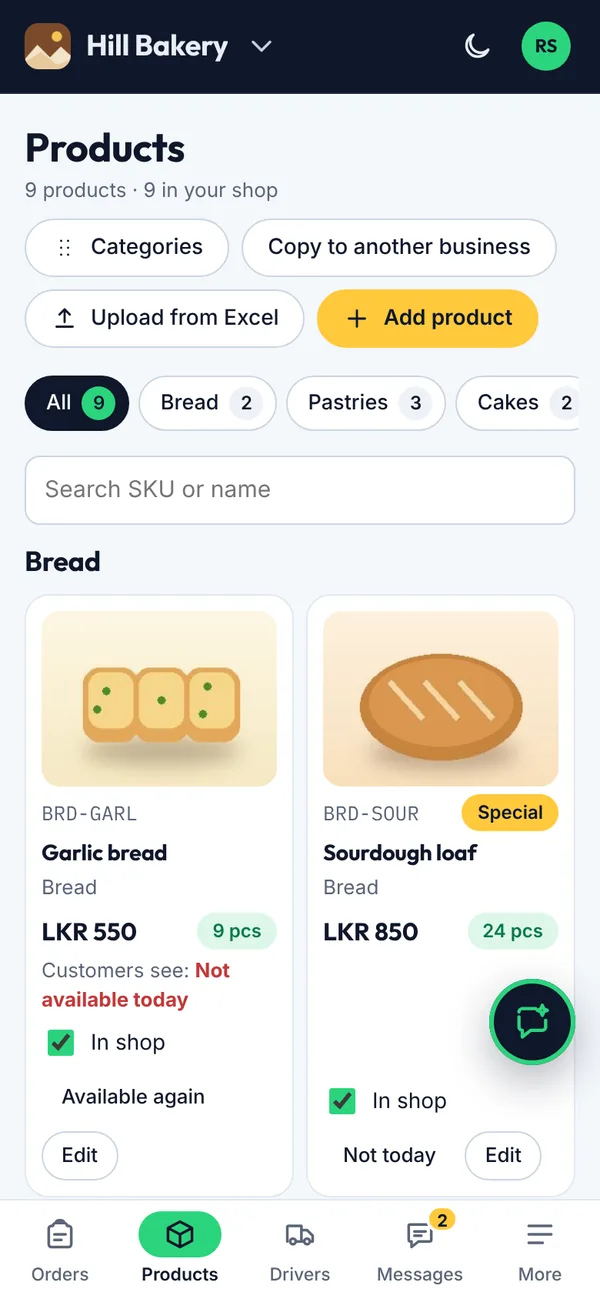
  1. Open Products and tap Categories. A new business starts with suggested categories for its type. Add, rename, reorder (arrows), hide or delete them.
  2. When something runs out for the day, tap Not today on it. Customers see “Not available today” and can't add it; it comes back by itself the next morning.
  3. Running another business with the same items? Tap Copy to another business to copy products, with their categories and options.
Products with categories and what customers see on a computer
Products with categories and what customers see on a phone
Figure 4.28Products with categories and what customers see
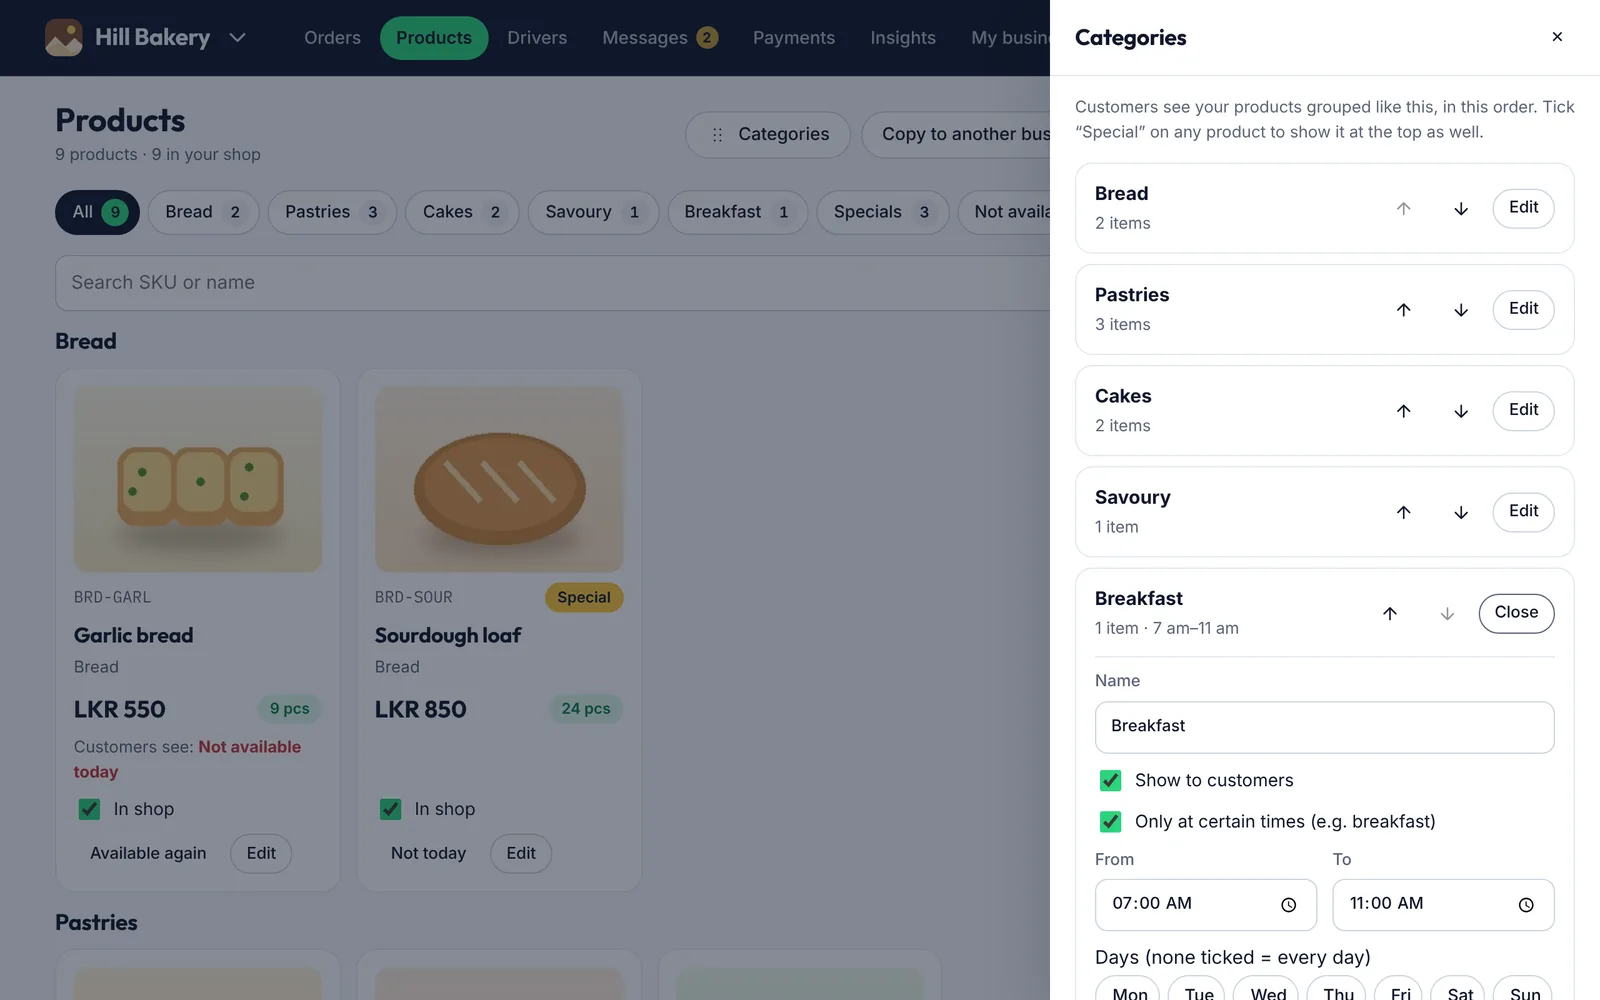
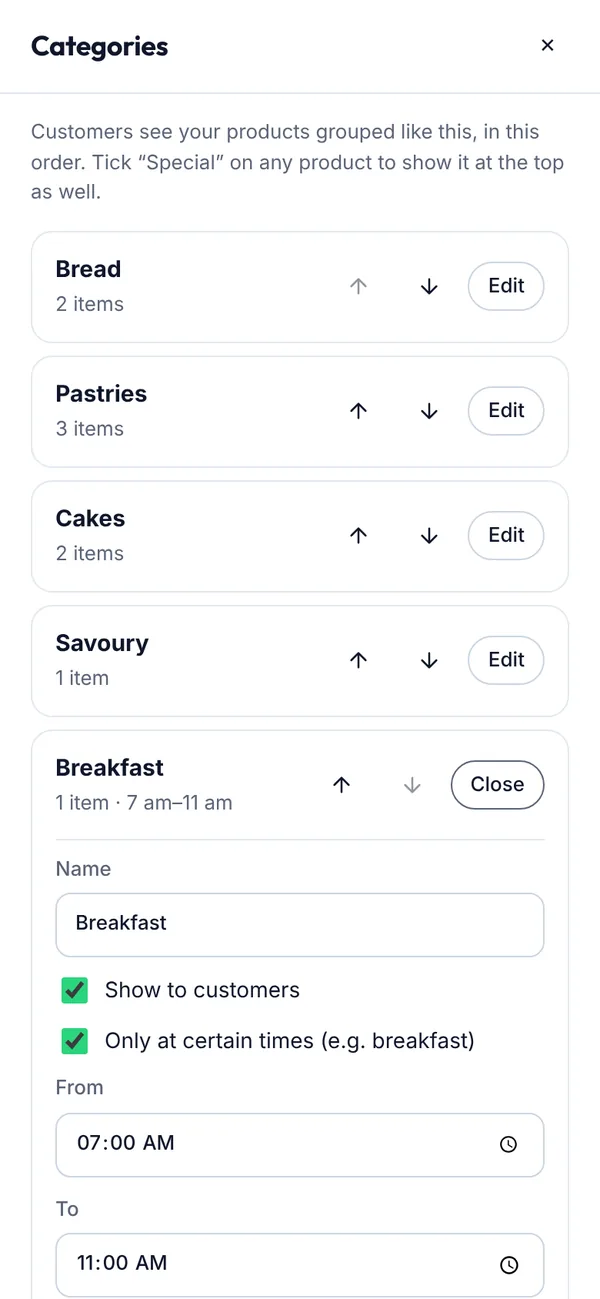
  1. To serve a category only at certain times, tap Edit, tick Only at certain times and set the hours and days (for example breakfast 7–11 am). Customers can still order those items for a time inside the hours.
Setting hours for a category on a computer
Setting hours for a category on a phone
Figure 4.29Setting hours for a category
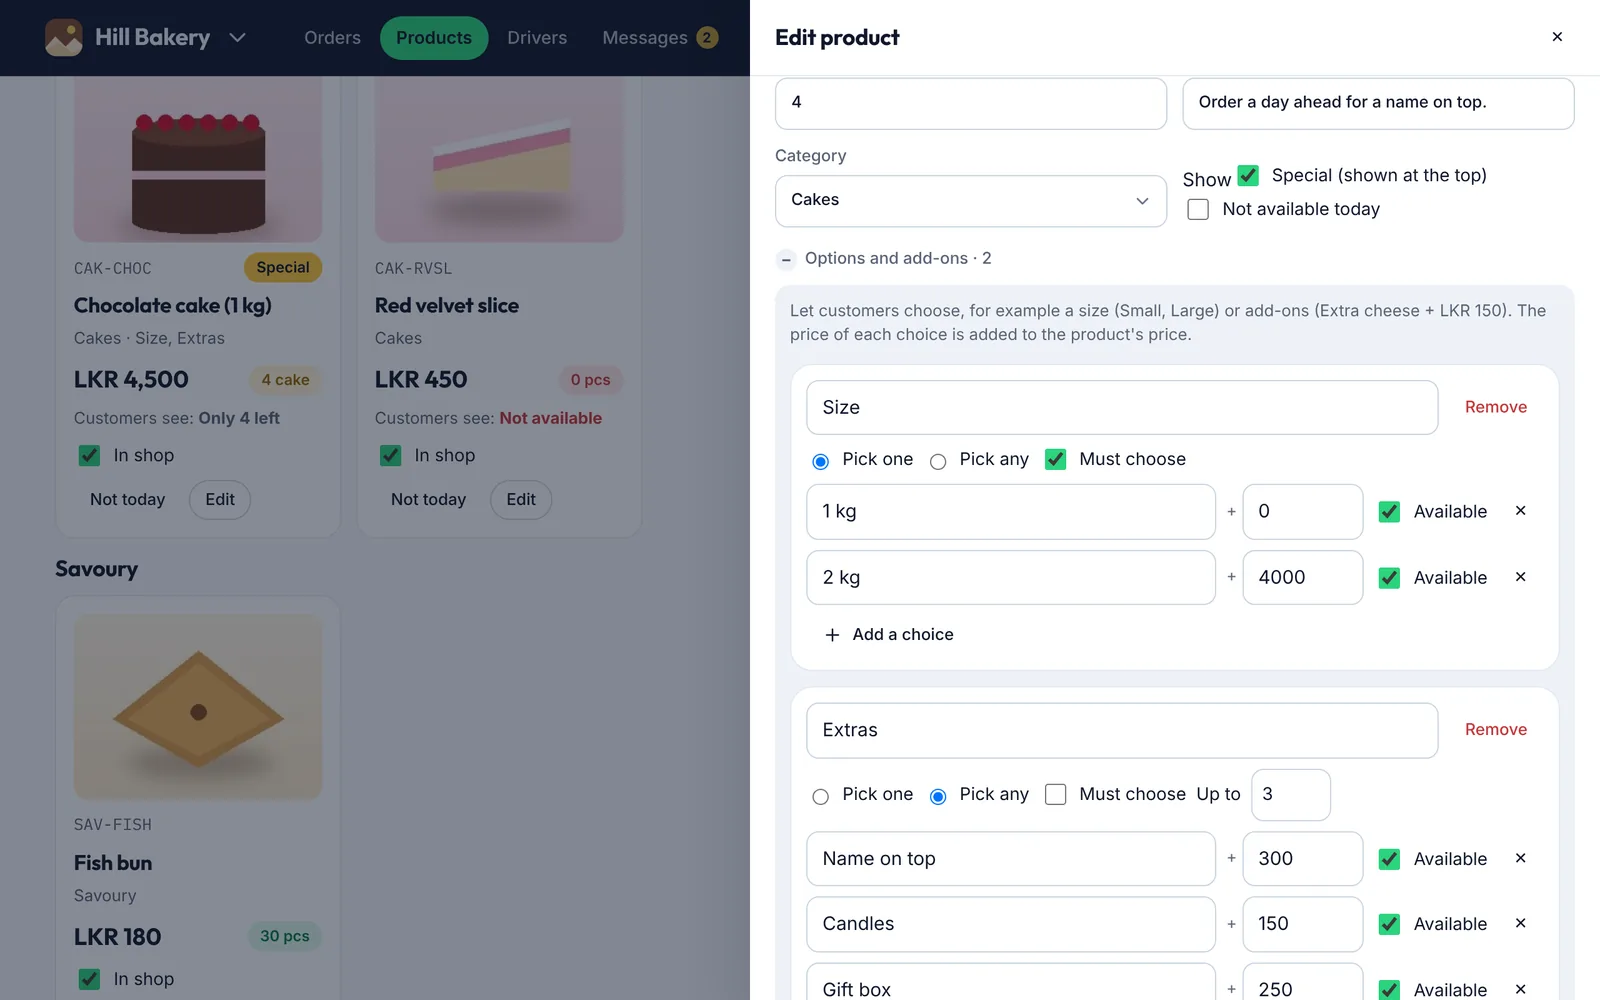
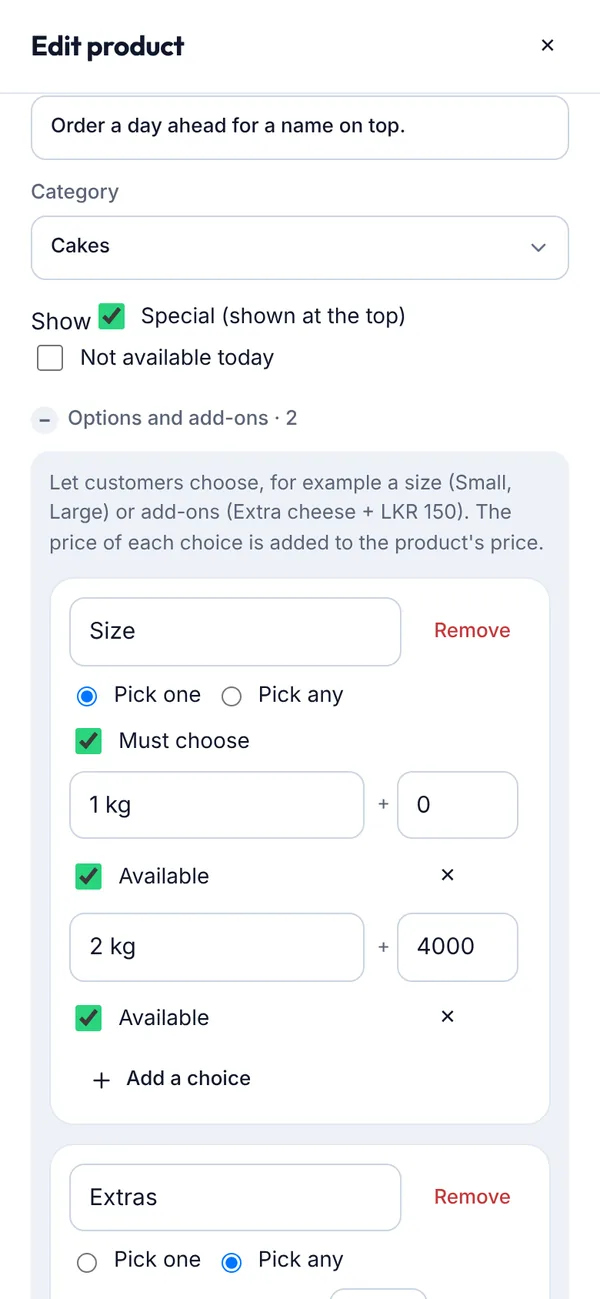
  1. In a product, choose its Category. Tick Special to show it at the top of your shop as well.
  2. Under Options and add-ons, tap + Sizes or + Add-ons, name each choice and add its extra price. Choose Pick one or Pick any, and tick Must choose when the customer has to pick one.
A product's category, special tick and options on a computer
A product's category, special tick and options on a phone
Figure 4.30A product's category, special tick and options
What you’ll see

Your shop shows category tabs, with Specials first. Items with no stock show “Not available”, and items with 5 or fewer left show “Only 3 left”. If something sells out while it's in a customer's cart, it's marked and left out of their order.

4.19How to see your drivers' calendar

See every driver's deliveries for the week in one calendar, the same way drivers see their own.

Steps

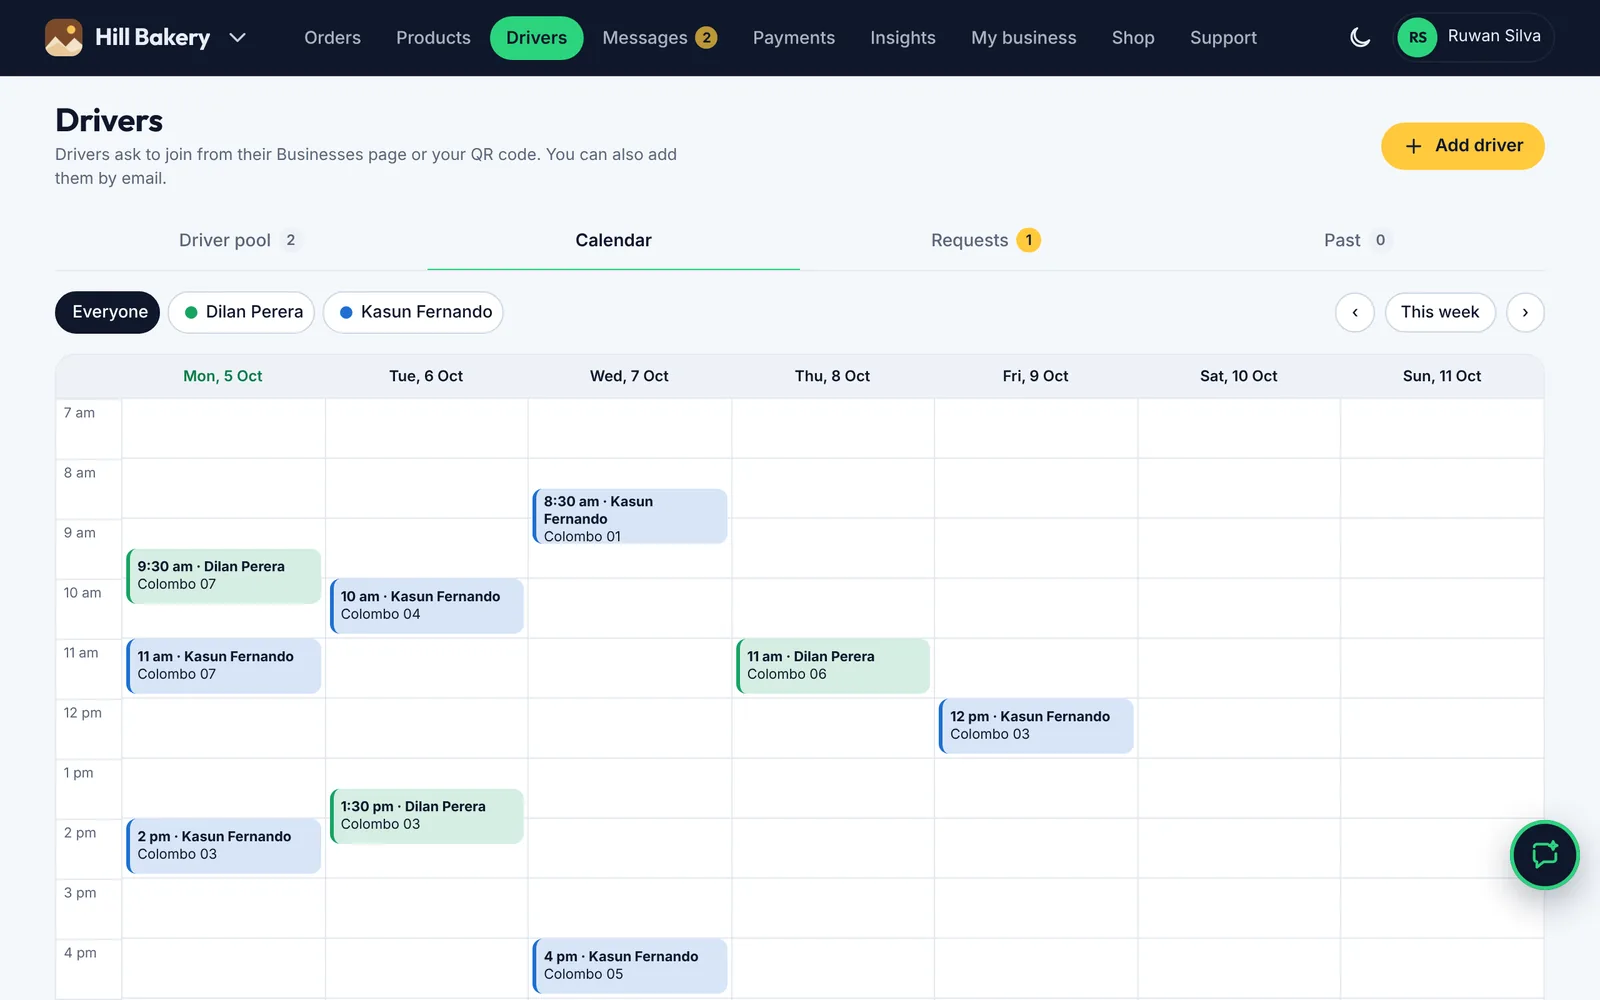
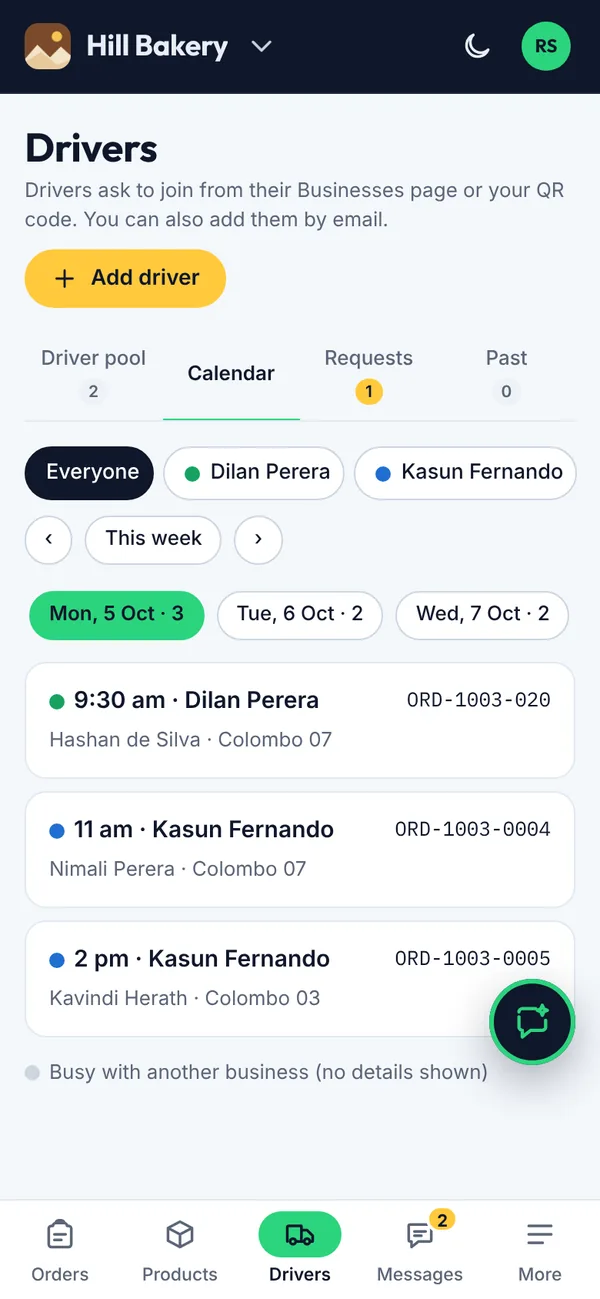
  1. Open Drivers and tap Calendar. Each driver has a colour. Use the arrows to change the week, or tap a driver's name to show only them.
  2. Tap a delivery to see its details, then Open order or Driver details.
  3. Grey striped blocks mean the driver is busy with another business at that time. You don't see that business's details.
Your drivers' week on a computer
Your drivers' week on a phone
Figure 4.31Your drivers' week
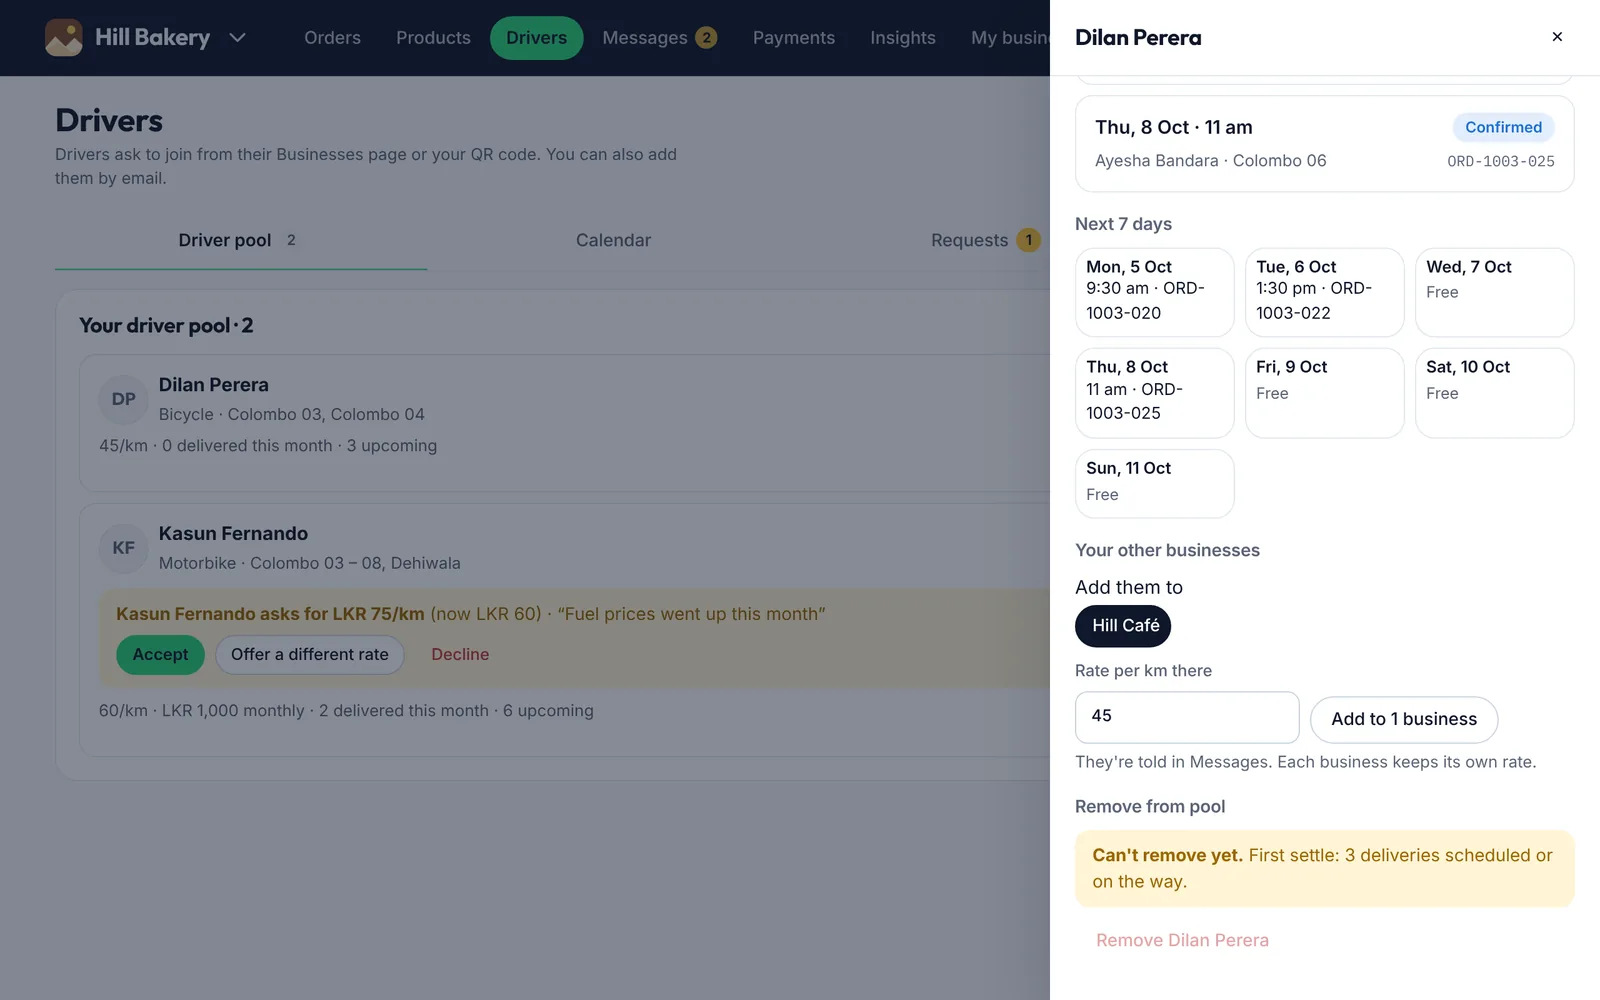
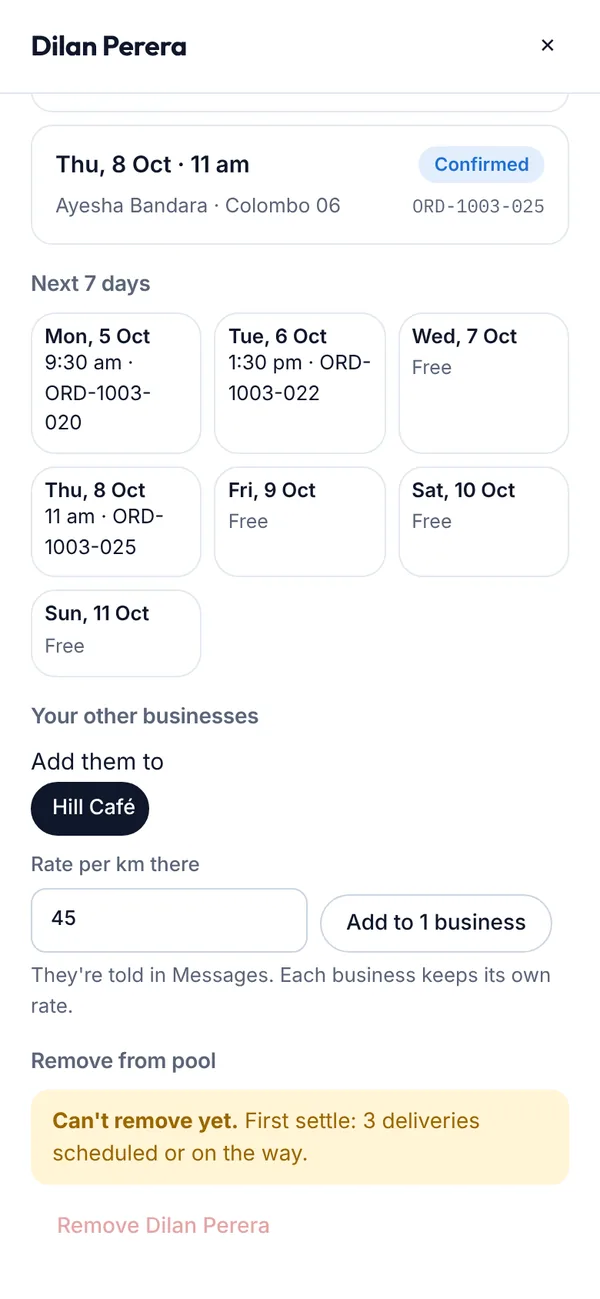
  1. In Driver details you see their upcoming jobs and rates. If you run several businesses, you can add the driver to your other businesses there, each at its own rate.
Driver details and adding them to another business on a computer
Driver details and adding them to another business on a phone
Figure 4.32Driver details and adding them to another business
Section 5 · For delivery people

5Delivery people

Join the businesses you want to work with, confirm jobs, find your way and track what you earn.

  1. 5.1How to set up your delivery profile
  2. 5.2Your Home page at a glance
  3. 5.3How to join a business
  4. 5.4How to change your rate or leave a business
  5. 5.5How to confirm a job
  6. 5.6How to make a delivery
  7. 5.7How to mark an order delivered
  8. 5.8How to hand over cash and see your earnings

5.1How to set up your delivery profile

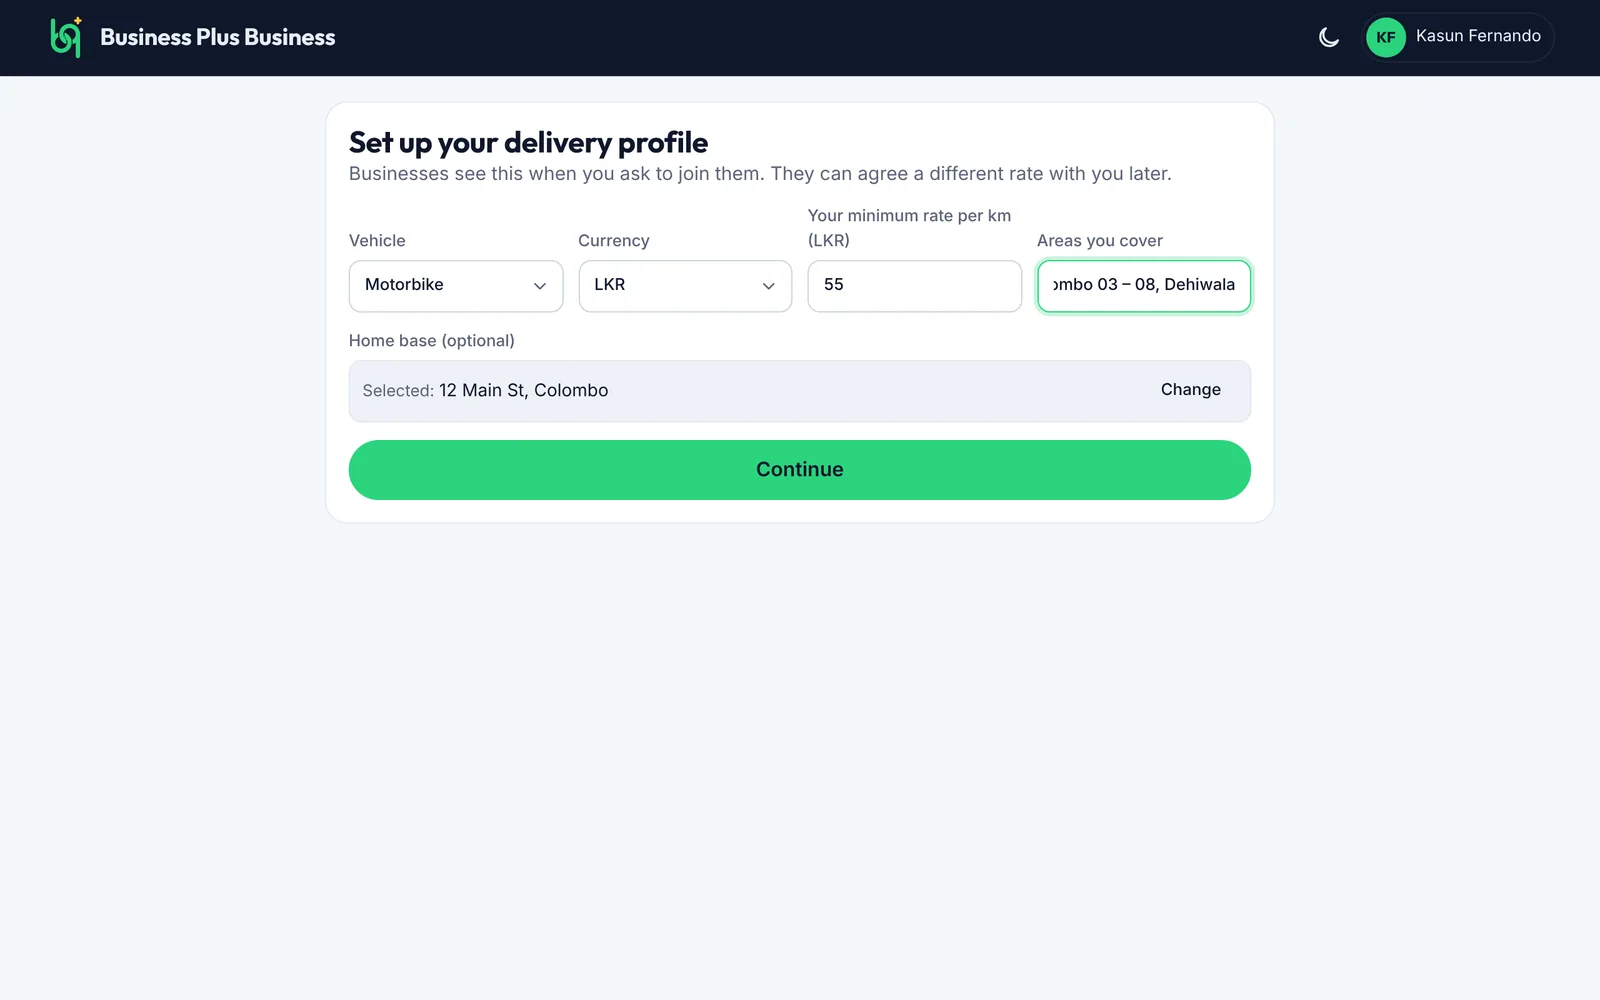
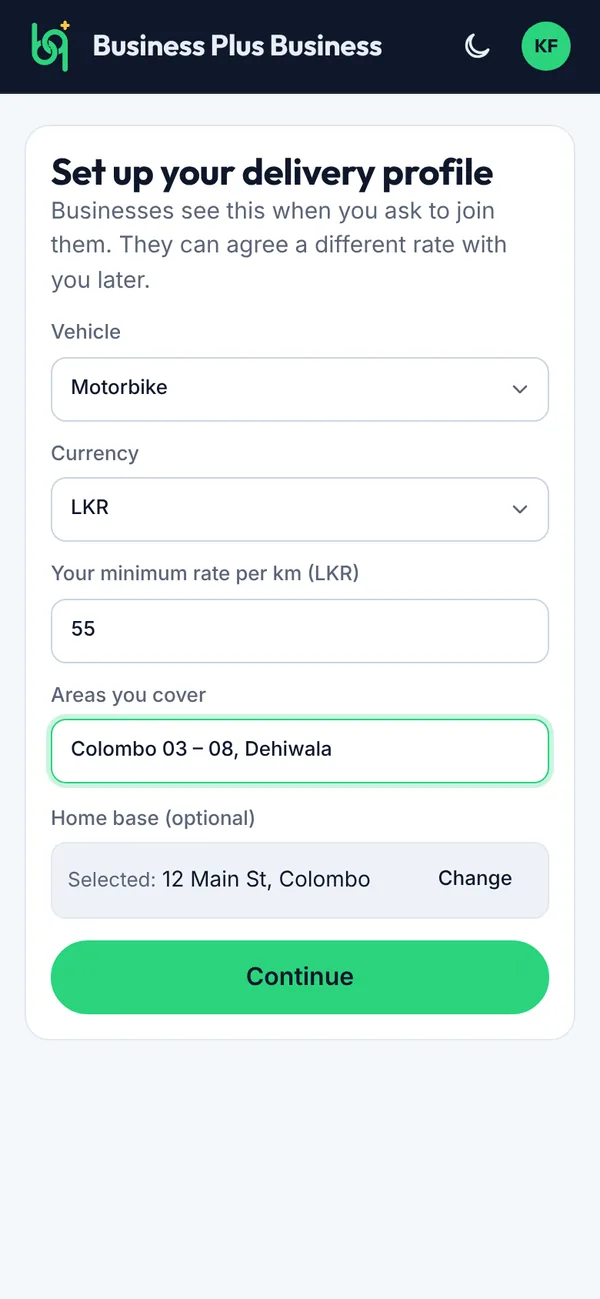
After you sign up as a delivery person, tell businesses what you drive, what you charge and where you work.

Steps

  1. Check your vehicle.
  2. Enter your minimum rate per km.
  3. Enter the areas you cover.
  4. Tap Continue.
Set up your delivery profile on a computer
Set up your delivery profile on a phone
Figure 5.1Set up your delivery profile
What you’ll see

Businesses see these details when you ask to join. You can change them later under Account.

5.2Your Home page at a glance

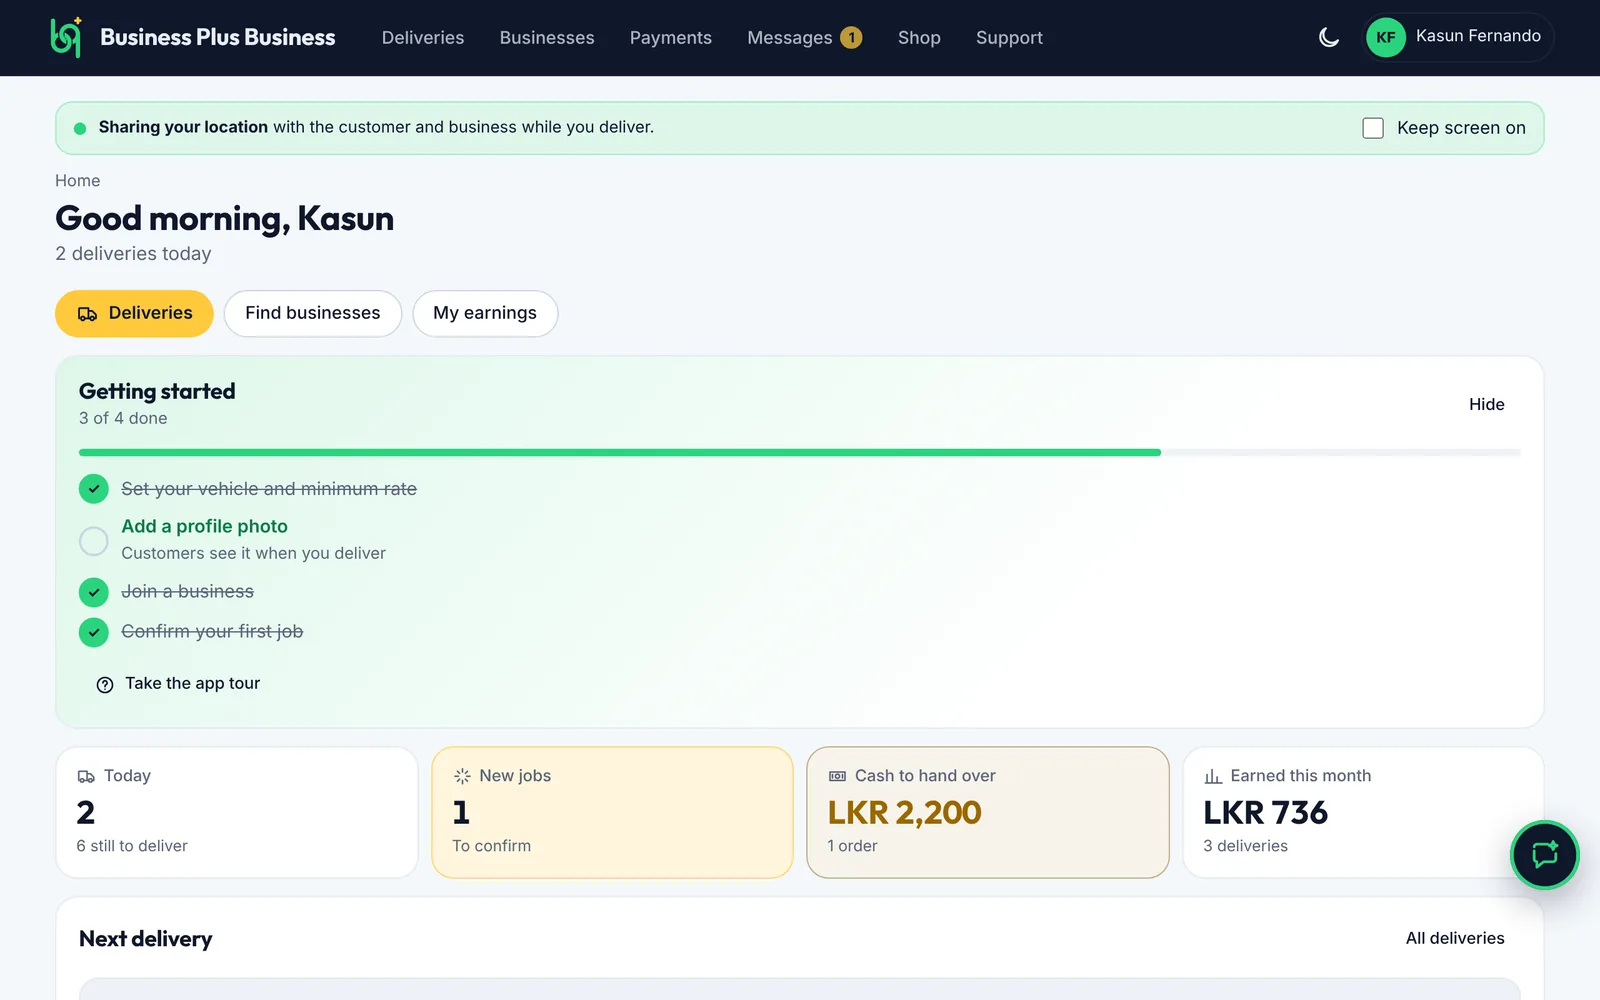
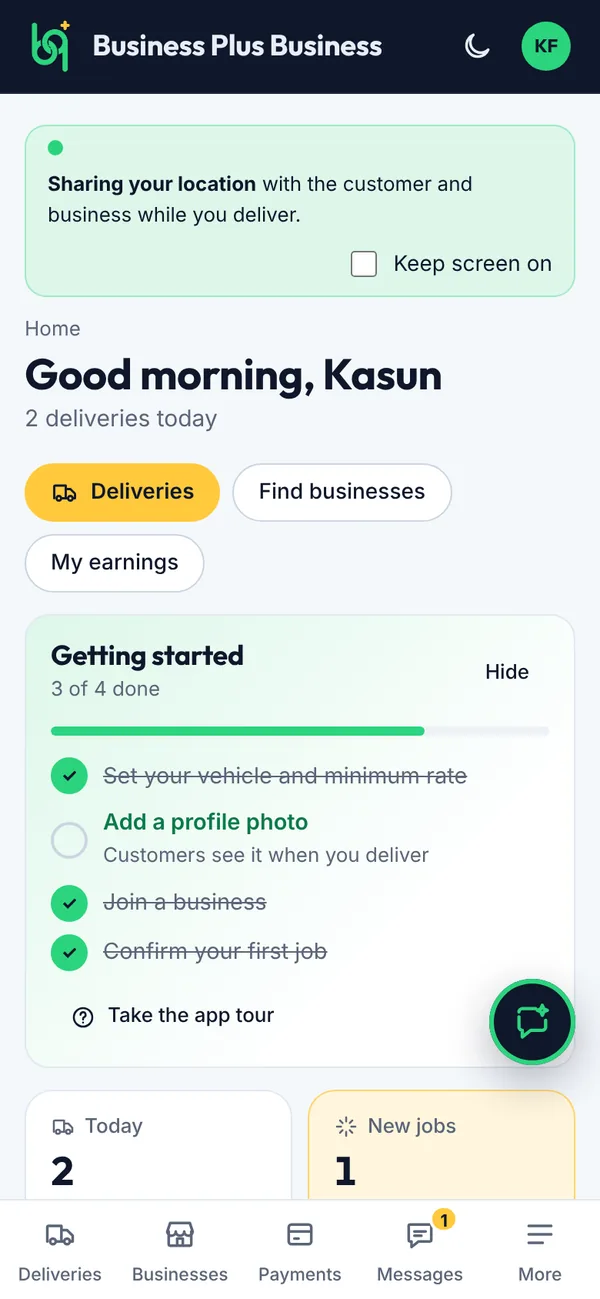
Home shows today's work and your money.

Steps

  1. The green bar means your location is shared with the customer and business while you deliver.
  2. The tiles show today's deliveries, new jobs, cash you hold and what you've earned this month.
  3. Next delivery shows where to go next.
Delivery person Home page on a computer
Delivery person Home page on a phone
Figure 5.2Delivery person Home page

5.3How to join a business

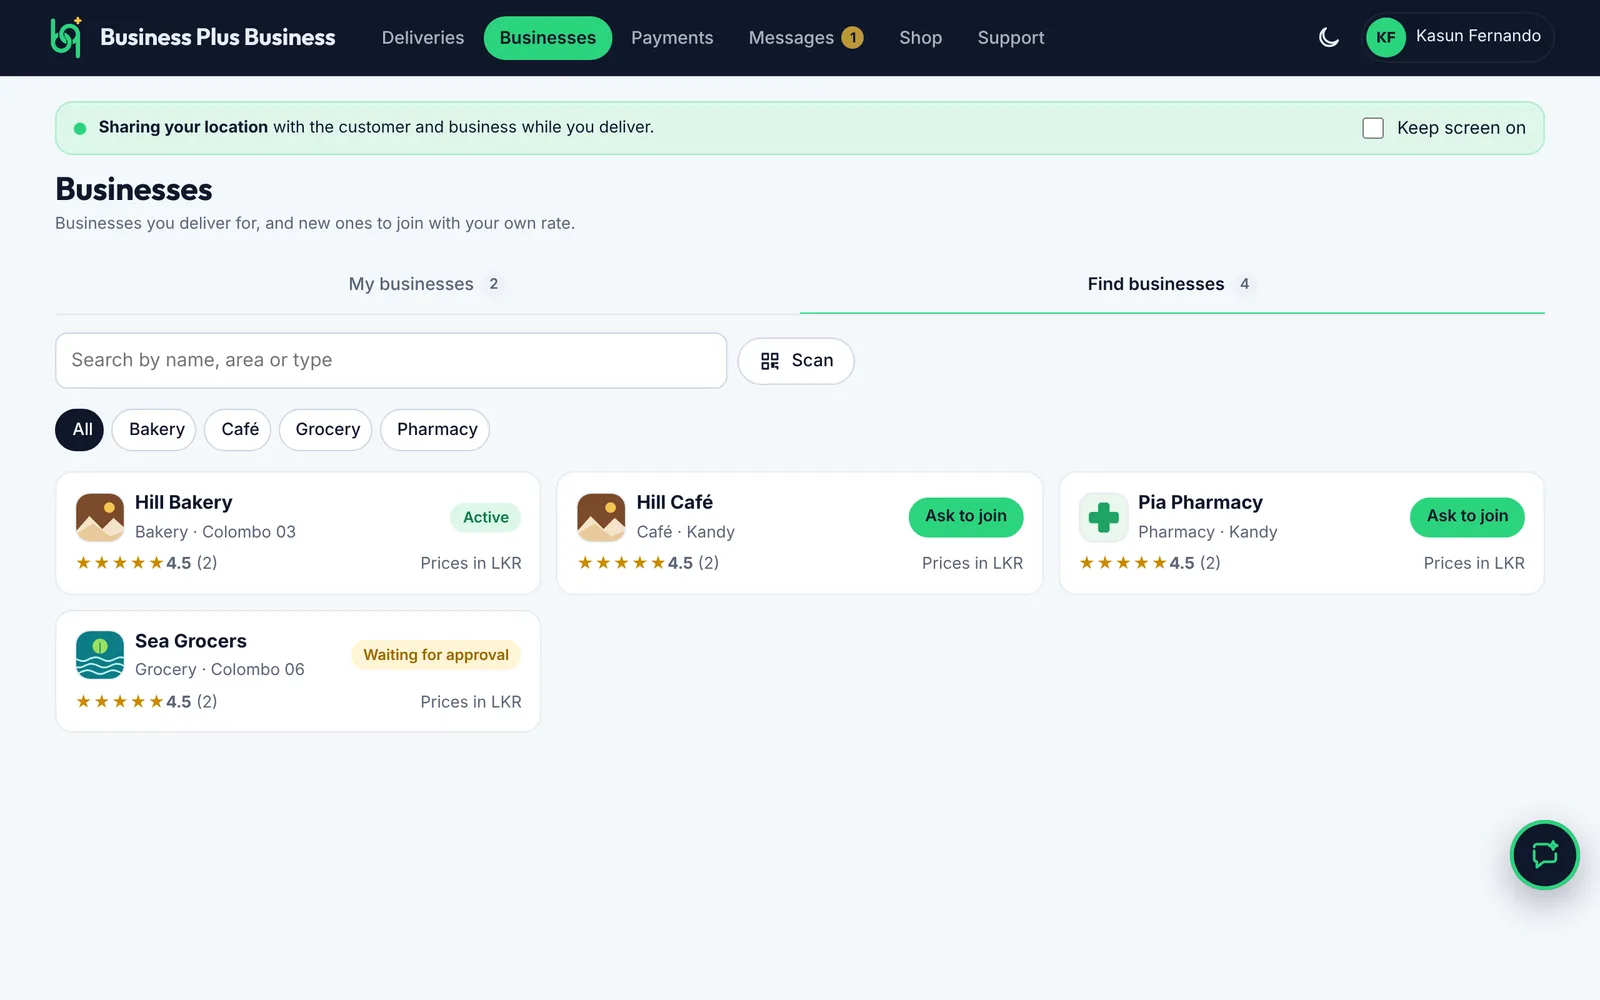
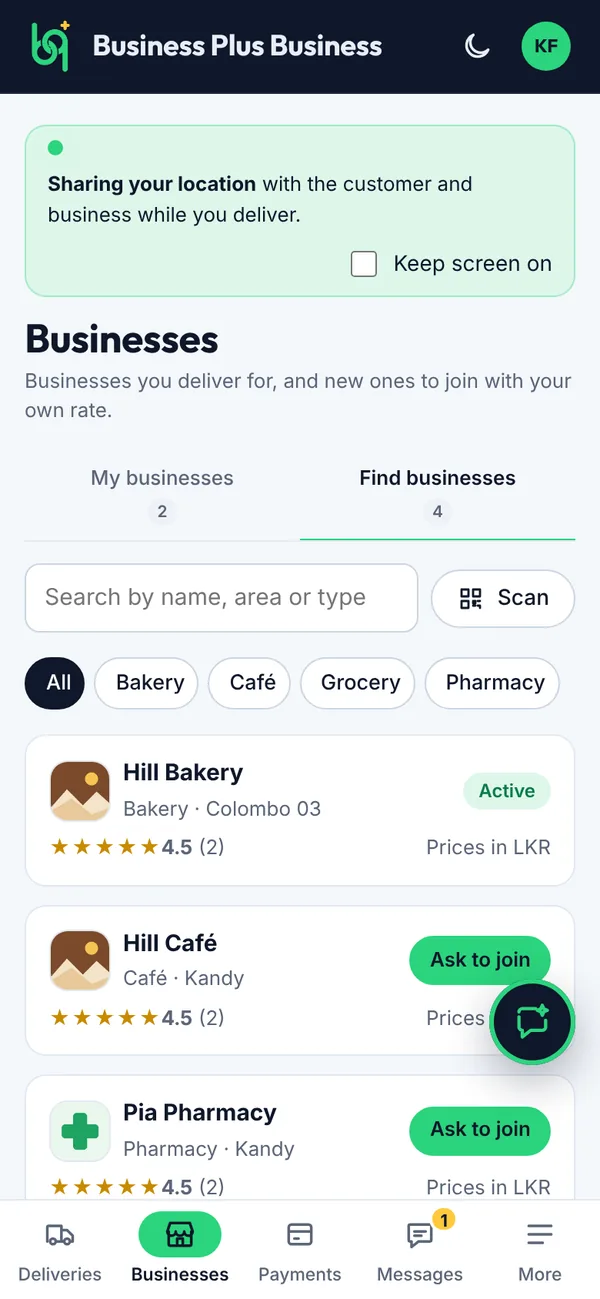
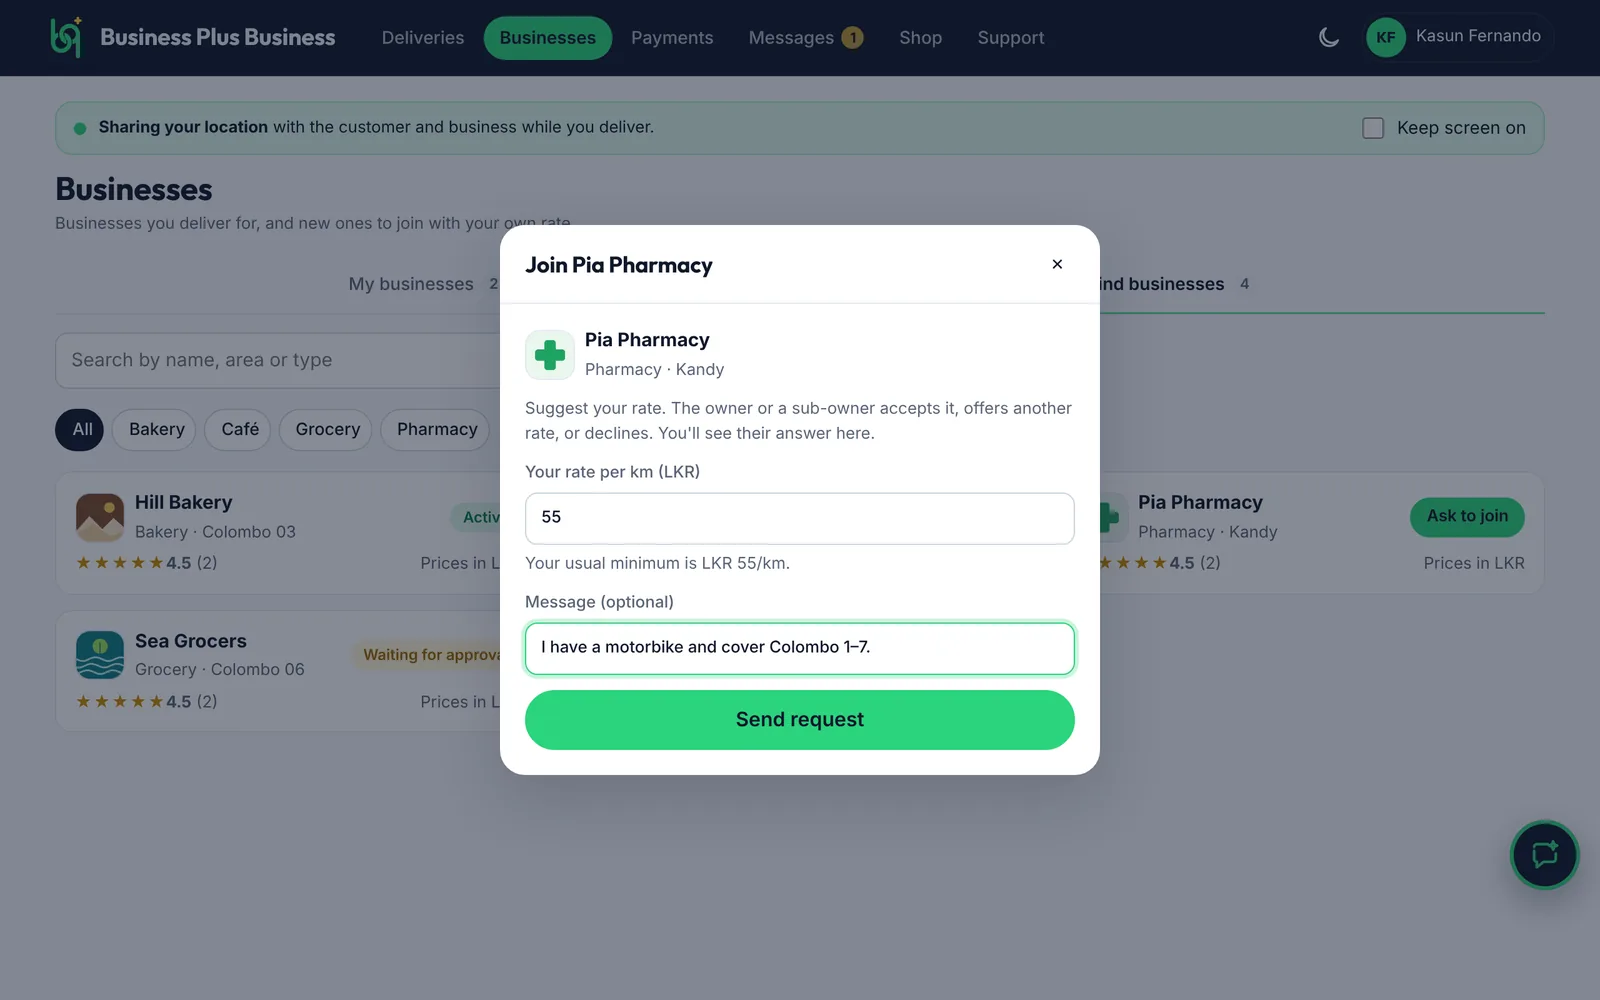
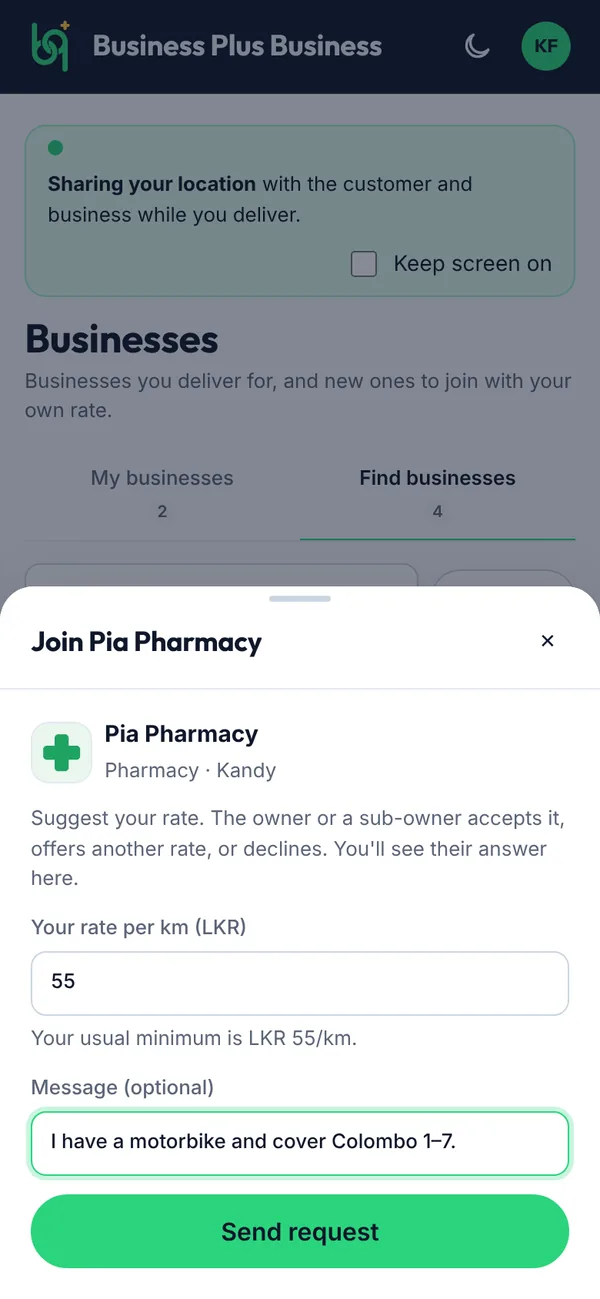
Ask to join a business at the rate you want. The owner or a sub-owner accepts your request.

Steps

  1. Open Businesses and tap Find businesses. Search, or tap Scan to scan a QR code.
  2. Tap Ask to join on a business.
  3. Your request shows Waiting for approval until it's accepted.
Find businesses on a computer
Find businesses on a phone
Figure 5.3Find businesses
Asking to join with your rate on a computer
Asking to join with your rate on a phone
Figure 5.4Asking to join with your rate
What you’ll see

In the join window, enter your rate per km and a short message, then tap Send request. Once accepted, the business shows Active and its jobs can come to you.

5.4How to change your rate or leave a business
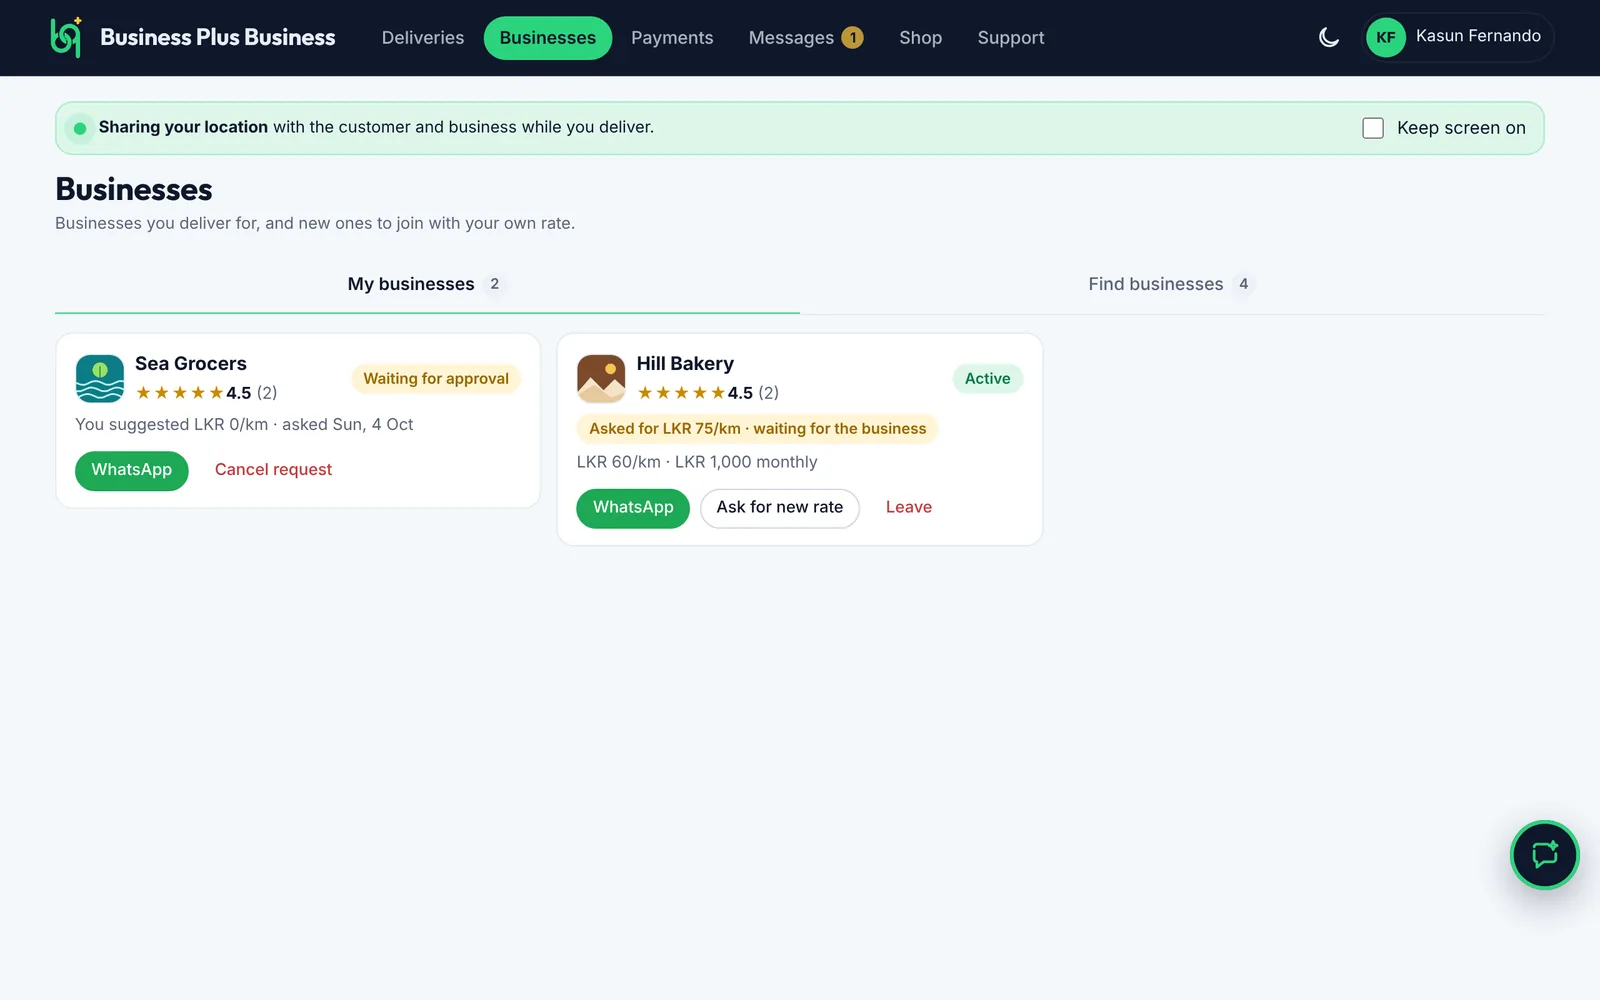
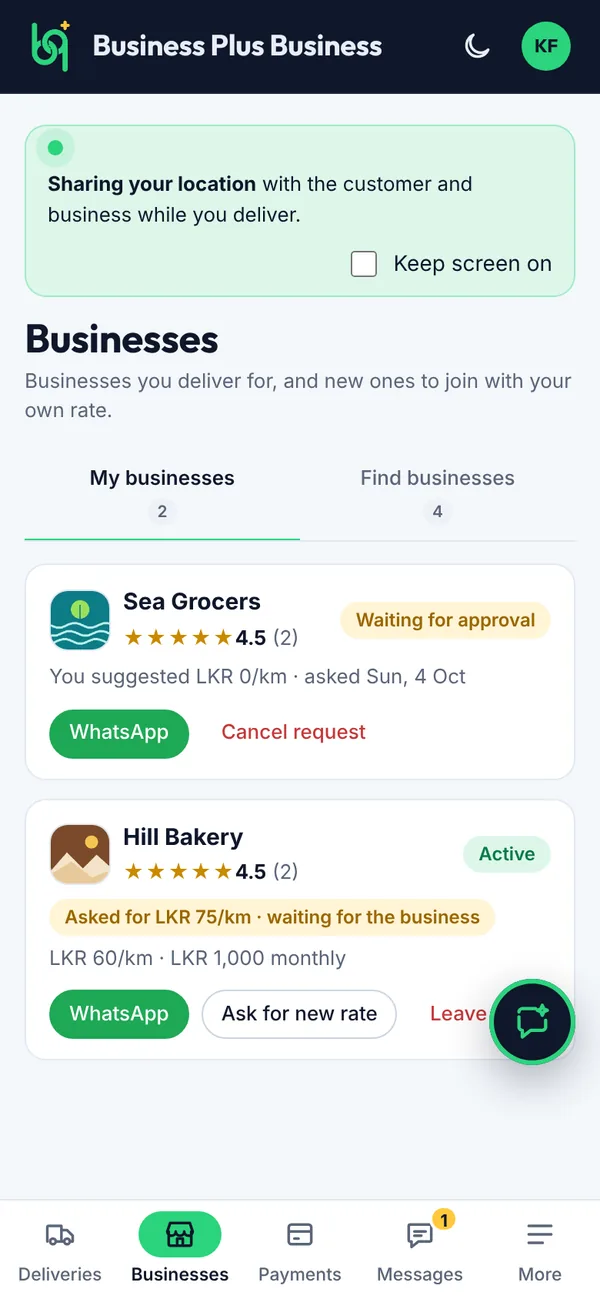
My businesses lists the businesses you deliver for and your pending requests.

Steps

  1. Tap Ask for new rate to suggest a different rate.
  2. Tap Cancel request to withdraw a request.
  3. Tap Leave to stop delivering for a business. You can only leave once you have no open deliveries for them.
My businesses on a computer
My businesses on a phone
Figure 5.5My businesses

5.5How to confirm a job

New jobs appear when a business assigns you. Confirm them so the business knows you've seen them.
Steps

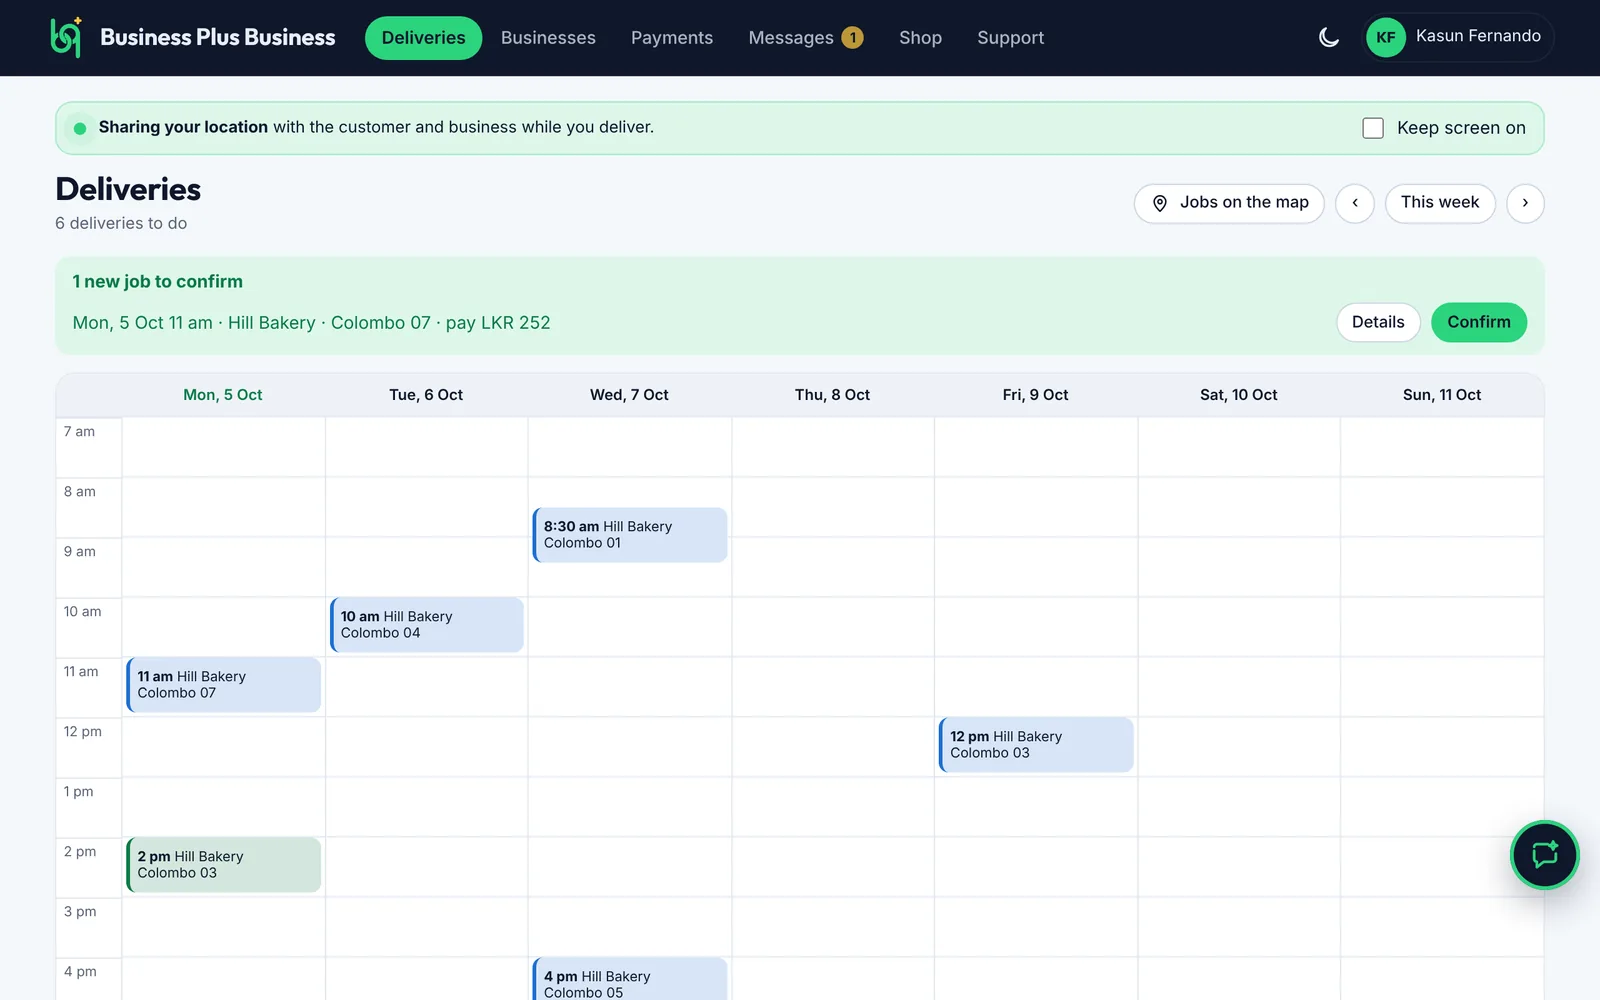
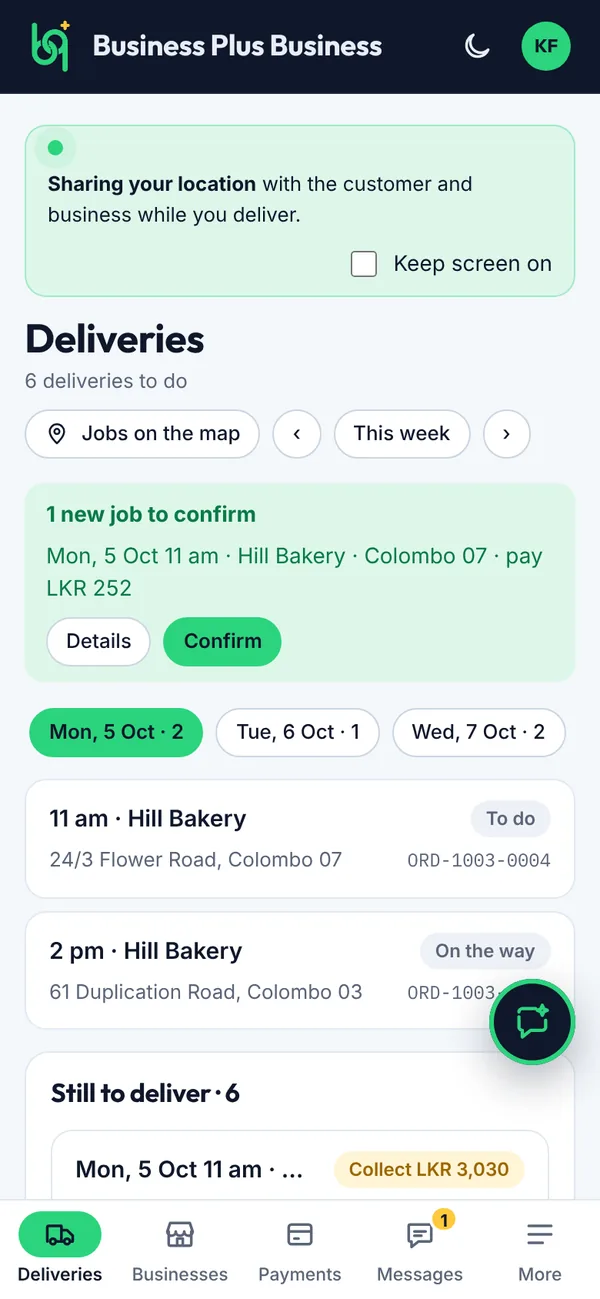
  1. Tap Confirm on a new job, or Details to look first.
  2. Jobs on the map shows all your stops at once.
  3. Tick Keep screen on while you drive so your location keeps updating.
Your deliveries on a computer
Your deliveries on a phone
Figure 5.6Your deliveries

5.6How to make a delivery

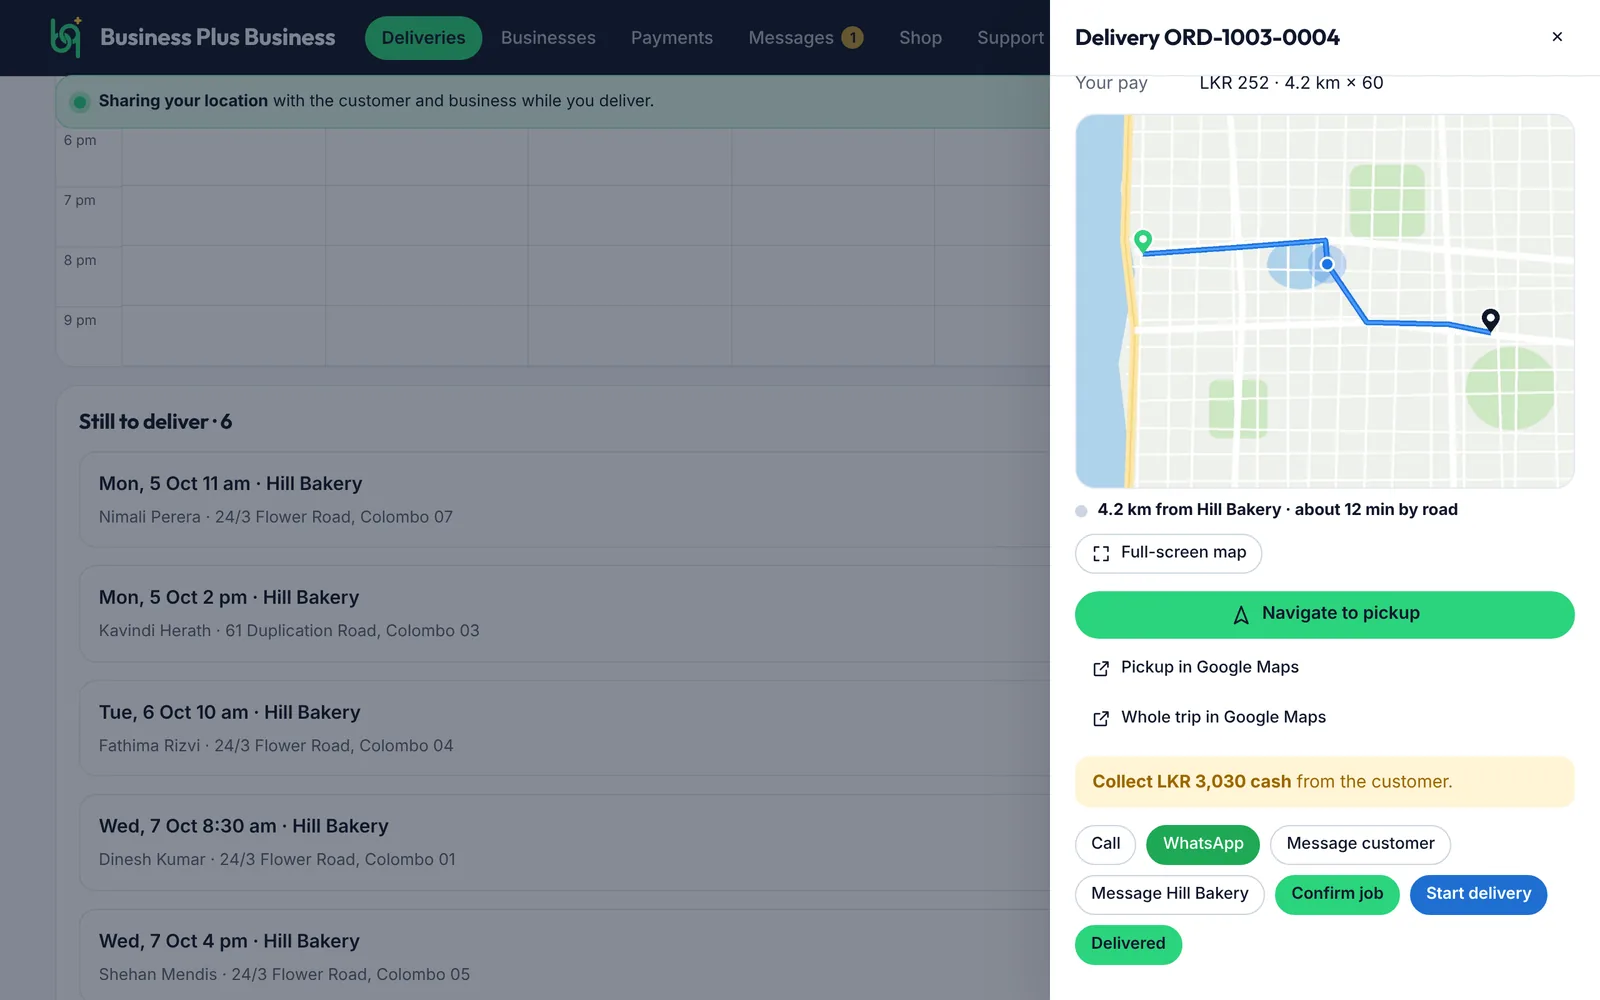
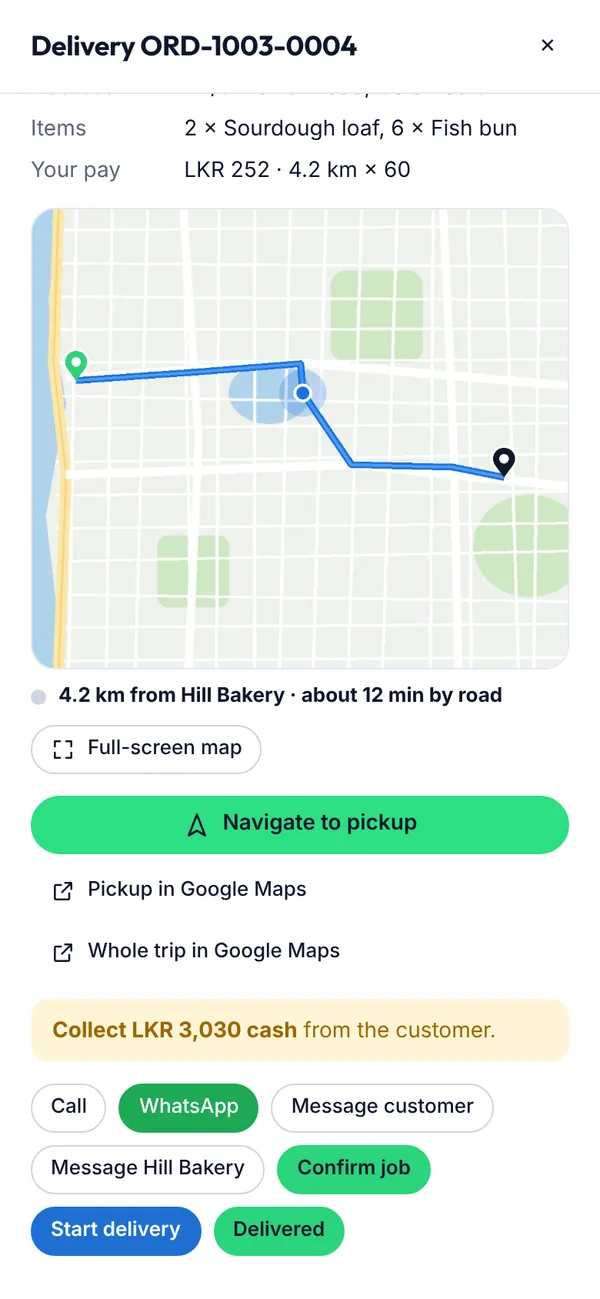
Open a job to see where to pick up, where to deliver, what to collect and what you'll earn.

Before you start
  • Open the job from Deliveries.

Steps

  1. Tap Start delivery when you leave. The customer can now track you.
Starting a delivery on a computer
Starting a delivery on a phone
Figure 5.7Starting a delivery
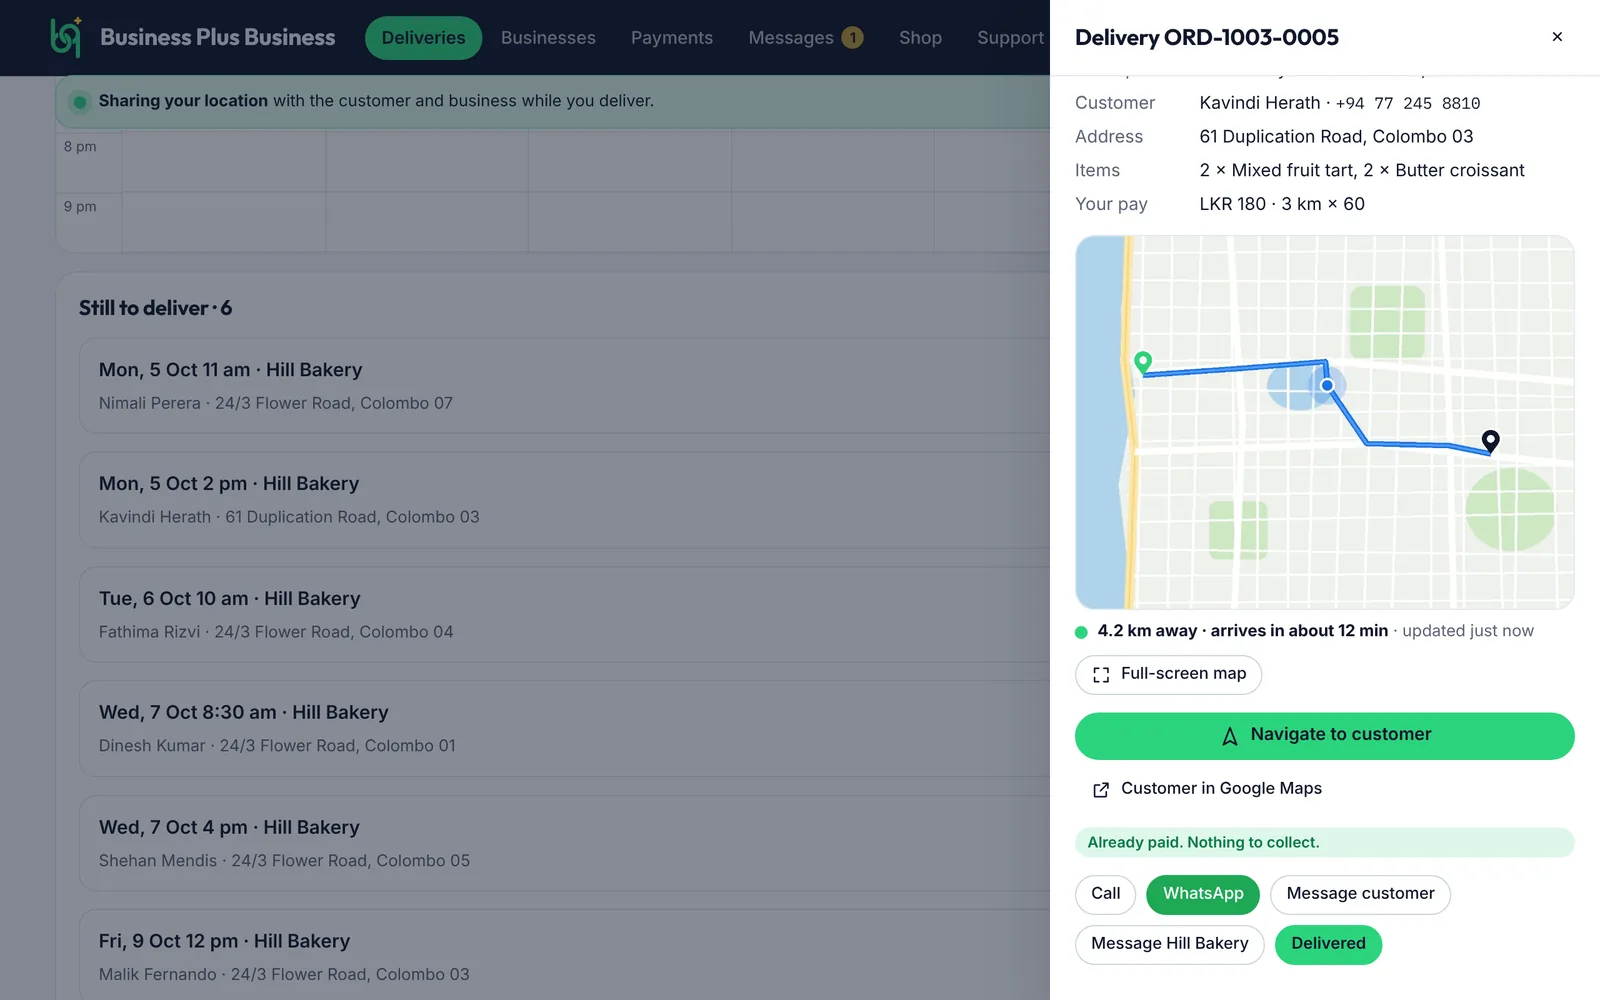
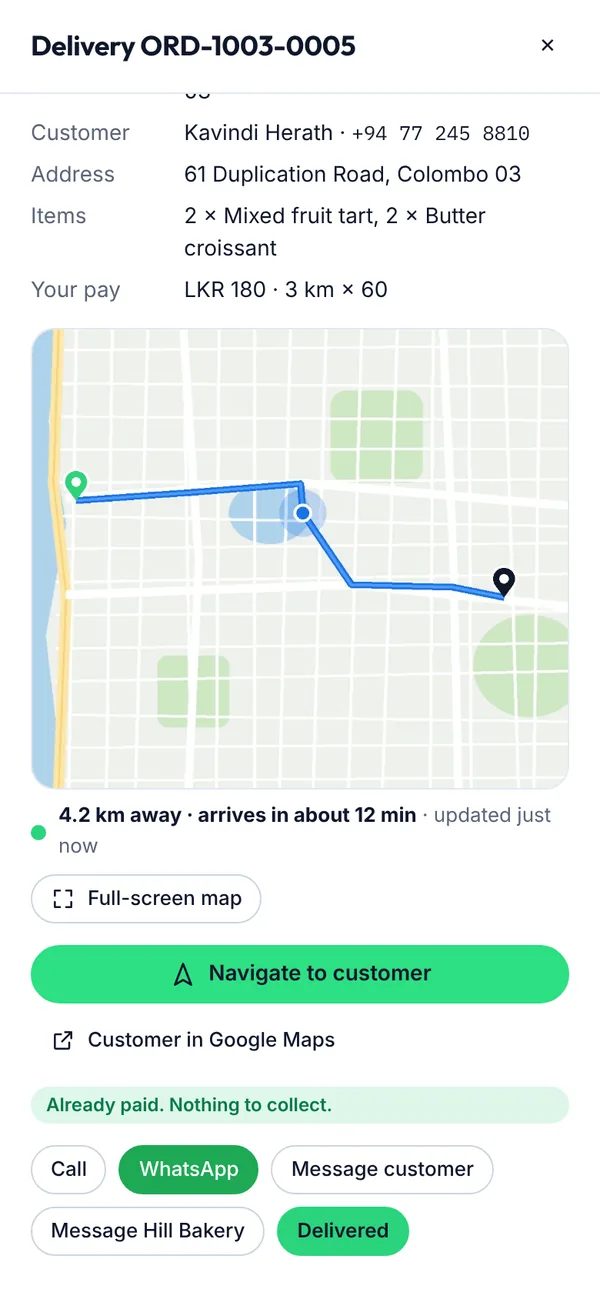
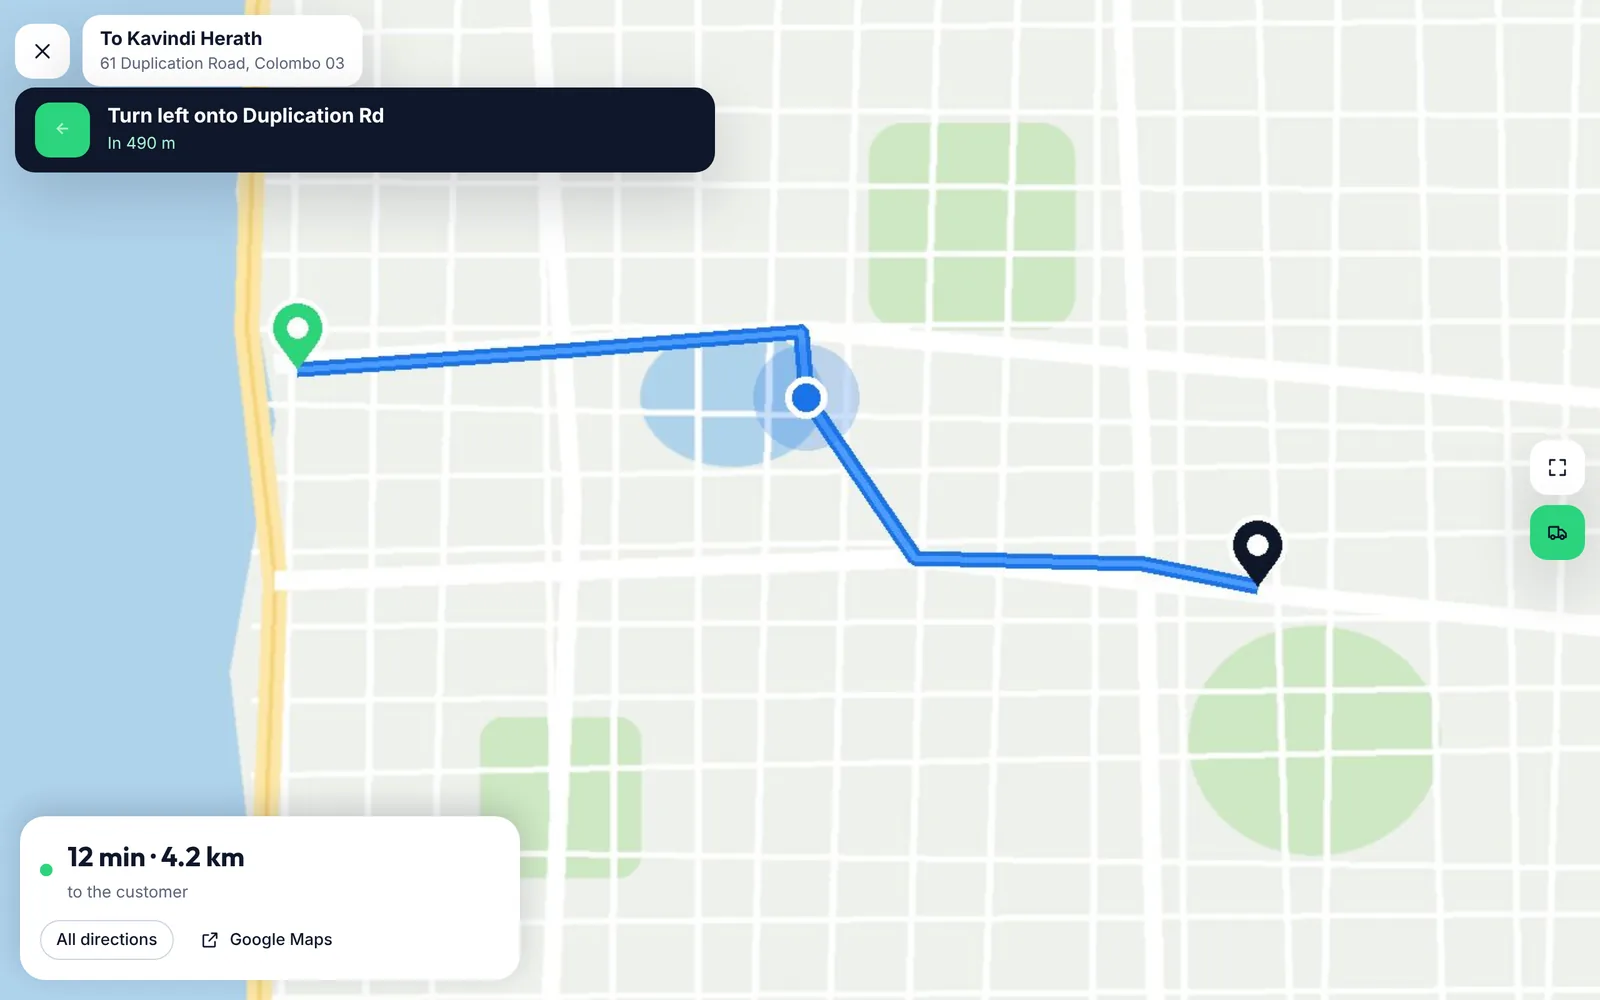
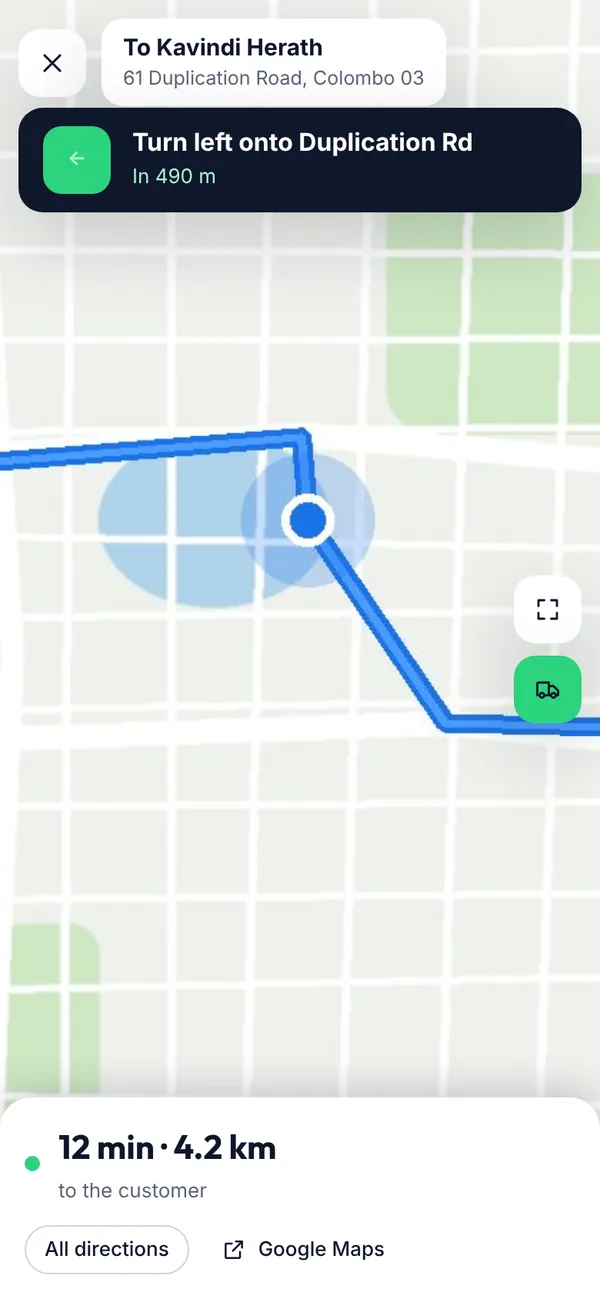
  1. Tap Navigate to customer for turn-by-turn directions in the app.
  2. Prefer Google Maps? Tap Customer in Google Maps.
  3. Call, WhatsApp or message the customer or the business if you need to.
A delivery on the way on a computer
A delivery on the way on a phone
Figure 5.8A delivery on the way
In-app navigation on a computer
In-app navigation on a phone
Figure 5.9In-app navigation
What you’ll see

Check the banner on each job: Collect … cash tells you how much to collect; Already paid means there's nothing to collect.

5.7How to mark an order delivered

Record the handover so the customer, the business and your earnings are updated.
Before you start
  • Open the job and tap Delivered.

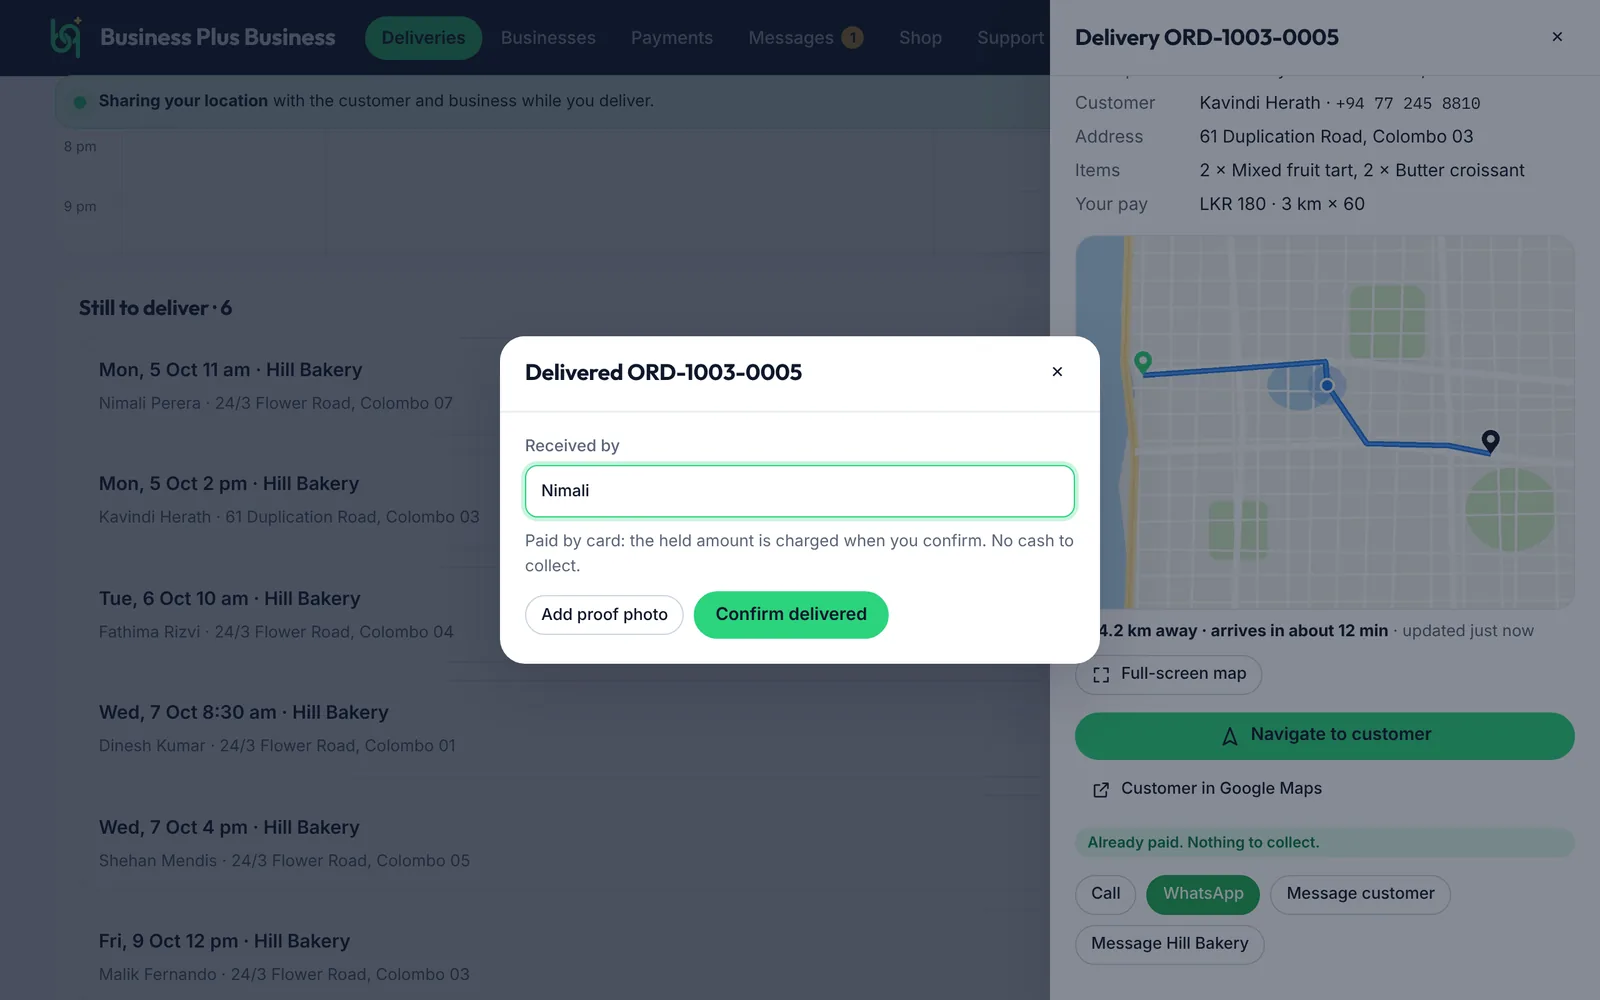
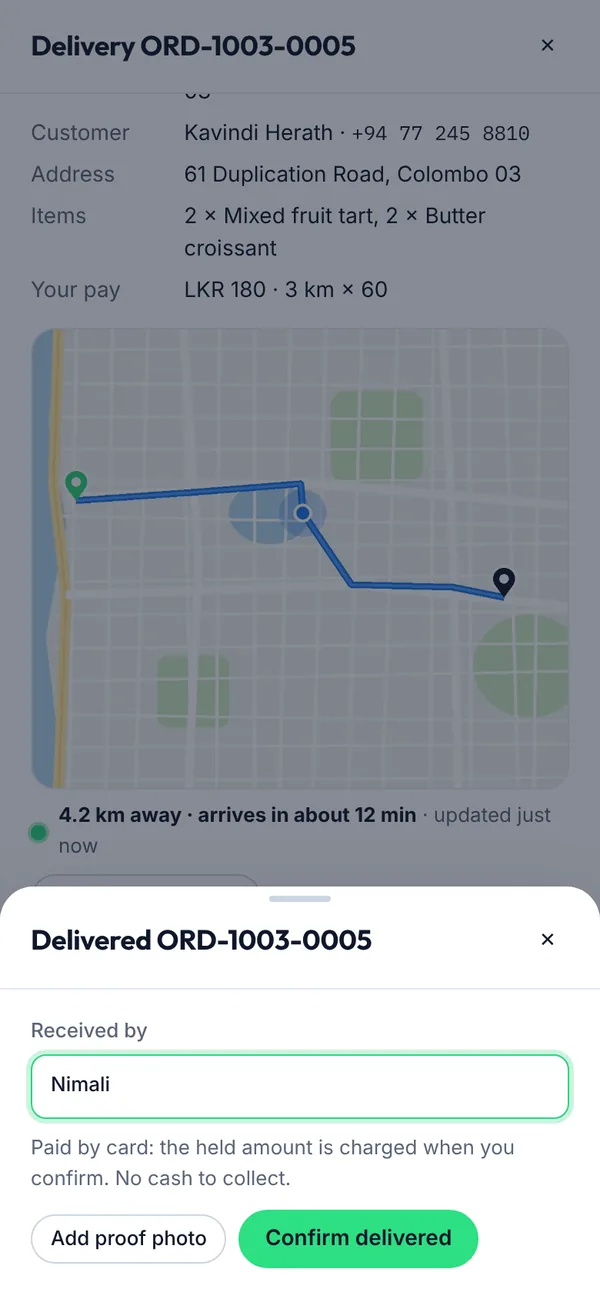
Steps

  1. Enter who received the order.
  2. Tap Add proof photo if you'd like a photo on record. For cash orders, enter the cash you collected.
  3. Tap Confirm delivered.
Marking an order delivered on a computer
Marking an order delivered on a phone
Figure 5.10Marking an order delivered
What you’ll see

The order shows Delivered. Card orders are charged automatically.

5.8How to hand over cash and see your earnings

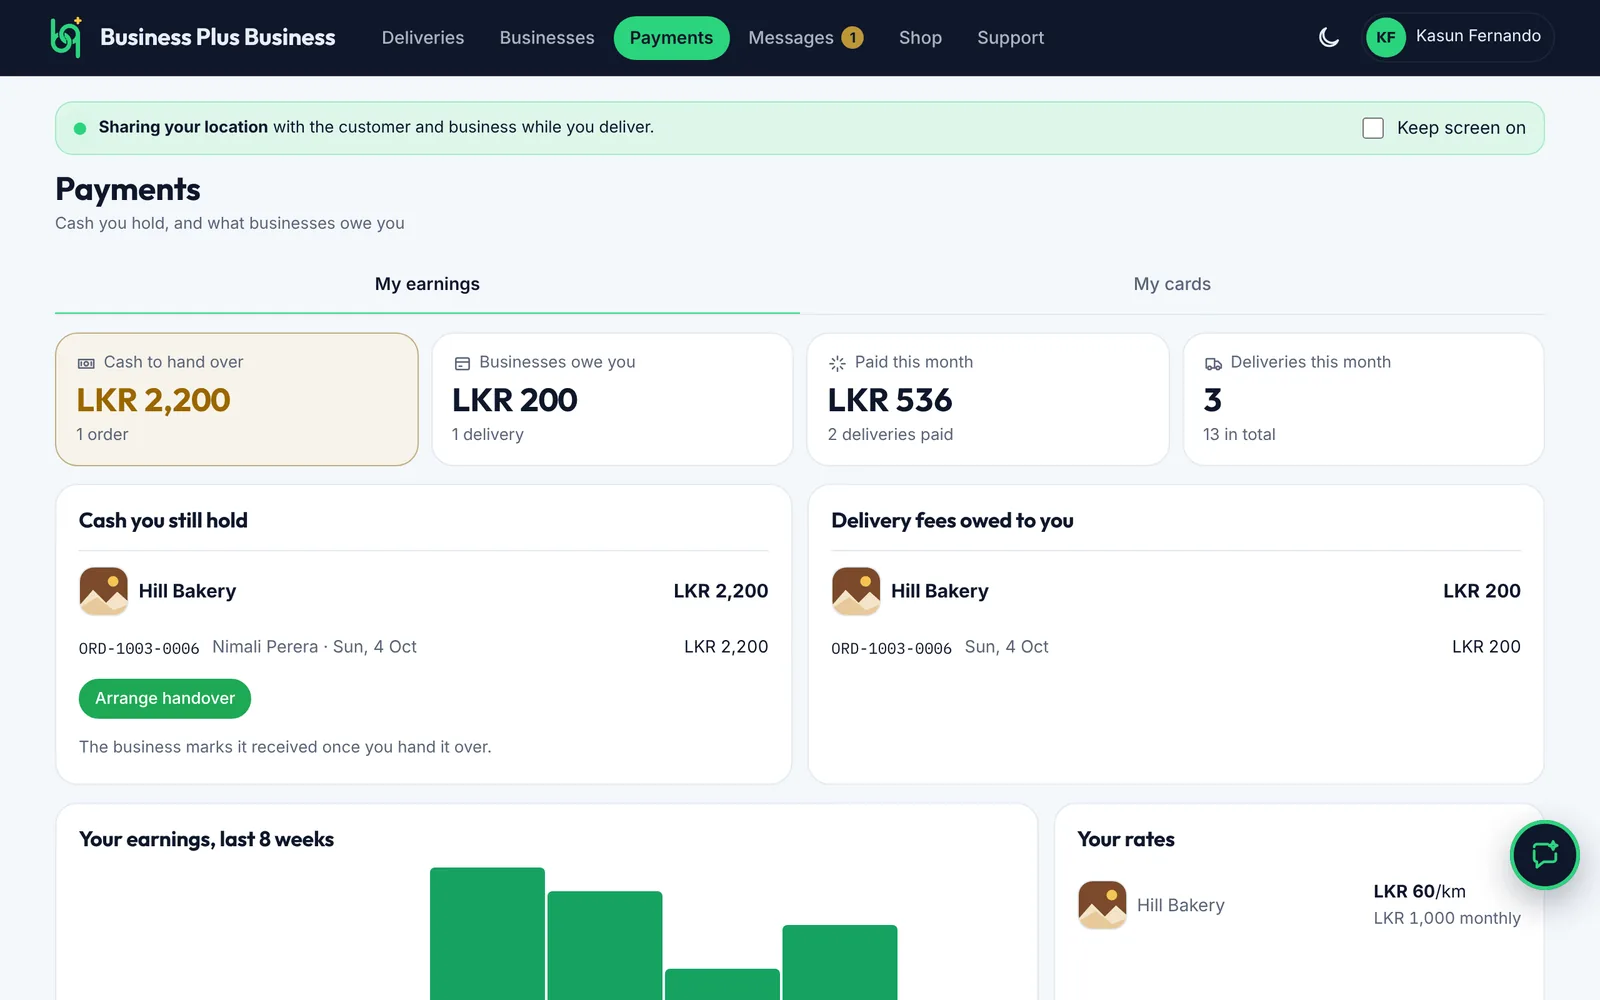
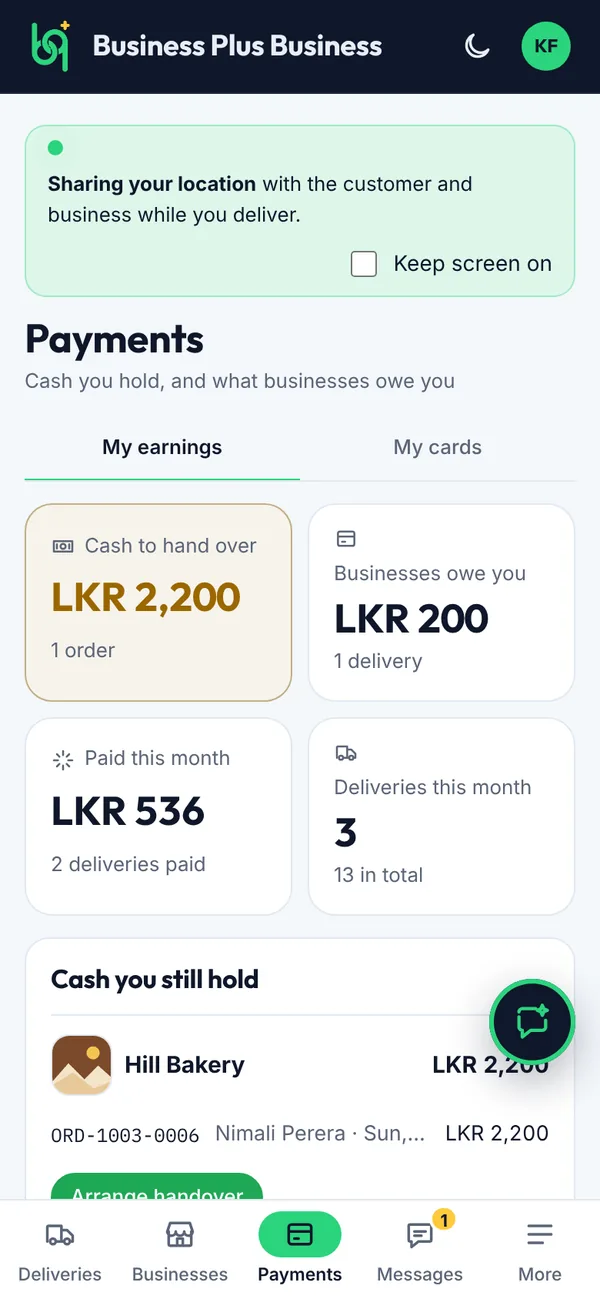
Payments shows the cash you hold, what businesses owe you and what you've earned.

Steps

  1. Tap Arrange handover to message the business about the cash you hold. They mark it received when you hand it over.
  2. Delivery fees owed to you lists what each business still has to pay you.
My earnings on a computer
My earnings on a phone
Figure 5.11My earnings
What you’ll see

You also see what you've been paid this month, your earnings for the last 8 weeks and your rate with each business.

Section 6 · For everyone

6Help and troubleshooting

How to reach us, and fixes for the most common problems.

  1. 6.1How to contact support
  2. 6.2Troubleshooting common problems

6.1How to contact support

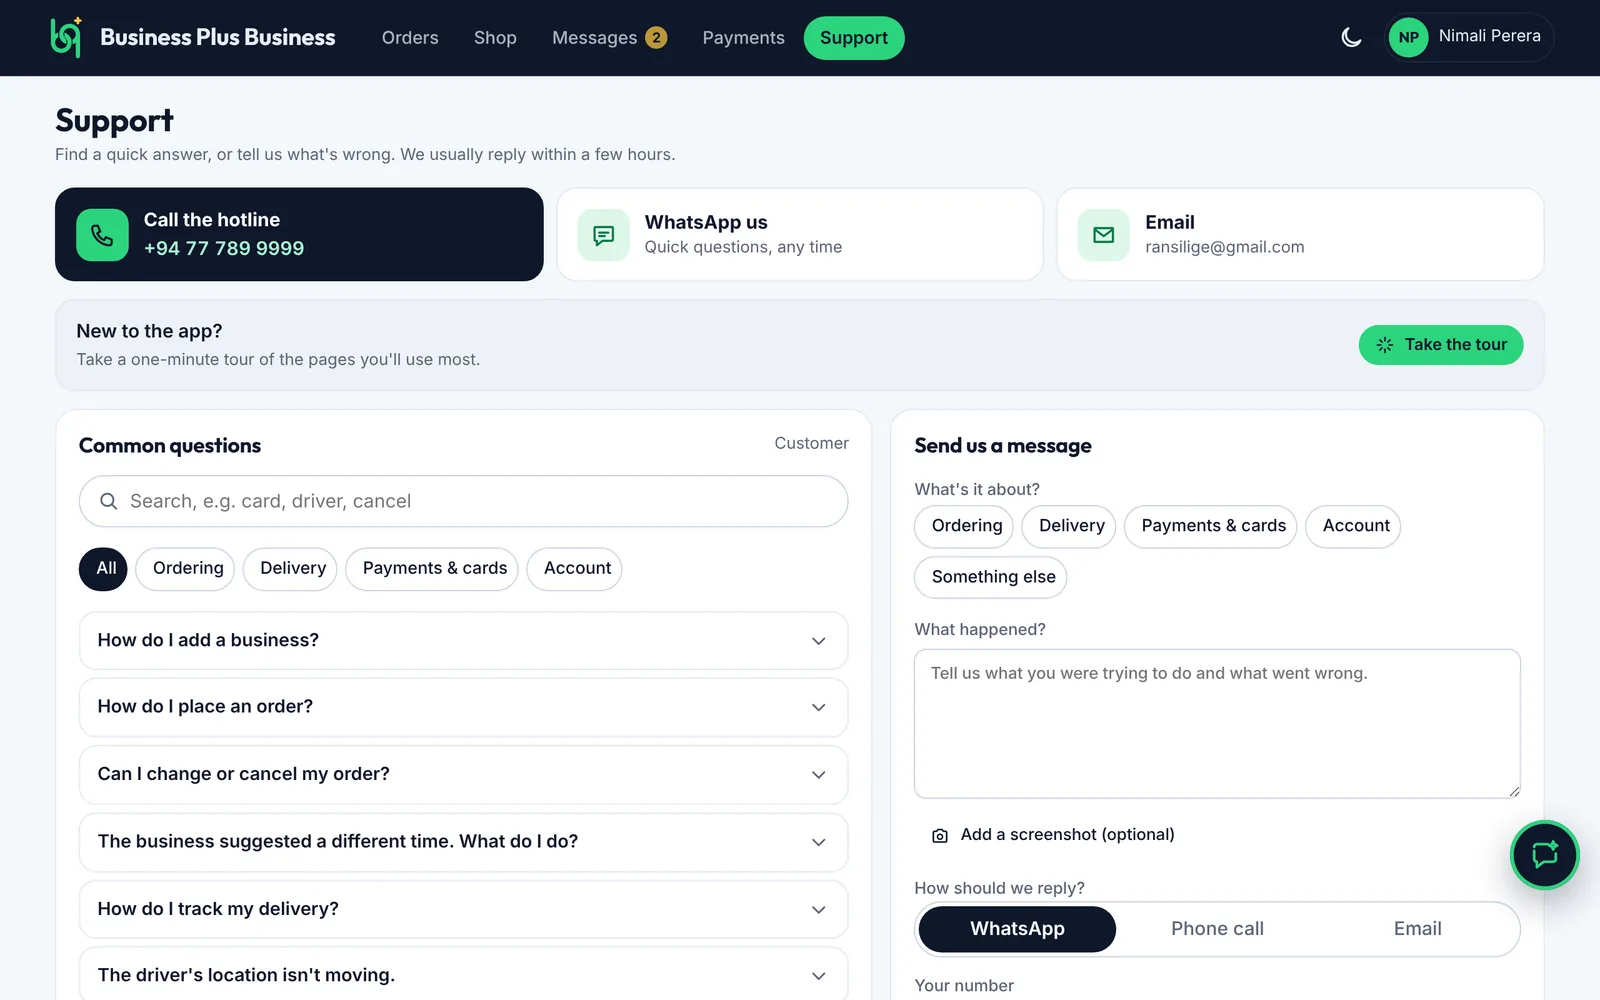
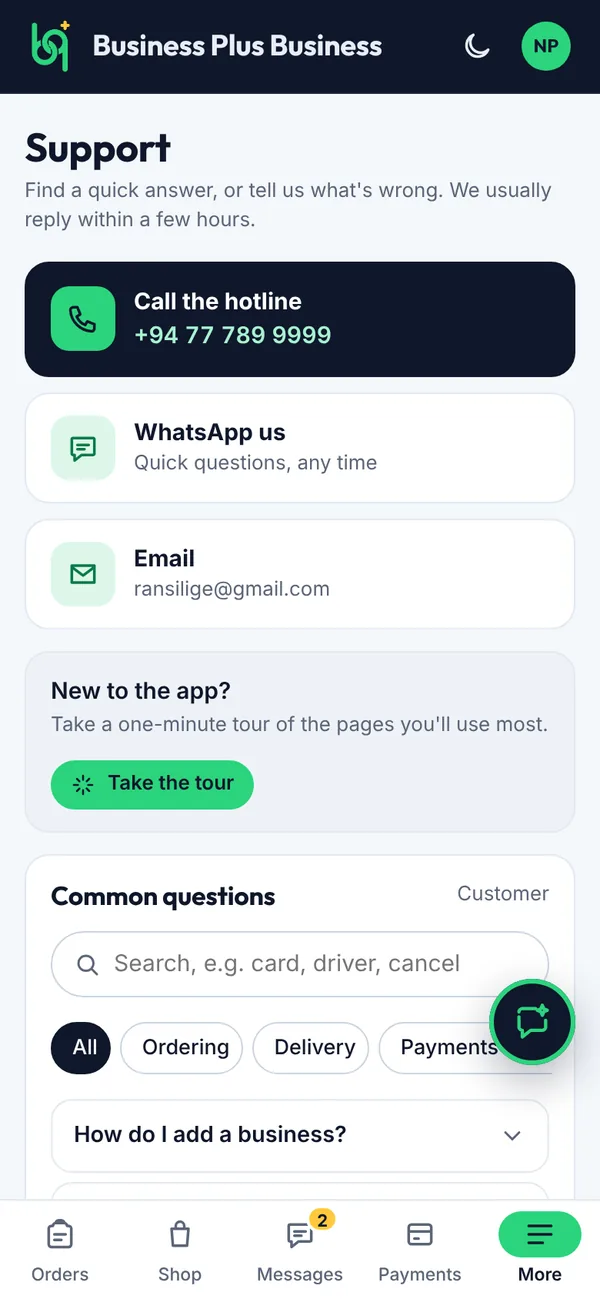
Open Support for answers written for your role, or send us a message. We usually reply within a few hours.

Steps

  1. Call the hotline, WhatsApp us or email us from the top of the page.
  2. Search the common questions. Many answers have a Take me there button.
  3. Under Send us a message, choose a topic, describe what happened, add a screenshot if it helps and choose how we should reply.
  4. Tap Take the tour to see the welcome tour again.
Support on a computer
Support on a phone
Figure 6.1Support
Hotline+94 77 789 9999
Emailransilige@gmail.com
In the appSupport

6.2Troubleshooting common problems

Quick fixes for the questions we hear most.

I didn't get the confirmation email
Check your spam folder. Wait a few minutes, then try signing in; the app tells you if your email still needs confirming.
I forgot my password
On the sign-in page, tap Forgot password? and follow the link we email you. See 2.2.
I can't pay by card
Card payments only work with businesses that show Cards accepted, for prices in LKR or USD. Otherwise, choose cash. See 3.4.
The map doesn't show my delivery person
The location updates while the delivery person has the app open. Wait a moment, or message them from the order. See 3.7.
The app says my location is blocked (delivery people)
Allow location for this site in your browser settings, then reopen the app. Tick Keep screen on while you drive.
The QR code won't scan
Make sure the camera can see the whole code in good light. You can also search for the business by name in Shop.
My account was deleted
If you sign in within 30 days of it being deleted, tap Rejoin and keep my history to get everything back. After 30 days, create a new account.
I can't delete my business
Finish or cancel its open orders and settle its payments first. The delete window tells you what's left. See 4.17.
A product says “Not available today”
The business has paused it for the day. It comes back the next morning, or when the business switches it back on.
I can't leave a business (delivery people)
Finish or hand back your open deliveries for that business first. See 5.4.